Difference between revisions of "OpenVPN SiteToSite"
Unnilennium (talk | contribs) (→Bugs) |
Unnilennium (talk | contribs) |
||
| (3 intermediate revisions by the same user not shown) | |||
| Line 3: | Line 3: | ||
===Maintainer=== | ===Maintainer=== | ||
| − | [[User:VIP-ire|Daniel B.]] | + | Current Maintainer: [[User:Unnilennium|J-P Pialasse]]</br> |
| − | [http://www.firewall-services.com Firewall Services] | + | Original Contributor: [[User:VIP-ire|Daniel B.]] ; [http://www.firewall-services.com Firewall Services] ; mailto:daniel@firewall-services.com |
| − | mailto:daniel@firewall-services.com | ||
| − | === Version === | + | ===Version=== |
{{#smeversion: smeserver-openvpn-s2s }} | {{#smeversion: smeserver-openvpn-s2s }} | ||
| − | === Description === | + | ===Description=== |
smeserver-openvpn-s2s lets you inter-connect several SME servers, and their local networks with secure VPN. It uses OpenVPN as backend, using either the simple shared secret method, or the stronger, but more complex TLS mechanism. It's well integrated in SME, providing a panel to configure most settings. | smeserver-openvpn-s2s lets you inter-connect several SME servers, and their local networks with secure VPN. It uses OpenVPN as backend, using either the simple shared secret method, or the stronger, but more complex TLS mechanism. It's well integrated in SME, providing a panel to configure most settings. | ||
| − | === Installation === | + | ===Installation=== |
install the rpms sme8.x and sme9.x | install the rpms sme8.x and sme9.x | ||
| − | + | <tabs container><tab name="For SME 10"> | |
| + | |||
| + | yum --enablerepo=smecontribs install smeserver-openvpn-s2s | ||
| + | |||
| + | </tab> | ||
| + | <tab name="For SME 9"> | ||
yum --enablerepo=smecontribs install smeserver-openvpn-s2s | yum --enablerepo=smecontribs install smeserver-openvpn-s2s | ||
expand-template /etc/rc.d/init.d/masq | expand-template /etc/rc.d/init.d/masq | ||
/etc/init.d/masq restart | /etc/init.d/masq restart | ||
| − | + | </tab> | |
| − | + | <tab name="For SME 8"> | |
| − | |||
| − | |||
yum --enablerepo=smecontribs install smeserver-openvpn-s2s | yum --enablerepo=smecontribs install smeserver-openvpn-s2s | ||
expand-template /etc/rc.d/init.d/masq | expand-template /etc/rc.d/init.d/masq | ||
/etc/init.d/masq restart | /etc/init.d/masq restart | ||
| − | + | </tab> | |
| − | + | </tabs> | |
| − | + | ===Configuration=== | |
| − | === Configuration === | ||
This contrib lets you create as many servers and clients daemon as you want. A server can only be used by one client (it's not a one server for multiple clients solution), so if you want to connect several SME to one central server, you'll need to create several server daemon, binding on different ports. | This contrib lets you create as many servers and clients daemon as you want. A server can only be used by one client (it's not a one server for multiple clients solution), so if you want to connect several SME to one central server, you'll need to create several server daemon, binding on different ports. | ||
| Line 39: | Line 40: | ||
Lets take a simple example. We manage two SME servers | Lets take a simple example. We manage two SME servers | ||
| − | |||
| − | |||
| − | |||
| − | * SME2 | + | *SME1 |
| − | ** Local network: 192.168.11.0/24 (192.168.11.1 being the address of the internal interface of SME2) | + | **Local network: 192.168.9.0/24 (192.168.9.1 being the address of the internal interface of SME1) |
| − | ** Public DNS domain name: sme2.domain.tld (resolves to the public IP of SME2) | + | **Public DNS domain name: sme1.domain.tld (resolves to the public IP of SME1) |
| + | |||
| + | *SME2 | ||
| + | **Local network: 192.168.11.0/24 (192.168.11.1 being the address of the internal interface of SME2) | ||
| + | **Public DNS domain name: sme2.domain.tld (resolves to the public IP of SME2) | ||
[[File:Ovpn_s2s_rzo_avant_vpn.png|768px|thumb|center|Before the VPN inter-connection]] | [[File:Ovpn_s2s_rzo_avant_vpn.png|768px|thumb|center|Before the VPN inter-connection]] | ||
| Line 77: | Line 79: | ||
Here are the explanation of some settings: | Here are the explanation of some settings: | ||
| − | * '''Daemon ID''': just a unique identifier for this connection. | + | |
| − | * '''Description''': a human readable description (eg link between SME1 and SME2) | + | *'''Daemon ID''': just a unique identifier for this connection. |
| − | * '''Status''': you can disable a VPN connection if you want, but most of the time you'll want it enabled | + | *'''Description''': a human readable description (eg link between SME1 and SME2) |
| − | * '''Authentication mechanism''': How both ends will authenticate. The easier solution is the Shared Key. You can also use TLS if you want, but it's usually for power users (you need to manage a PKI, you can use [[PHPki]] for this if you want) | + | *'''Status''': you can disable a VPN connection if you want, but most of the time you'll want it enabled |
| − | * '''Remote Host''' (available on client only): IP or FQDN of the remote peer | + | *'''Authentication mechanism''': How both ends will authenticate. The easier solution is the Shared Key. You can also use TLS if you want, but it's usually for power users (you need to manage a PKI, you can use [[PHPki]] for this if you want) |
| − | * '''Remote Port''' (available on client only): port used by the remote server | + | *'''HMAC''': THis is part of the security of the data channel with the Cipher. Default is the insecure SHA1, we suggest you use SHA256 as a minimum. This setting should match on both the server and the client. You can get a list of available HMAC using this command: |
| − | * '''Local Port''' (available on server only): port on which the OpenVPN server will bind, waiting for connection of the client. Remote Port on the client and Local Port on the server should be the same | + | |
| − | * '''Local Virtual IP''': the IP used internally by OpenVPN. You should choose a IP outside of any local networks | + | openvpn --show-digests | egrep 'digest size' | awk {'print $1'} |
| − | * '''Remote Virtual IP''': the IP used internally by OpenVPN on the other side. Those two virtual IP should be reversed between the client and the server | + | |
| + | *'''Cipher''': The cipher used. The default is to use the insecure BlowFish algorithm, we suggest you use AES-128-CBC as a minimum. This setting should match on both the server and the client. You can get a list of available ciphers using this command: | ||
| + | |||
| + | openvpn --show-ciphers | egrep '^[A-Z]{2}' | awk {'print $1'} | ||
| + | |||
| + | *'''Remote Host''' (available on client only): IP or FQDN of the remote peer | ||
| + | *'''Remote Port''' (available on client only): port used by the remote server | ||
| + | *'''Local Port''' (available on server only): port on which the OpenVPN server will bind, waiting for connection of the client. Remote Port on the client and Local Port on the server should be the same | ||
| + | *'''Local Virtual IP''': the IP used internally by OpenVPN. You should choose a IP outside of any local networks | ||
| + | *'''Remote Virtual IP''': the IP used internally by OpenVPN on the other side. Those two virtual IP should be reversed between the client and the server | ||
{{Note box|You don't really need to remember the virtual IP, as once the connection is established, you'll use the internal IP to access the remote server through the VPN. You just need to choose two IP address which won't clash with any other local networks, then, just forget about it}} | {{Note box|You don't really need to remember the virtual IP, as once the connection is established, you'll use the internal IP to access the remote server through the VPN. You just need to choose two IP address which won't clash with any other local networks, then, just forget about it}} | ||
| − | * '''Remote Networks''': Enter in this field the networks reachable through the other end point. For example, on SME1, you'll enter the local networks of SME2: 192.168.11.0/255.255.255.0, on SME2, you'll enter the local network of SME1: 192.168.9.0/255.255.255.0 | + | |
| + | * '''SnatOutbound''': can be enabled or disabled (default is enabled). When enabled, connections initiated by the server itself will be SNATed so they will appear to come from the internal IP. If disabled, connections from the server itself will have the virtual IP as source. (This is only available since 0.1-19). | ||
| + | |||
| + | *'''Remote Networks''': Enter in this field the networks reachable through the other end point. For example, on SME1, you'll enter the local networks of SME2: 192.168.11.0/255.255.255.0, on SME2, you'll enter the local network of SME1: 192.168.9.0/255.255.255.0 | ||
{{Note box|If your server is in serveronly mode, you'll have to add the same routes in the device which acts as the default gatway of your local network, using the IP of your SME Server as the gateway}} | {{Note box|If your server is in serveronly mode, you'll have to add the same routes in the device which acts as the default gatway of your local network, using the IP of your SME Server as the gateway}} | ||
| Line 96: | Line 110: | ||
We are now able to ping hosts on the other side using their private IP. | We are now able to ping hosts on the other side using their private IP. | ||
| − | === Additional options === | + | ===Additional options=== |
Some advanced settings are not available on the panel, but only with db commands: | Some advanced settings are not available on the panel, but only with db commands: | ||
| − | * '''LogLevel''': if you want to increase the verbosity of a daemon (either client or server), you set the LogLevel property. Valid LogLevel values are numbers between 0 (no output except fatal errors) to 11 (really verbose) | + | |
| − | * '''Protocol''': can be tcp or udp. The default is to use udp. You shouldn't change this setting unless you have good reason to do so. This setting should match on both the server and the client. | + | *'''LogLevel''': if you want to increase the verbosity of a daemon (either client or server), you set the LogLevel property. Valid LogLevel values are numbers between 0 (no output except fatal errors) to 11 (really verbose) |
| − | + | *'''Protocol''': can be tcp or udp. The default is to use udp. You shouldn't change this setting unless you have good reason to do so. This setting should match on both the server and the client. | |
| − | + | *'''Compression''': can be enabled or disabled. Toggle the internal compression used by OpenVPN. The default is enabled. This setting should match on both the server and the client | |
| − | * '''Compression''': can be enabled or disabled. Toggle the internal compression used by OpenVPN. The default is enabled. This setting should match on both the server and the client | + | *'''AllowInbound''': can be yes or no (default to yes). If set to no, inbound connections from this VPN will be dropped. This is usefull if you wan't a one-way VPN only (eg 192.168.9.0/24 can reach 192.168.11.0/24, but not the other way). Obviously, this setting only makes sens if you enable it on either the server or the client, but not both. |
| − | * '''AllowInbound''': can be yes or no (default to yes). If set to no, inbound connections from this VPN will be dropped. This is usefull if you wan't a one-way VPN only (eg 192.168.9.0/24 can reach 192.168.11.0/24, but not the other way). Obviously, this setting only makes sens if you enable it on either the server or the client, but not both | ||
| − | |||
If you use TLS as authentication mechanism, you can set some other properties: | If you use TLS as authentication mechanism, you can set some other properties: | ||
| − | * '''RemoteCommonName''': The connection will be accepted only if the remote endpoint has a valid certificate, with this common name | + | *'''RemoteCommonName''': The connection will be accepted only if the remote endpoint has a valid certificate, with this common name |
| − | * '''CheckCertificateUsage''': can be enabled or disabled (default is disabled). If enabled, a server daemon will only accept the connection if the remote endpoint present a client certificate, and a client daemon will only accept the connection if the remote endpoint present a server certificate. | + | *'''CheckCertificateUsage''': can be enabled or disabled (default is disabled). If enabled, a server daemon will only accept the connection if the remote endpoint present a client certificate, and a client daemon will only accept the connection if the remote endpoint present a server certificate. |
| + | *'''tlsVmin''': This is the minimum TLS version accepted, unless you need to communicate with a very old server, you should not be using lower than 1.2 as it is insecure. Default is 1.2. | ||
| + | *'''tlsCipherSuites13''': This is the list of accepted ciphers for TLS v1.3 in order of presentation. Default is TLS_CHACHA20_POLY1305_SHA256:TLS_AES_128_GCM_SHA256 | ||
| + | *'''tlsCipher12''': This is the list of accepted ciphers for TLS v1.2 in order of presentation. Default is TLS-ECDHE-ECDSA-WITH-CHACHA20-POLY1305-SHA256:TLS-ECDHE-RSA-WITH-CHACHA20-POLY1305-SHA256:TLS-ECDHE-ECDSA-WITH-AES-128-GCM-SHA256:TLS-ECDHE-RSA-WITH-AES-128-GCM-SHA256 | ||
example: | example: | ||
| Line 123: | Line 138: | ||
signal-event openvpn-s2s-update | signal-event openvpn-s2s-update | ||
| − | === Troubleshoot === | + | ===Troubleshoot=== |
If you have problems, you can check the logs of the OpenVPN processes in /var/log/openvpn-s2s/<Daemon ID>.log | If you have problems, you can check the logs of the OpenVPN processes in /var/log/openvpn-s2s/<Daemon ID>.log | ||
| − | === Backup and Restore === | + | ===Backup and Restore=== |
You should backup the directories /etc/openvpn/s2s/priv and /etc/openvpn/s2s/pub because keys and certificates used by this contrib are stored there. | You should backup the directories /etc/openvpn/s2s/priv and /etc/openvpn/s2s/pub because keys and certificates used by this contrib are stored there. | ||
| − | === Uninstall === | + | ===Uninstall=== |
If you want to remove the contrib, just run: | If you want to remove the contrib, just run: | ||
yum remove smeserver-openvpn-s2s | yum remove smeserver-openvpn-s2s | ||
| Line 135: | Line 150: | ||
You can then remove the directory /etc/openvpn/s2s if you really want to remove everything (including the private keys and certificates) | You can then remove the directory /etc/openvpn/s2s if you really want to remove everything (including the private keys and certificates) | ||
| − | === Source === | + | ===Source=== |
The source for this contrib can be found in the smeserver [http://smeserver.cvs.sourceforge.net/smeserver/smeserver-openvpn-s2s/ CVS] on sourceforge. | The source for this contrib can be found in the smeserver [http://smeserver.cvs.sourceforge.net/smeserver/smeserver-openvpn-s2s/ CVS] on sourceforge. | ||
| − | === Workarounds and known issues === | + | ===Workarounds and known issues=== |
if you migrate from SME8 to SME9 and are not able to connect after correctly migrating your certificates, this might be related to not secure enough algorithm. CentOS 6.9 release notes state that "Support for insecure cryptographic protocols and algorithms has been dropped. This affects usage of MD5, SHA0, RC4 and DH parameters shorter than 1024 bits." Of course real solution would be to migrate all your certs to better algorithm. | if you migrate from SME8 to SME9 and are not able to connect after correctly migrating your certificates, this might be related to not secure enough algorithm. CentOS 6.9 release notes state that "Support for insecure cryptographic protocols and algorithms has been dropped. This affects usage of MD5, SHA0, RC4 and DH parameters shorter than 1024 bits." Of course real solution would be to migrate all your certs to better algorithm. | ||
| Line 154: | Line 169: | ||
Only released version in smecontrib are listed here. | Only released version in smecontrib are listed here. | ||
| − | {{ #smechangelog: smeserver-openvpn-s2s}} | + | {{#smechangelog: smeserver-openvpn-s2s}} |
==Other articles in this category== | ==Other articles in this category== | ||
Latest revision as of 17:00, 30 March 2021
Maintainer
Current Maintainer: J-P Pialasse
Original Contributor: Daniel B. ; Firewall Services ; mailto:daniel@firewall-services.com
Version
Description
smeserver-openvpn-s2s lets you inter-connect several SME servers, and their local networks with secure VPN. It uses OpenVPN as backend, using either the simple shared secret method, or the stronger, but more complex TLS mechanism. It's well integrated in SME, providing a panel to configure most settings.
Installation
install the rpms sme8.x and sme9.x
yum --enablerepo=smecontribs install smeserver-openvpn-s2s
yum --enablerepo=smecontribs install smeserver-openvpn-s2s
expand-template /etc/rc.d/init.d/masq
/etc/init.d/masq restart
yum --enablerepo=smecontribs install smeserver-openvpn-s2s
expand-template /etc/rc.d/init.d/masq
/etc/init.d/masq restart
Configuration
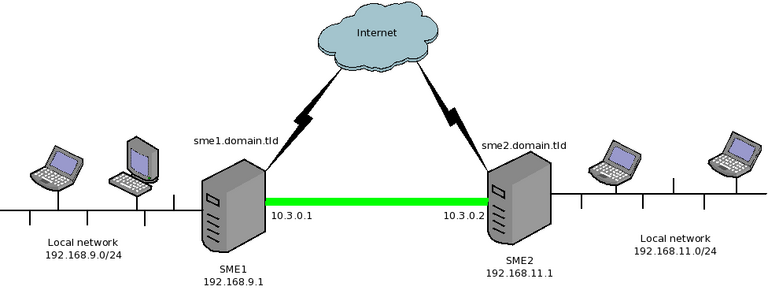
This contrib lets you create as many servers and clients daemon as you want. A server can only be used by one client (it's not a one server for multiple clients solution), so if you want to connect several SME to one central server, you'll need to create several server daemon, binding on different ports. Once connected, OpenVPN makes no difference between client and server, we just need to define which endpoint will bind on a local port waiting for a connection of the remote endpoint.
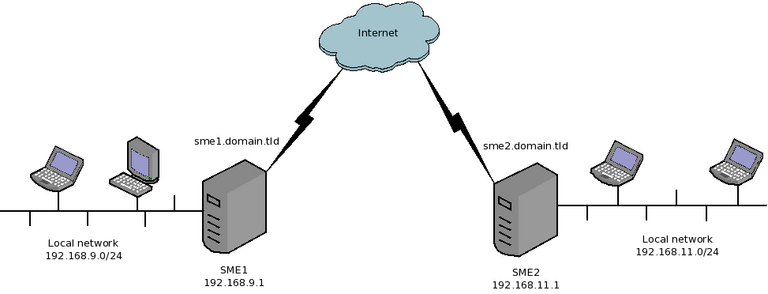
Lets take a simple example. We manage two SME servers
- SME1
- Local network: 192.168.9.0/24 (192.168.9.1 being the address of the internal interface of SME1)
- Public DNS domain name: sme1.domain.tld (resolves to the public IP of SME1)
- SME2
- Local network: 192.168.11.0/24 (192.168.11.1 being the address of the internal interface of SME2)
- Public DNS domain name: sme2.domain.tld (resolves to the public IP of SME2)
Now, we want to connect both servers, so that the two private networks can see each other.
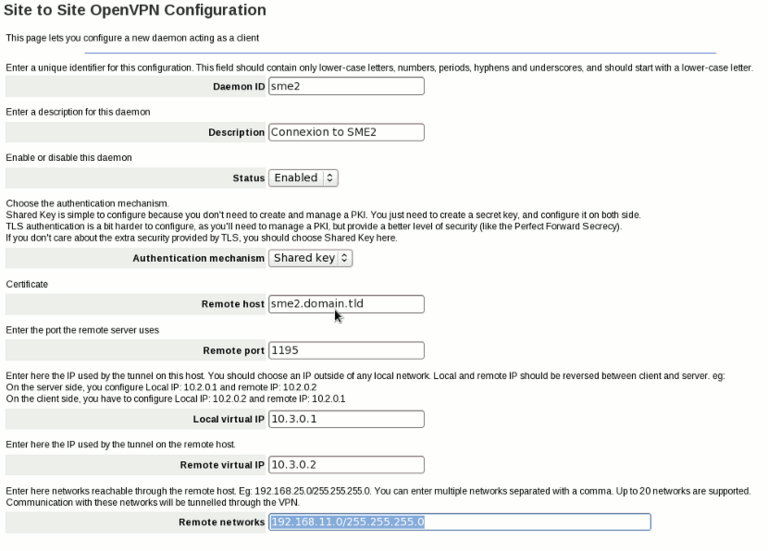
We will configure SME1 as a OpenVPN client and SME2 as an OpenVPN server. We'll use the shared secret method as it's easier to configure.
So, in SME1 server-manager, we'll have to add a new client (in OpenVPN Site to Site panel) and configure it like this:
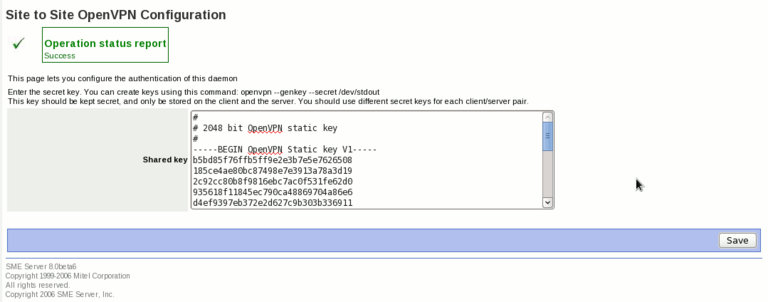
Then, click on the next button, we'll have a page to configure the shared secret key. We can generate such keys using openvpn command (on your SME Server, or on another Linux box. To create a new key, type the following command on your shell:
openvpn --genkey --secret /dev/stdout
You can also generate a key from a Windows box like this:
C:\Program Files\OpenVPN\bin\openvpn.exe --genkey --secret secret.txt
Then, open the secret.txt file.
Now, copy the key in the page of the server-manager, like this:
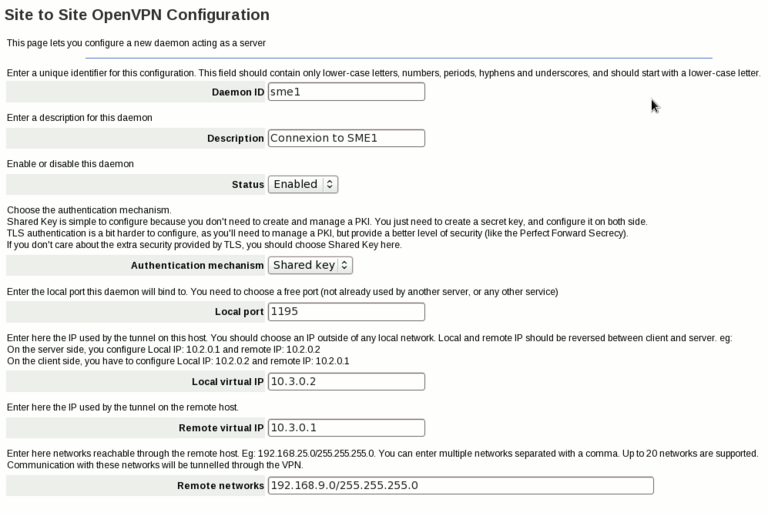
Now, on SME2, we add a new server, and configure it like this:
On the next page, we have to enter the same key we've used on SME1
Here are the explanation of some settings:
- Daemon ID: just a unique identifier for this connection.
- Description: a human readable description (eg link between SME1 and SME2)
- Status: you can disable a VPN connection if you want, but most of the time you'll want it enabled
- Authentication mechanism: How both ends will authenticate. The easier solution is the Shared Key. You can also use TLS if you want, but it's usually for power users (you need to manage a PKI, you can use PHPki for this if you want)
- HMAC: THis is part of the security of the data channel with the Cipher. Default is the insecure SHA1, we suggest you use SHA256 as a minimum. This setting should match on both the server and the client. You can get a list of available HMAC using this command:
openvpn --show-digests | egrep 'digest size' | awk {'print $1'}
- Cipher: The cipher used. The default is to use the insecure BlowFish algorithm, we suggest you use AES-128-CBC as a minimum. This setting should match on both the server and the client. You can get a list of available ciphers using this command:
openvpn --show-ciphers | egrep '^[A-Z]{2}' | awk {'print $1'}
- Remote Host (available on client only): IP or FQDN of the remote peer
- Remote Port (available on client only): port used by the remote server
- Local Port (available on server only): port on which the OpenVPN server will bind, waiting for connection of the client. Remote Port on the client and Local Port on the server should be the same
- Local Virtual IP: the IP used internally by OpenVPN. You should choose a IP outside of any local networks
- Remote Virtual IP: the IP used internally by OpenVPN on the other side. Those two virtual IP should be reversed between the client and the server
- SnatOutbound: can be enabled or disabled (default is enabled). When enabled, connections initiated by the server itself will be SNATed so they will appear to come from the internal IP. If disabled, connections from the server itself will have the virtual IP as source. (This is only available since 0.1-19).
- Remote Networks: Enter in this field the networks reachable through the other end point. For example, on SME1, you'll enter the local networks of SME2: 192.168.11.0/255.255.255.0, on SME2, you'll enter the local network of SME1: 192.168.9.0/255.255.255.0
Once both peers are configured, we'll get something like this:
We are now able to ping hosts on the other side using their private IP.
Additional options
Some advanced settings are not available on the panel, but only with db commands:
- LogLevel: if you want to increase the verbosity of a daemon (either client or server), you set the LogLevel property. Valid LogLevel values are numbers between 0 (no output except fatal errors) to 11 (really verbose)
- Protocol: can be tcp or udp. The default is to use udp. You shouldn't change this setting unless you have good reason to do so. This setting should match on both the server and the client.
- Compression: can be enabled or disabled. Toggle the internal compression used by OpenVPN. The default is enabled. This setting should match on both the server and the client
- AllowInbound: can be yes or no (default to yes). If set to no, inbound connections from this VPN will be dropped. This is usefull if you wan't a one-way VPN only (eg 192.168.9.0/24 can reach 192.168.11.0/24, but not the other way). Obviously, this setting only makes sens if you enable it on either the server or the client, but not both.
If you use TLS as authentication mechanism, you can set some other properties:
- RemoteCommonName: The connection will be accepted only if the remote endpoint has a valid certificate, with this common name
- CheckCertificateUsage: can be enabled or disabled (default is disabled). If enabled, a server daemon will only accept the connection if the remote endpoint present a client certificate, and a client daemon will only accept the connection if the remote endpoint present a server certificate.
- tlsVmin: This is the minimum TLS version accepted, unless you need to communicate with a very old server, you should not be using lower than 1.2 as it is insecure. Default is 1.2.
- tlsCipherSuites13: This is the list of accepted ciphers for TLS v1.3 in order of presentation. Default is TLS_CHACHA20_POLY1305_SHA256:TLS_AES_128_GCM_SHA256
- tlsCipher12: This is the list of accepted ciphers for TLS v1.2 in order of presentation. Default is TLS-ECDHE-ECDSA-WITH-CHACHA20-POLY1305-SHA256:TLS-ECDHE-RSA-WITH-CHACHA20-POLY1305-SHA256:TLS-ECDHE-ECDSA-WITH-AES-128-GCM-SHA256:TLS-ECDHE-RSA-WITH-AES-128-GCM-SHA256
example:
db openvpn-s2s setprop sme1 LogLevel 5 Cipher AES-256-CBC Compression disabled
signal-event openvpn-s2s-update
Templates for all the daemon (client and server) are in /etc/e-smith/templates/etc/openvpn/s2s/openvpn-s2s.conf/ You can create custom templates in /etc/e-smith/templates-custom/etc/openvpn/s2s/openvpn-s2s.conf/, the change will affect all the daemons. If you want to add special options only for one particular daemon, you can create a special file. For example, you want to add special OpenVPN options for a daemon called myvpn (daemon ID), and these options are not available with DB properties. Just create a file /etc/openvpn/s2s/myvpn.conf.custom, and add your options here. It'll be automatically loaded on templates expansion. example:
echo "no-replay" > /etc/openvpn/s2s/myvpn.conf.custom
echo "reneg-sec 900" >> /etc/openvpn/s2s/myvpn.conf.custom
signal-event openvpn-s2s-update
Troubleshoot
If you have problems, you can check the logs of the OpenVPN processes in /var/log/openvpn-s2s/<Daemon ID>.log
Backup and Restore
You should backup the directories /etc/openvpn/s2s/priv and /etc/openvpn/s2s/pub because keys and certificates used by this contrib are stored there.
Uninstall
If you want to remove the contrib, just run:
yum remove smeserver-openvpn-s2s
You can then remove the directory /etc/openvpn/s2s if you really want to remove everything (including the private keys and certificates)
Source
The source for this contrib can be found in the smeserver CVS on sourceforge.
Workarounds and known issues
if you migrate from SME8 to SME9 and are not able to connect after correctly migrating your certificates, this might be related to not secure enough algorithm. CentOS 6.9 release notes state that "Support for insecure cryptographic protocols and algorithms has been dropped. This affects usage of MD5, SHA0, RC4 and DH parameters shorter than 1024 bits." Of course real solution would be to migrate all your certs to better algorithm.
workaround :
echo -e "LegacySigningMDs md2 md5\nMinimumDHBits 512\n" >> /etc/pki/tls/legacy-settings
service openvpn-s2s restart
Bugs
Please raise bugs under the SME-Contribs section in bugzilla and select the smeserver-openvpn-s2s component or use this link
| ID | Product | Version | Status | Summary (3 tasks) ⇒ |
|---|---|---|---|---|
| 12223 | SME Contribs | 10.0 | CONFIRMED | add option for lzo in gui |
| 11504 | SME Contribs | 10.0rc | CONFIRMED | NFR: allow individual connections handling with dedicated systemd unit |
| 9718 | SME Contribs | 10.0rc | CONFIRMED | DNS resolution problem |
Changelog
Only released version in smecontrib are listed here.
Other articles in this category
Ipsec, Libreswan, Libreswan-xl2tpd, OpenVPN, OpenVPN Bridge, OpenVPN Bridge/fr, OpenVPN Routed, OpenVPN SiteToSite, SME Server wishlist, SoftEther VPN, Softethervpn-server, VPN, Wireguard, Wireguard/fr
