Difference between revisions of "SME Server:Documentation:Administration Manual:Chapter5"
| Line 45: | Line 45: | ||
====Installing the Software==== | ====Installing the Software==== | ||
| + | [[bugzilla: 6702]] | ||
| + | {{Note box|With some newer motherboards you may need to set SATA AHCI mode to AHCI instead of IDE in the Bios to enable the installation to commence and complete.}} | ||
| + | |||
When booting from the installation CD you will get a boot prompt where you can simply '''press Enter to start''' the standard installation (or upgrade) routine. | When booting from the installation CD you will get a boot prompt where you can simply '''press Enter to start''' the standard installation (or upgrade) routine. | ||
Revision as of 20:34, 23 November 2013
Installing And Configuring Your SME Server Software
The following sections explain in detail the process of installing the SME Server software.
Licensing Terms and Conditions
In installing the SME Server software, you are agreeing to the open source licensing terms and conditions associated with it. You can read these terms and conditions in|Chapter 1.2. of this guide under the title Software Licensing Terms and Conditions .
RAID1 Support (Disk Mirroring)
With SME Server, you have the ability to set up disk mirroring, also called RAID Level 1. In disk mirroring, you basically write all of your data to two separate hard disks installed in your server. One is the mirror of the other. Should the primary disk experience a hardware failure, the mirror disk will continue operations as if nothing had happened. All of your data will be protected.
Disk mirroring can be accomplished through either software or hardware .
Software Mirroring
The SME Server comes by default with RAID disk mirroring. The level of Raid depends on the number of drives installed. The server is configured to accept any number of drives and will function properly. You can verify the RAID status from the console. If you later wish to add more drives, just add them and instruct the server via the console to create the mirror. It will take some time to build so do it during scheduled maintenance. They can be either SCSI or IDE drives, but we strongly advise they are the same size and type.
There is more technical information on SME Raid at http://wiki.contribs.org/Raid
Hardware Mirroring
With hardware mirroring, you use a special RAID disk controller to perform the actual mirroring across multiple disks. As mirroring is performed in hardware, the performance can be significantly faster than software mirroring. Additionally it can simplify configuration because to the operating system the entire RAID disk system looks like one single disk. You should be able to use any supported SCSI hardware RAID controller.
If you are going to use hardware mirroring, you should NOT choose Install - Dual hard disk with software RAID-1 mirroring during the installation process described in section 5.4. Installing the Software. (Doing so will enable software mirroring.) Instead, you should do a regular installation of the software. See Booting
Upgrading From A Previous Version
If you have previously installed a server and now wish to upgrade to a later version, you can do so while preserving your configuration data. To do so, select Upgrade from the appropriate screen in the installation process as described in section 5.4. Installing the Software.
While the upgrade should proceed smoothly, we do recommend that you back up your system prior to performing this upgrade just to be safe. Also see the related Howto UpgradeDisk if you are restoring to a new server or new Drive.
Bugzilla: 6732 and Bugzilla: 7056
Installing the Software
When booting from the installation CD you will get a boot prompt where you can simply press Enter to start the standard installation (or upgrade) routine.
After showing the boot prompt for some time SME will start the installation process automatically. It will then afford you the opportunity to test the installation medium.
Afterwards you can choose which language you want to use for the following installation process.
Step 1: Insert the CD-ROM media.
Step 2: You will be given the option of testing the CD --ROM-- media before beginning installation. Choose OK to test the CD media or choose Skip to start the installation.
Step 3: Select the language you would like to use during the installation process.
Step 4: Select which model keyboard is attached to your computer.
Step 5: You are informed that all disks will be formatted and any data will be lost. You must choose Yes to proceed.
Step 6: Select which time zone you are in. The installation process will now automatically proceed to install the necessary packages.
Step 7: Finishing the installation is automatic and takes only a few minutes. At the end of the process, you will be prompted to remove the CD and then to reboot your computer.
Restoring a Backup
If you have a tar backup (usually smeserver.tgz) you are prompted if you wish to restore. Enter your media, CD, DVD, USB Disk or Tape drive
If you have a DAR backup perform your restore from the server-manager after configuration.
Configuring your SME Server
Once your system has restarted (so that it is no longer booting from the installation CD), you are ready to configure your system.
If your ISP provided you with a summary of your configuration choices and network information, we suggest that you keep it handy while completing the screens in the configuration section of the server console.
There are several types of configuration parameters that must be entered into your server:
- the system password
- the type of ethernet adapters (network interface cards, or NICs) that will be used by your server to communicate with the internal network and the Internet (or external network). Typically, the server software will detect this information automatically. (Note that if you are connecting to the Internet with a dialup connection, you only need one ethernet adapter.)
- configuration for the internal (local) network - you must provide information about your internal network so that your server can communicate with other machines on your local network.
- operation mode - you must select whether your server will operate in server and gateway mode or server-only mode.
- configuration for the external network/Internet - you must configure your server so that it can communicate with your ISP either by a dedicated connection or using a dialup connection (only for server and gateway mode).
- miscellaneous information - there are several final items to configure, such as whether to allow your users to use a proxy server, whether to provide status reporting to Contribs.org, and whether you wish to secure the server console so that it can only be accessed using the administrator's password.
As you select a given configuration parameter, you will be presented only with the screens necessary for your given configuration. Each screen will provide you with a simple, detailed explanation of the required information.
Setting Your Administrator Password
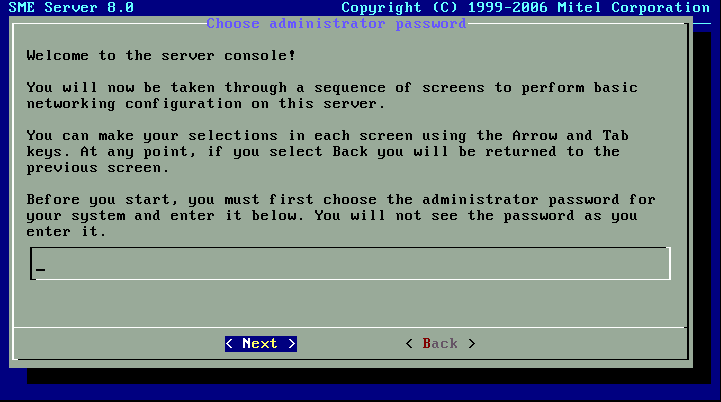
As shown in the image below, the first thing you will be asked to do is to set the system password. This is the password you will enter to access the web-based server manager. Depending on how you configure the system, you may also need to enter this password to access the server console. It is extremely important that you choose a good password and keep that password secret.
Anyone who gains access to this password has the power to make any change to your server!
After you enter the password once, you will be asked to type it again to confirm that the password was recorded correctly. The password will also be examined to determine how strong it is from a security point-of-view. If it is found to be weak (for instance, a dictionary word), you will see an additional screen asking if you really want to use this password. You will have the option to go back and change to a stronger password or to continue using the weaker password.
Configuring Your System Name and Domain Name
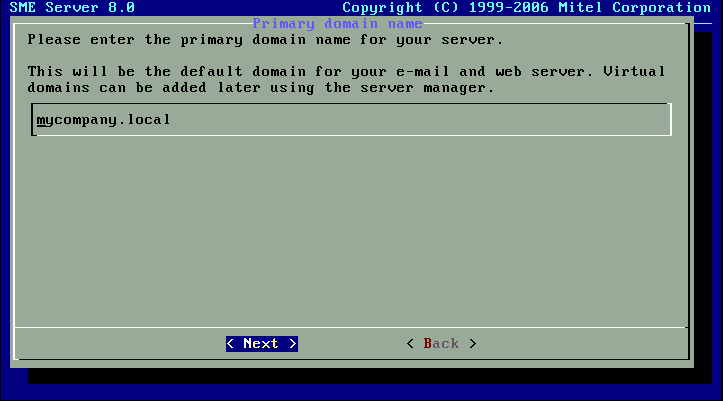
As shown below, your next step is to enter the primary domain name that will be associated with your SME Server. (You can later configure other virtual domains that work with the server.)
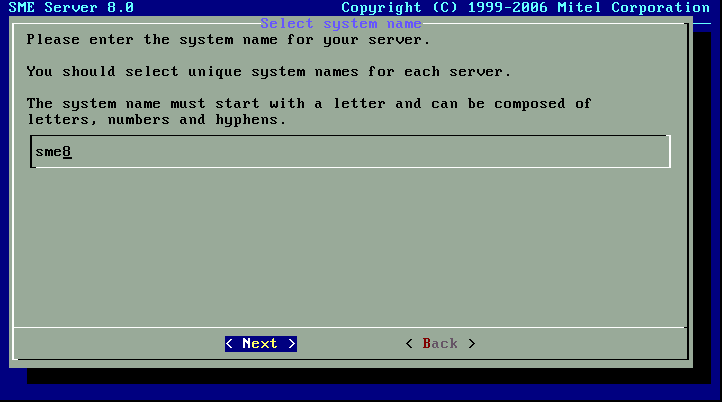
Next you need to provide a name for your server. You should think carefully about this as changing it later may create additional work. (For instance, Windows client computers may be mapping drives to your server using its name. Those clients would need to remap the drive using the new name.)
Configuring Your Local Network
Selecting Your Local Ethernet Adapter
An ethernet adapter - also called an ethernet card or network interface card (NIC) - is a special piece of hardware that serves as the interface between a computer and the ethernet network. It connects your computer and the ethernet, allowing the computer to communicate with other computers and devices on the network.
A computer needs a special software program, called an "ethernet driver", to use an ethernet adapter. Which ethernet driver is required depends on which ethernet adapter is installed on your computer.
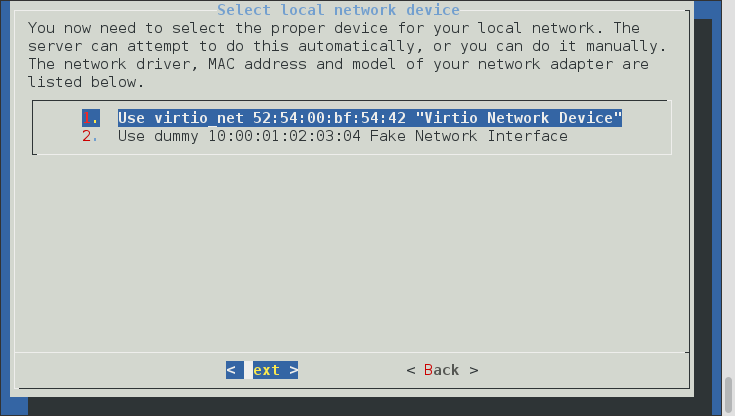
You will first need to select the appropriate driver for the ethernet adapter connected to your local network, a shown in the screen below:
If you are using a PCI ethernet adapter that appears on our supported list, it is likely that your server will be able to detect your hardware automatically and you will simply be able to choose option 1, "Use xxxx (for chipset yyyy)", where 'xxxx' and 'yyyy' are specific to your hardware. If the software fails to detect it correctly, you can manually select the appropriate driver for your ethernet adapter from a list of drivers or from a list of ethernet adapter models. After the appropriate driver is selected, select "OK" and proceed to the next screen.
Configuring Local Network Parameters
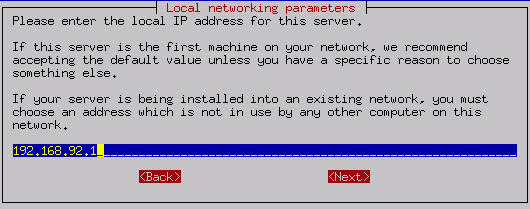
Your SME Server needs information about your local network in order to communicate with the other computers on your network. This includes the IP address and the subnet mask on your server's internal interface. Because your server acts as a gateway and firewall, these will differ from the IP address and subnet mask on the external interface.
If you plan to operate in server and gateway mode (explained in greater detail below), your server will act as a relay between your local network and the Internet. Because no computer on your local network, other than your server, directly interacts with the external world, the IP addresses assigned to those computers need only be unique with regards to your local network. (It doesn't matter if a computer on someone else's local network uses the same IP address, because the two machines will not be in direct contact.) As a result, we are able to use special "non-routable IP addresses" for your local network, including the internal interface of your server.
If you have no reason to prefer one set of IP addresses over another for your local network, your server will prompt you with default parameters that are probably appropriate in your situation.
If, however, you are operating your server in "server-only" mode and there are already servers on your network, you will need to obtain an unused IP address for your local network.
Next, you will be prompted to enter the subnet mask for your local network. If you are adding your server to an existing network, you will need to use the subnet mask used by the local network. Otherwise, unless you have a specific need for some other setting, you can accept the default setting.
Operation Mode
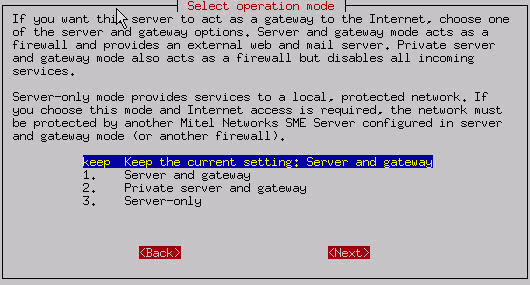
After configuring your SME Server for your local network, you will see the following screen. This is where you select your server's operation mode.
Option 1: Server and gateway mode
In server and gateway mode, your server provides services (such as e-mail, web services, file and print sharing) to your network and also acts as a gateway between your internal network and the outside world. The fact that it serves as a "gateway" means it has separate interfaces with each network, and provides security and routing.
If you configure your server to operate in server and gateway mode, your server will require either:
 1. two ethernet adapters (one to communicate with the local network and the other to communicate with the external network/Internet)
 1. one ethernet adapter (for the local network) and a modem for a dialup connection
With server and gateway mode, there are a number of extra parameters that will need to be configured. These will be discussed in the next section.
Option 2: Private server and gateway
This mode is a variation of option 1 and provides the same functionality with the following differences:
- our web server is not visible to anyone outside of the local network.
- our mail server is not accessible from outside of the local network.
- Additional firewall rules have been configured to drop packets for various services (such as 'ping' requests).
All services are available on the internal network. The differences are entirely in how your server is seen by the external world.
You would select this mode only if you wish to use the server as a gateway, but do not wish to publish any services to the external Internet.
Option 3: Server-only mode
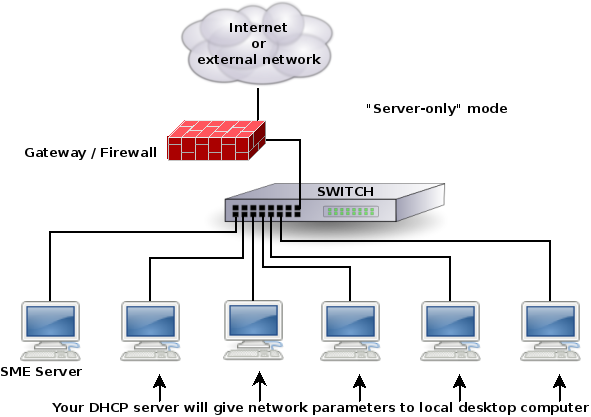
Server-only mode is appropriate if you do not wish to use the gateway capabilities of your server. In this configuration, your server connects only to the local network and does not connect directly to the outside world (although it may connect indirectly through your firewall or another server).
Your network will resemble the image below:
If you have a connection to the Internet by way of another gateway or corporate firewall, you can configure your server to provide services (including e-mail, web services, file and print-sharing) to your network. In this instance, you do not need your server to provide the gateway role because that role is fulfilled by your firewall. If you select Option 3, " Server-only mode - protected network ", your server will provide your local network with web, e-mail, file and print-sharing.
On the next configuration screen, you should enter the IP address for the Internet gateway on your local network. If you do not have an Internet connection, simply leave this configuration screen blank.
Configuring Server and Gateway Mode
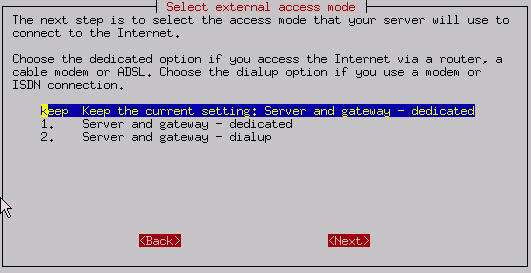
If you are configuring your server to operate in server and gateway mode, you must select one of two Internet connection types - a dedicated connection (such as ADSL or cable modem) or a dialup connection (in which case you will be connecting to your ISP via a modem).
The next step after selecting a connection type is to enter the specific parameters representing that connection.
Server and Gateway Mode - Dedicated
How you configure your server's external interface depends on whether you are using a dedicated connection or a dialup connection. Therefore, if you configured your server for "server and gateway mode - dedicated connection" you will be presented with very different configuration screens than if you configured the server for "server and gateway - dialup connection" (as discussed in the next section).
Configuring Your External Ethernet Adapter
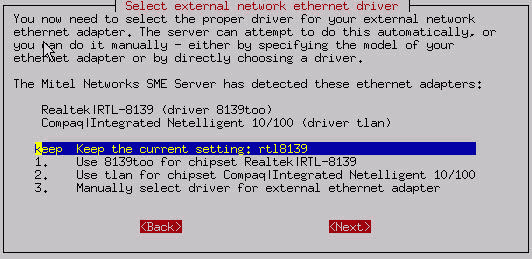
As you did previously with your local ethernet adapter, you need to configure the driver for your external ethernet adapter. As before, the software will attempt to detect the card. If it correctly identifies the card, you can proceed using Option 1, "Keep current driver". If it does not, you will need to manually select the driver.
Assigning Your Ethernet Adapters to Network Connection
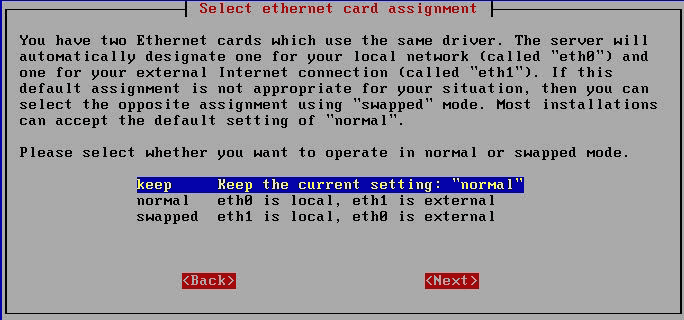
To communicate successfully, your server needs to know which ethernet adapter connects it to the internal network and which adapter connects it to the external network/Internet. Your server will make this designation automatically - the first ethernet adapter (in position "eth0") will normally be assigned to the local, internal network and the second ethernet adapter (in position "eth1") will normally be assigned to the external network/Internet. In the event that this assumption is incorrect, this screen allows you to easily swap that designation.
If you don't know which ethernet adapter is designated to eth0 and which is designated to eth1, we suggest you leave it in the default configuration while completing the rest of the screens. You will later have the opportunity to "Test Internet Access" from the server console. If your test fails at that time, return to this screen, swap the card assignment and retry the test.
Configuring Your External Interface
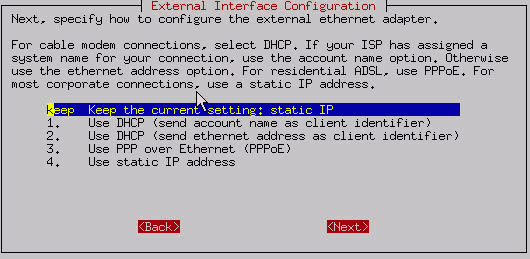
With a dedicated connection in server and gateway mode, you will be presented with the following screen:
Your server must know three additional things to communicate on the Internet:
- its own unique IP address so that Internet data packets can reach it.
- a subnet mask (also called a netmask) which looks like an IP address and allows other computers to infer your network address from your IP address.
- the IP address of the external gateway for your server. This is the IP address of the router on your server's external network. It identifies the computer that your server should contact in order to exchange information with the rest of the Internet.
Normally, you would need to know this information and enter it into the server console. However, most ISPs are capable of automatically assigning these configuration parameters to your server using a DHCP server or PPPoE .
If you have a static IP address and your ISP is configuring your server using DHCP or PPPoE, select Option 1, 2 or 3 depending upon how you will be connecting to your ISP. When you first connect to your ISP, your server will automatically be given its external interface configuration parameters.
If your ISP is providing you with a dynamic IP address, the ISP will configure this through DHCP or PPPoE and your server will be re-configured automatically whenever your IP address changes. If you plan to use a Dynamic DNS service, select Option 2. Otherwise, select Option 1.
There are some very good reasons to use a dynamic DNS service if you have a dynamically assigned IP address. It is a simple, affordable way to ensure continuity of service when your IP address changes. Please read the next section on dynamic DNS for more information about dynamic DNS.
If you are using ADSL and need PPP over Ethernet, choose Option 3. You will then be asked for the user name and password you use to connect to your ISP. Note that some ISPs require you to enter their domain name as well as your user name.
If you have a static IP address and your ISP does not offer DHCP or PPPoE, then your ISP will give you the static IP address, subnet mask (or netmask), and the gateway IP address of the device that your server should connect to in order to communicate with the Internet. Assuming you have this information on hand, you can go ahead and select Option 4. Successive screens will prompt you to enter each parameter.
Configuring Dynamic DNS
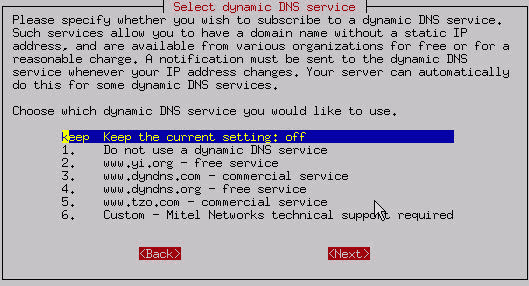
If you choose either of the DHCP options or PPPoE, you will be presented with an additional screen where you can choose which dynamic DNS service you wish to use.
The server is pre-configured to operate with four dynamic DNS organizations: yi.org, dyndns.com, dyndns.org, and tzo.com. (You can elect to use a different service, but doing so would require some customization of the server.) Once the service is selected, the subsequent two screens will prompt you to enter your account name and the password for your account. (These two parameters would be given to you by the service. Note that the dynamic DNS service may place restrictions on which domain name you can use for your company.) Please read Appendix B on dynamic DNS for more information about whether a dynamic DNS is right for you.
NB. the script for "dyndns.com - Commercial service" doesn't work, if you wish to use this service select custom and write your own script.
Configuring the Server for Server and Gateway Mode - Dialup Access
If you select dialup access, successive screens will ask you for the following information:
- information regarding the modem or ISDN connection with your ISP, such as the serial port your modem is connected to *2
- modem or ISDN initialization screen - most users can simply leave this blank, but with some particular modems or ISDN cards, additional information may need to be entered here
- the dialup access phone number
- username
- password
- connection policy
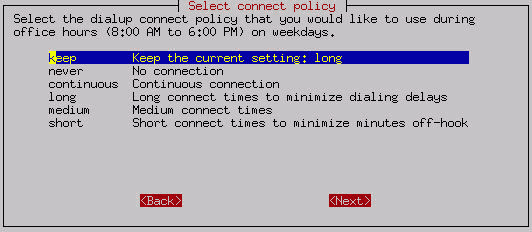
This last item may be of special interest. As shown in the screen below, you can configure what type of policy you wish to have in place during typical work hours. If you are in a small office and wish to share your phone line between your computer and phone or fax, you may wish to minimize the time you are online. This is also true if your ISP charges a fee on a per-minute basis. On the other hand, if you have a separate phone line or unlimited time with your ISP, you might want to have long connection times or a continuous connection.
After configuring this policy for "work" hours, you can then configure the policy for time outside of office hours and additionally for the weekend. Notice that you do have the choice of never, which would allow you to restrict your system from connecting on weekends or during off-hours.
The connection policy defines several choices including Short, Medium or Long. These specify how long the server should wait before disconnecting the dialup connection. If your office only shares a single phone line, the Short option minimizes the amount of connection time and frees up the phone line for later use. The down side to this is that if someone is reading a long page on the web site or steps away from their computer for a brief moment, when they want to then go to another web page, the server will probably have disconnected and will need to redial and connect. On the other hand, setting the Long connection time will result in users experiencing fewer delays while waiting for the server to reconnect. However, the phone line will used for a larger amount of time.
There are two separate timeout values configured by each choice. One value is the length of time since the last HTTP (web) packet went through the server. The other is a more general timeout for any other types of packets. The difference is there because it is assumed that people reading a web page may take longer to go on to another web page, whereas users connecting to another service (such as ssh or POP3 to an external server) probably will be more active than someone using a web browser. The timeout values are shown in the table below.
| Choice | HTTP Timeout | Other Timeout |
| Short | 3 minutes | 30 seconds |
| Medium | 10 minutes | 5 minutes |
| Long | 20 minutes | 10 minutes |
Note that there is also the option for a Continuous dial-up connection. Choosing this option is basically equivalent to creating a permanent or dedicated connection, but only doing so through the use of a dial-up connection and a modem or ISDN adapter. One example of this use might be to set a Continuous connection policy during work hours and then some variable policy during off-hours and the weekend. Assuming that your ISP is okay with this arrangement and you can afford to do so financially, these settings would give your users the fastest response time as the connection would always be online.
#2 Your modem documentation may indicate which serial port is used by the modem. You may also be able to visually identify which port your modem uses.
Dialup phone numbers with # and * characters
nano /usr/lib/perl5/site_perl/esmith/console/configure.pm
Section
DIALUP_ACCESS_NUMBER:
Change line 1398 "if ($choice =~ /^[-,0-9]+$/)"
To "if ($choice =~ /^[-,\#\*0-9]+$/)"
Which allows '#' and '*' in the Dialup phone number
save changes.
Configuring Your DHCP Server
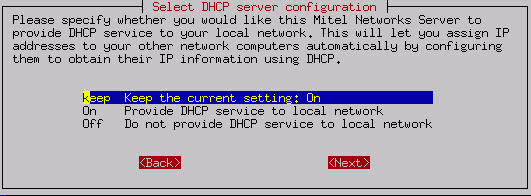
You now will be prompted regarding DHCP service. Your SME Server can be configured to provide DHCP service to your internal network. The DHCP server can automatically configure the other computers on your internal network with such parameters as non-routable IP address, subnet mask and gateway IP address. This reduces the risk of error and simplifies the process of configuring your network.
We recommend configuring your server to use DHCP to configure all of your network clients. You should not do this if there is an existing DHCP server on your network as there should typically be only one DHCP server per network.
Configuring the DHCP Address Range
Before the DHCP server is able to assign IP addresses to the computers on your network, you need to tell it what range of IP addresses it can safely distribute. As above, this section is pre-configured with defaults that are appropriate in most situations. If you have fewer than 180 machines on your local network and no reason to prefer one range of IP addresses over another, you can simply accept the defaults for these screens. Client IP Addresses are handed out at the high end of the range.


