Difference between revisions of "Email - Setting up E-mail clients for SME 8.0"
| Line 1: | Line 1: | ||
==Why This Is Needed== | ==Why This Is Needed== | ||
| − | From SME 8.0beta6 onwards, standard, unauthorised access to SMTP on Port 25 has been prevented, by design, even for users in the local network, and replaced with SSL authorised access on Port 25. At the same time the security arrangements in standard Windows Email clients, such as Outlook, have been beefed up. The result is that setting up such clients to successfully authorise against SME-Server SMTP has become a little complicated. This Howto is intended to give step-by-step instructions. | + | From SME 8.0beta6 onwards, standard, unauthorised access to SMTP on Port 25 has been prevented, by design, even for users in the local network, and replaced with SSL authorised access on Port 25. At the same time the security arrangements in standard Windows Email clients, such as Outlook, have been beefed up. The result is that setting-up such clients to successfully authorise against SME-Server SMTP has become a little complicated. This Howto is intended to give step-by-step instructions. |
The same sequence of steps should apply to most other Email Clients, although the locations of the settings may vary. | The same sequence of steps should apply to most other Email Clients, although the locations of the settings may vary. | ||
| Line 24: | Line 24: | ||
===Make sure fully qualified Server Name is used=== | ===Make sure fully qualified Server Name is used=== | ||
| + | |||
| + | This is necessary because the self-issued security certificate uses this name. Servers described by IP addresses will cause Outlook to require that the certificate be accepted again every time the program is restarted and will play havoc with automatic email use. | ||
Click ''''File'''' then ''''Account Settings'''' and then the drop-down ''''Account Settings'''' button. | Click ''''File'''' then ''''Account Settings'''' and then the drop-down ''''Account Settings'''' button. | ||
| Line 34: | Line 36: | ||
[[File:Server Name.jpg]] | [[File:Server Name.jpg]] | ||
| + | |||
| + | The Change Account dialogue is shown below with the fully qualified server name in both incoming and outgoing server settings. | ||
| + | |||
| + | [[File:Change Account.jpg]] | ||
[[Category:Howto]] | [[Category:Howto]] | ||
[[Category:E-mail Client Setup]] | [[Category:E-mail Client Setup]] | ||
Revision as of 00:11, 5 February 2011
Why This Is Needed
From SME 8.0beta6 onwards, standard, unauthorised access to SMTP on Port 25 has been prevented, by design, even for users in the local network, and replaced with SSL authorised access on Port 25. At the same time the security arrangements in standard Windows Email clients, such as Outlook, have been beefed up. The result is that setting-up such clients to successfully authorise against SME-Server SMTP has become a little complicated. This Howto is intended to give step-by-step instructions.
The same sequence of steps should apply to most other Email Clients, although the locations of the settings may vary.
Assumptions
This Howto was researched and tested on a systems where the server is used as the SMTP server for the network. Systems with a Smarthost configured should work in the same way because the fundamental principle is to allow clients to authorise to the SME Server before mail is accepted for transmission. Perhaps someone with such a system can check and confirm this assumption.
The configuration details given are from Outlook 2010; other versions of Outlook are similar.
Things to do in the Server Manager
Allow SSMTP
Login to the server manager at http://your_server_address/server-manager and click on the menu item Email. Then click the button labelled 'Change e-mail reception settings.'
Change 'SMTP authentication' to 'Allow both SMTP and SSMTP' and save the new settings.
Things to do in Outlook
Make sure fully qualified Server Name is used
This is necessary because the self-issued security certificate uses this name. Servers described by IP addresses will cause Outlook to require that the certificate be accepted again every time the program is restarted and will play havoc with automatic email use.
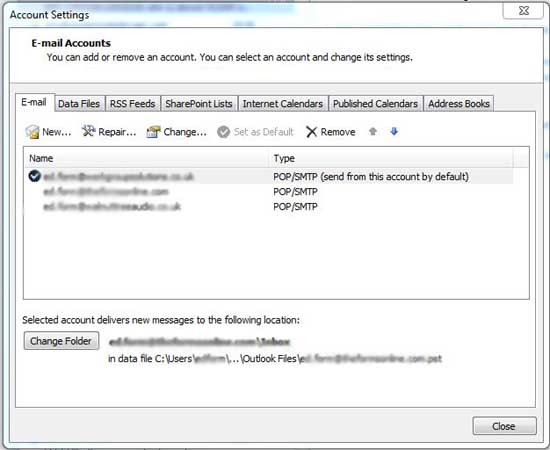
Click 'File' then 'Account Settings' and then the drop-down 'Account Settings' button.
In the 'Account Setings' dialogue, highlight an email account and click the small 'Change' button above.
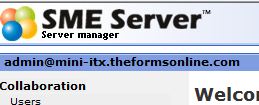
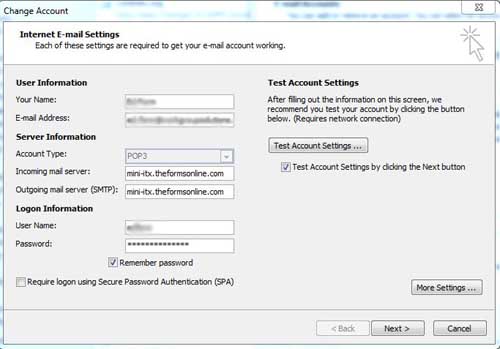
In the first page of the dialogue that results, make sure that your incoming and outgoing servers are both the fully qualified name of your server. This will take the form - 'server_machine_name.domain_name.com' [ or .co.uk, .org etc.] and will be as shown in the top left hand corner of the Server Manager screen with the username 'admin' in front. Use the part after 'admin@' - In my case this is 'mini-itx.theformsonline.com' and is shown below.
The Change Account dialogue is shown below with the fully qualified server name in both incoming and outgoing server settings.


