Difference between revisions of "VirtualBox 4.0 on SME Server v8 beta 6"
m |
m |
||
| Line 12: | Line 12: | ||
<li>Setup SME Server v8 beta 6.</li> | <li>Setup SME Server v8 beta 6.</li> | ||
<li>Do a yum update.</li> | <li>Do a yum update.</li> | ||
| − | + | <pre>yum update</pre> | |
| − | + | <li> If any updates were applied, update and reboot the server.</li> | |
| − | |||
| − | <li> If any updates were applied,</ | ||
| − | |||
<pre>signal-event post-upgrade | <pre>signal-event post-upgrade | ||
signal-event reboot</pre> | signal-event reboot</pre> | ||
| − | |||
<li>Check your current kernel.</li> | <li>Check your current kernel.</li> | ||
| − | + | <pre>uname -r</pre> | |
| − | |||
| − | |||
<li>Install kernel-devel to get the latest development tree.</li> | <li>Install kernel-devel to get the latest development tree.</li> | ||
| − | |||
Use this command only if you have a PAE kernel installed: | Use this command only if you have a PAE kernel installed: | ||
| − | + | <pre>yum install kernel-PAE-devel kernel-headers</pre> | |
| − | |||
Otherwise, | Otherwise, | ||
| − | + | <pre>yum install kernel-devel kernel-headers</pre> | |
| − | + | <li> Check if the compiler (GCC) is installed. If not installed, install it.</li> | |
| − | + | <pre>yum install gcc</pre> | |
| − | <li> | + | <li>Update SME, and reboot again</li> |
| − | Update SME again | ||
<pre>signal-event post-upgrade | <pre>signal-event post-upgrade | ||
signal-event reboot</pre> | signal-event reboot</pre> | ||
| − | |||
<li>Create a symbolic link</li> | <li>Create a symbolic link</li> | ||
| + | <pre>NOTE: Be careful if you cut-and-paste the command below. | ||
| + | In some terminal windows, from some browsers, the parts of the command in | ||
| + | bold font do not paste correctly. Pay particular attention to the | ||
| + | dashes (-) and the backticks (`). There aren't any single quote marks in | ||
| + | the command below - they are all supposed to be backticks.</pre> | ||
| − | + | ln <b>–s</b> /usr/src/kernels/<b>`uname –r`</b>-<b>`uname-m`</b> /lib/modules/<b>`uname -r`</b>/build | |
| − | |||
| − | |||
<li>Check that the symbolic link was properly created by doing a directory listing.</li> | <li>Check that the symbolic link was properly created by doing a directory listing.</li> | ||
| + | <pre>NOTE: Be careful if you cut-and-paste the command below. | ||
| + | In some terminal windows, from some browsers, the parts of the command in | ||
| + | bold font do not paste correctly. Pay particular attention to the | ||
| + | dashes (-) and the backticks (`). There aren't any single quote marks in | ||
| + | the command below - they are all supposed to be backticks.</pre> | ||
| − | + | ls /lib/modules/<b>`uname -r`</b>/build | |
<li>Install the Fedora Epel repository using the instructions [http://wiki.contribs.org/Epel here].</li> | <li>Install the Fedora Epel repository using the instructions [http://wiki.contribs.org/Epel here].</li> | ||
| − | |||
<li>Install Dynamic Kernel Module Support (DKMS)</li> | <li>Install Dynamic Kernel Module Support (DKMS)</li> | ||
<pre>yum install --enablerepo=epel dkms</pre> | <pre>yum install --enablerepo=epel dkms</pre> | ||
| − | |||
| − | |||
| − | |||
| − | |||
| − | |||
<li>Install the VirtualBox repository using the instructions [http://wiki.contribs.org/VirtualBox_Repository here].</li> | <li>Install the VirtualBox repository using the instructions [http://wiki.contribs.org/VirtualBox_Repository here].</li> | ||
| − | + | <li>Install <b>VirtualBox</b> (At the time of the last update to these instructions, the latest version was v4.1-2).</li> | |
| − | <li>Install <b>VirtualBox</b> (At the time of the last update to these instructions, the latest version was v4.1 | ||
| − | |||
| − | |||
| − | |||
| − | |||
| − | |||
<pre>yum install --enablerepo=virtualbox VirtualBox-4.1</pre> | <pre>yum install --enablerepo=virtualbox VirtualBox-4.1</pre> | ||
| − | + | <li>Review the VirtualBox installation log to ensure that the installation was successful.</li> | |
| − | <li>Setup VirtualBox as a service so it starts automatically after a reboot | + | <pre>tail /var/log/vbox-install.log</pre> |
| + | <li> Remove the compiler install (for security best practices)</li> | ||
| + | <pre> rpm -e gcc</pre> | ||
| + | <li>Update SME, and reboot again</li> | ||
| + | <pre>signal-event post-upgrade | ||
| + | signal-event reboot</pre> | ||
| + | <li>Setup VirtualBox as a service so it starts automatically after a reboot.</li> | ||
<pre>cp /etc/rc5.d/S30vboxdrv /etc/rc7.d/. | <pre>cp /etc/rc5.d/S30vboxdrv /etc/rc7.d/. | ||
cp /etc/rc5.d/S35vboxballoonctrl-service /etc/rc7.d/. | cp /etc/rc5.d/S35vboxballoonctrl-service /etc/rc7.d/. | ||
cp /etc/rc5.d/S35vboxweb-service /etc/rc7.d/.</pre> | cp /etc/rc5.d/S35vboxweb-service /etc/rc7.d/.</pre> | ||
| − | + | <li>Create a ''vbox.cfg'' file on your /etc/vbox/.</li> | |
| − | <li>Create a ''vbox.cfg'' file on your /etc/vbox/. | ||
<pre>nano /etc/vbox/vbox.cfg</pre> | <pre>nano /etc/vbox/vbox.cfg</pre> | ||
| Line 80: | Line 71: | ||
Note: Without the vbox.cfg, vbox services on your rc7.d folder will not start. | Note: Without the vbox.cfg, vbox services on your rc7.d folder will not start. | ||
| − | |||
<li>Login to the server-manager page and create an ibay for <b>phpvbox</b>. | <li>Login to the server-manager page and create an ibay for <b>phpvbox</b>. | ||
| − | For instructions on how to create and configure an ibay, please see [http://wiki.contribs.org/SME_Server:Documentation:Administration_Manual:Chapter14 the SME Server Administration manual.] | + | For instructions on how to create and configure an ibay, please see [http://wiki.contribs.org/SME_Server:Documentation:Administration_Manual:Chapter14 the SME Server Administration manual.]</li> |
| − | + | After creating the ibay, <b>do not forget to assign a password.</b> | |
| − | |||
<li>Before we install <b>[http://code.google.com/p/phpvirtualbox/ phpVirtualBox]</b>, make sure you install <b>SOAP</b> first</li> | <li>Before we install <b>[http://code.google.com/p/phpvirtualbox/ phpVirtualBox]</b>, make sure you install <b>SOAP</b> first</li> | ||
| − | |||
<pre>yum install php-soap</pre> | <pre>yum install php-soap</pre> | ||
| − | |||
<li>Install <b>phpVirtualBox</b></li> | <li>Install <b>phpVirtualBox</b></li> | ||
<pre>cd /tmp | <pre>cd /tmp | ||
wget `wget -q -O - http://phpvirtualbox.googlecode.com/files/LATEST.txt` -O phpvirtualbox-latest.zip | wget `wget -q -O - http://phpvirtualbox.googlecode.com/files/LATEST.txt` -O phpvirtualbox-latest.zip | ||
unzip phpvirtualbox-latest.zip</pre> | unzip phpvirtualbox-latest.zip</pre> | ||
| − | Note: at the time of this writing, the latest version was 4.1-2. Please adjust the following for later versions. | + | Note: at the time of this writing, the latest version was 4.1-2. Please adjust the following for later versions. |
| − | <pre> | + | <pre>cd phpvirtualbox-4.1-2 |
| − | cd phpvirtualbox-4.1-2 | ||
cp –R * /home/e-smith/files/ibays/phpvbox/html</pre> | cp –R * /home/e-smith/files/ibays/phpvbox/html</pre> | ||
| − | |||
<li>Create a <b>tmp</b> folder inside the /phpvbox/html folder.</li> | <li>Create a <b>tmp</b> folder inside the /phpvbox/html folder.</li> | ||
| − | + | <pre>cd /home/e-smith/files/ibays/phpvbox/html | |
mkdir tmp | mkdir tmp | ||
chmod 777 tmp/</pre> | chmod 777 tmp/</pre> | ||
| − | |||
<li>Create a config file using the example file provided.</li> | <li>Create a config file using the example file provided.</li> | ||
<pre>cp config.php-example config.php</pre> | <pre>cp config.php-example config.php</pre> | ||
| − | |||
<li>Open ''config.php'' (located on your /phpvbox/html/ folder). Uncomment some lines (by removing the '#' at the beginning of the line).</li> | <li>Open ''config.php'' (located on your /phpvbox/html/ folder). Uncomment some lines (by removing the '#' at the beginning of the line).</li> | ||
<pre>nano /home/e-smith/files/ibays/phpvbox/html/config.php</pre> | <pre>nano /home/e-smith/files/ibays/phpvbox/html/config.php</pre> | ||
| − | + | <pre>/* SOAP URL of vboxwebsrv (not phpVirtualBox's URL) */ | |
| − | |||
var $location = 'http://127.0.0.1:18083/';</pre> | var $location = 'http://127.0.0.1:18083/';</pre> | ||
| − | |||
<pre>// Disable authentication | <pre>// Disable authentication | ||
var $noAuth = true;</pre> | var $noAuth = true;</pre> | ||
| Line 127: | Line 108: | ||
var $enableAdvancedConfig = true;</pre> | var $enableAdvancedConfig = true;</pre> | ||
| − | <pre>// Authentication library. | + | <pre>// Authentication library. |
//var $authLib = 'Builtin';</pre> | //var $authLib = 'Builtin';</pre> | ||
| − | <pre>// Allow VDE network configuration. This must be supported by the underlying VirtualBox installation! | + | <pre>// Allow VDE network configuration. This must be supported by the underlying VirtualBox installation! |
var $enableVDE = true;</pre> | var $enableVDE = true;</pre> | ||
| − | Change the tmp location as per below. | + | Change the tmp location as per below. |
| − | <pre>// Path | + | <pre>// Path |
var $cachePath = '../tmp';</pre> | var $cachePath = '../tmp';</pre> | ||
Revision as of 21:34, 9 September 2011
Maintainer
Description
Below are instructions on how to install VirtualBox version 4 on a fresh install SME Server v8 beta 6 and higher. Plus installing and configuring phpVirtualBox to control (create, edit, remove) your virtual machine on its web interface. In addition, scripts to automatically start the vbox service and the virtual machines in case of power failure can be found at the end of this article.
Requirements
Computer with SME server version 8 beta 6 and higher installed.
Installation
- Setup SME Server v8 beta 6.
- Do a yum update.
- If any updates were applied, update and reboot the server.
- Check your current kernel.
- Install kernel-devel to get the latest development tree. Use this command only if you have a PAE kernel installed:
- Check if the compiler (GCC) is installed. If not installed, install it.
- Update SME, and reboot again
- Create a symbolic link
- Check that the symbolic link was properly created by doing a directory listing.
- Install the Fedora Epel repository using the instructions here.
- Install Dynamic Kernel Module Support (DKMS)
- Install the VirtualBox repository using the instructions here.
- Install VirtualBox (At the time of the last update to these instructions, the latest version was v4.1-2).
- Review the VirtualBox installation log to ensure that the installation was successful.
- Remove the compiler install (for security best practices)
- Update SME, and reboot again
- Setup VirtualBox as a service so it starts automatically after a reboot.
- Create a vbox.cfg file on your /etc/vbox/.
- Login to the server-manager page and create an ibay for phpvbox. For instructions on how to create and configure an ibay, please see the SME Server Administration manual. After creating the ibay, do not forget to assign a password.
- Before we install phpVirtualBox, make sure you install SOAP first
- Install phpVirtualBox
- Create a tmp folder inside the /phpvbox/html folder.
- Create a config file using the example file provided.
- Open config.php (located on your /phpvbox/html/ folder). Uncomment some lines (by removing the '#' at the beginning of the line).
- Disable authentication of vboxwebsrv (this is not recommended, but at this stage, this is the only setup that works). Login to the server’s SSH and type this command.
- Install VirtualBox extension pack to enable support for USB 2.0 devices, VirtualBox RDP and PXE boot for Intel cards. Please install the extension pack with the same version as your installed version of VirtualBox!
- Enable fopen on php.ini (line 65) located on /etc/
- Go to http://your_server’s_ip/phpvbox (e.g. http://192.168.100.1/phpvbox) to create our virtual machine.
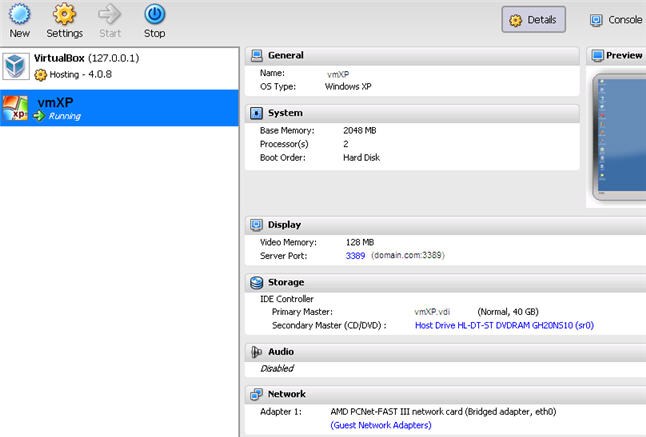
- Create a new virtual machine (e.g. vmXP)
- Enable network card (either NAT or Bridged) so you can connect to your new VM console.
- Open an RDP client (run->mstsc) then type your server’s IP address e.g. 192.168.100.1.
- Download VirtualBox Guest Addition from here http://download.virtualbox.org/virtualbox/4.0.8/VBoxGuestAdditions_4.0.8.iso and install it to your newly setup VM.
yum update
signal-event post-upgrade
signal-event reboot
uname -r
yum install kernel-PAE-devel kernel-headers
Otherwise,
yum install kernel-devel kernel-headers
yum install gcc
signal-event post-upgrade
signal-event reboot
NOTE: Be careful if you cut-and-paste the command below.
In some terminal windows, from some browsers, the parts of the command in
bold font do not paste correctly. Pay particular attention to the
dashes (-) and the backticks (`). There aren't any single quote marks in
the command below - they are all supposed to be backticks.
ln –s /usr/src/kernels/`uname –r`-`uname-m` /lib/modules/`uname -r`/build
NOTE: Be careful if you cut-and-paste the command below.
In some terminal windows, from some browsers, the parts of the command in
bold font do not paste correctly. Pay particular attention to the
dashes (-) and the backticks (`). There aren't any single quote marks in
the command below - they are all supposed to be backticks.
ls /lib/modules/`uname -r`/build
yum install --enablerepo=epel dkms
yum install --enablerepo=virtualbox VirtualBox-4.1
tail /var/log/vbox-install.log
rpm -e gcc
signal-event post-upgrade
signal-event reboot
cp /etc/rc5.d/S30vboxdrv /etc/rc7.d/.
cp /etc/rc5.d/S35vboxballoonctrl-service /etc/rc7.d/.
cp /etc/rc5.d/S35vboxweb-service /etc/rc7.d/.
nano /etc/vbox/vbox.cfg
vbox.cfg should have this content.
VBOXWEB_USER='root'
VBOXWEB_HOST=127.0.0.1
VBOXWEB_PORT=18083
Note: Without the vbox.cfg, vbox services on your rc7.d folder will not start.
yum install php-soap
cd /tmp
wget `wget -q -O - http://phpvirtualbox.googlecode.com/files/LATEST.txt` -O phpvirtualbox-latest.zip
unzip phpvirtualbox-latest.zip
Note: at the time of this writing, the latest version was 4.1-2. Please adjust the following for later versions.
cd phpvirtualbox-4.1-2
cp –R * /home/e-smith/files/ibays/phpvbox/html
cd /home/e-smith/files/ibays/phpvbox/html
mkdir tmp
chmod 777 tmp/
cp config.php-example config.php
nano /home/e-smith/files/ibays/phpvbox/html/config.php
/* SOAP URL of vboxwebsrv (not phpVirtualBox's URL) */
var $location = 'http://127.0.0.1:18083/';
// Disable authentication
var $noAuth = true;
Adjust the consoleHost ip address to an unused static ip address on your internal network
// Host / ip to use for console connections
//var $consoleHost = '192.168.100.1';
/* Enable advanced configuration items (normally hidden in the VirtualBox GUI)
 * Note that some of these items may not be translated to languages other than $
 */
var $enableAdvancedConfig = true;
// Authentication library.
//var $authLib = 'Builtin';
// Allow VDE network configuration. This must be supported by the underlying VirtualBox installation!
var $enableVDE = true;
Change the tmp location as per below.
// Path
var $cachePath = '../tmp';
vboxmanage setproperty websrvauthlibrary null
wget http://download.virtualbox.org/virtualbox/4.1.2/Oracle_VM_VirtualBox_Extension_Pack-4.1.2-73507.vbox-extpack -O latest.vbox-extpack
vboxmanage extpack install latest.vbox-extpack
allow_url_fopen = On

Automatically Start Virtual Machine
- Edit your vbox file on /etc/sysconfig/
- Edit your vbox file located on /etc/init.d/
nano /etc/sysconfig/vbox
vbox code should look like this:
# Virtual box machines to autostart
# Example to start 2 machines
#       VBOX_AUTOSTART = "MachineName1 MachineName2"

VBOX_AUTOSTART="vmXP"
#!/bin/sh
#
# chkconfig: - 91 35
# description: Starts and stops vbox autostart VMs.

### BEGIN INIT INFO
# Provides: vbox
# Required-Start: $network $named $vboxdrv
# Required-Stop: $network $named
# Default-Start:
# Default-Stop: 0 1 2 3 4 5 6
# Short-Description: Autostart some Virtual Box VMs
# Description: Autostart some Virtual Box VMs that are mentioned in /etc/sysconfig/vbox file
# Written by Alex Amiryan
### END INIT INFO

. /etc/rc.d/init.d/functions

MANAGE_CMD=vboxmanage

[ -r /etc/sysconfig/vbox ] && . /etc/sysconfig/vbox

prog=$"Virtual Box Machines"

start()
{
        echo -n $"Starting $prog: "
        RETVAL=0

        for vbox_name in ${VBOX_AUTOSTART}
        do
            SERVS=1
            echo -n "${vbox_name} "
            daemon $MANAGE_CMD startvm "${vbox_name}" -type headless >/dev/null 2>&1
            RETVAL=$?
            [ "$RETVAL" -eq 0 ] || break
        done
        if [ -z "$SERVS" ]; then
            echo -n "no virtual machines configured "
            failure
            RETVAL=6
        else
            if [ "$RETVAL" -eq 0 ]; then
                success $"vbox startup"
                touch /var/lock/subsys/vbox
            else
                failure $"vbox start"
            fi
        fi
        echo
        return "$RETVAL"
}

stop()
{
        echo -n $"Shutting down $prog: "
        for vbox_name in ${VBOX_AUTOSTART}
        do
            echo -n "${vbox_name} "
            runuser root -c "$MANAGE_CMD -q controlvm "${vbox_name}" savestate" >/dev/null 2>&1
        done
        RETVAL=$?
        [ "$RETVAL" -eq 0 ] && success $"vbox shutdown" || \
            failure $"vbox shutdown"
        echo<
        [ "$RETVAL" -eq 0 ] && rm -f /var/lock/subsys/vbox
        return "$RETVAL"
}

status()
{
        for vbox_name in ${VBOX_AUTOSTART}
        do
            echo -n "${vbox_name} "
            $MANAGE_CMD showvminfo "${vbox_name}"|grep "^State:\s*.*$"
        done
}

case "$1" in
  start)
        start
        ;;
  stop)
        stop
        ;;
  restart|force-reload)
        stop
        start
        ;;
  status)
        status
        ;;
  *)
        echo "Usage: $SCRIPTNAME {start|stop|restart|force-reload|status}" >&2
        exit 3
        ;;
esac