Difference between revisions of "Gitea install"
| Line 30: | Line 30: | ||
<syntaxhighlight lang="bash"> | <syntaxhighlight lang="bash"> | ||
wget https://raw.githubusercontent.com/go-gitea/gitea/main/contrib/systemd/gitea.service -O /usr/lib/systemd/system/gitea.service | wget https://raw.githubusercontent.com/go-gitea/gitea/main/contrib/systemd/gitea.service -O /usr/lib/systemd/system/gitea.service | ||
| − | |||
</syntaxhighlight> | </syntaxhighlight> | ||
The following is ONLY needed on an smeserver build | The following is ONLY needed on an smeserver build | ||
Revision as of 04:30, 12 November 2023
Installation
Gitea is an open-source forge software package for hosting software development version control using Git as well as other collaborative features like bug tracking, wikis, and code review.
This is how I installed the latest version of Gitea (https://gitea.io) on my smeserver build box (this is running smeserver v10.1 in serveronly)
This will work for a Centos 7 build as well.
First we need to install git (latest stable version at the time)
export GITVER=2.39.1-1
wget http://opensource.wandisco.com/centos/7/git/x86_64/git-${GITVER}.WANdisco.x86_64.rpm
wget http://opensource.wandisco.com/centos/7/git/x86_64/perl-Git-${GITVER}.WANdisco.noarch.rpm
yum localinstall git-${GITVER}.WANdisco.x86_64.rpm perl-Git-${GITVER}.WANdisco.noarch.rpm
export GITEAVER=1.18.5
wget https://github.com/go-gitea/gitea/releases/download/v${GITEAVER}/gitea-${GITEAVER}-linux-amd64 -O /usr/local/bin/gitea
chmod +x /usr/local/bin/gitea
useradd git
mkdir -p /etc/gitea /var/lib/gitea/{custom,data,indexers,public,log}
chown git:git /var/lib/gitea/{data,indexers,log}
chmod 750 /var/lib/gitea/{data,indexers,log}
chown root:git /etc/gitea
chmod 770 /etc/gitea
Now we want to set it up as a service and ensure that it will be restarted on reboot.
wget https://raw.githubusercontent.com/go-gitea/gitea/main/contrib/systemd/gitea.service -O /usr/lib/systemd/system/gitea.service
The following is ONLY needed on an smeserver build
mkdir /usr/lib/systemd/system/gitea.service.d
cat <<EOT > /usr/lib/systemd/system/gitea.service.d/50koozali.conf
[Install]
WantedBy=sme-server.target
EOT
config set gitea service status enabled
Now we setup gitea on your server
systemctl enable --now gitea
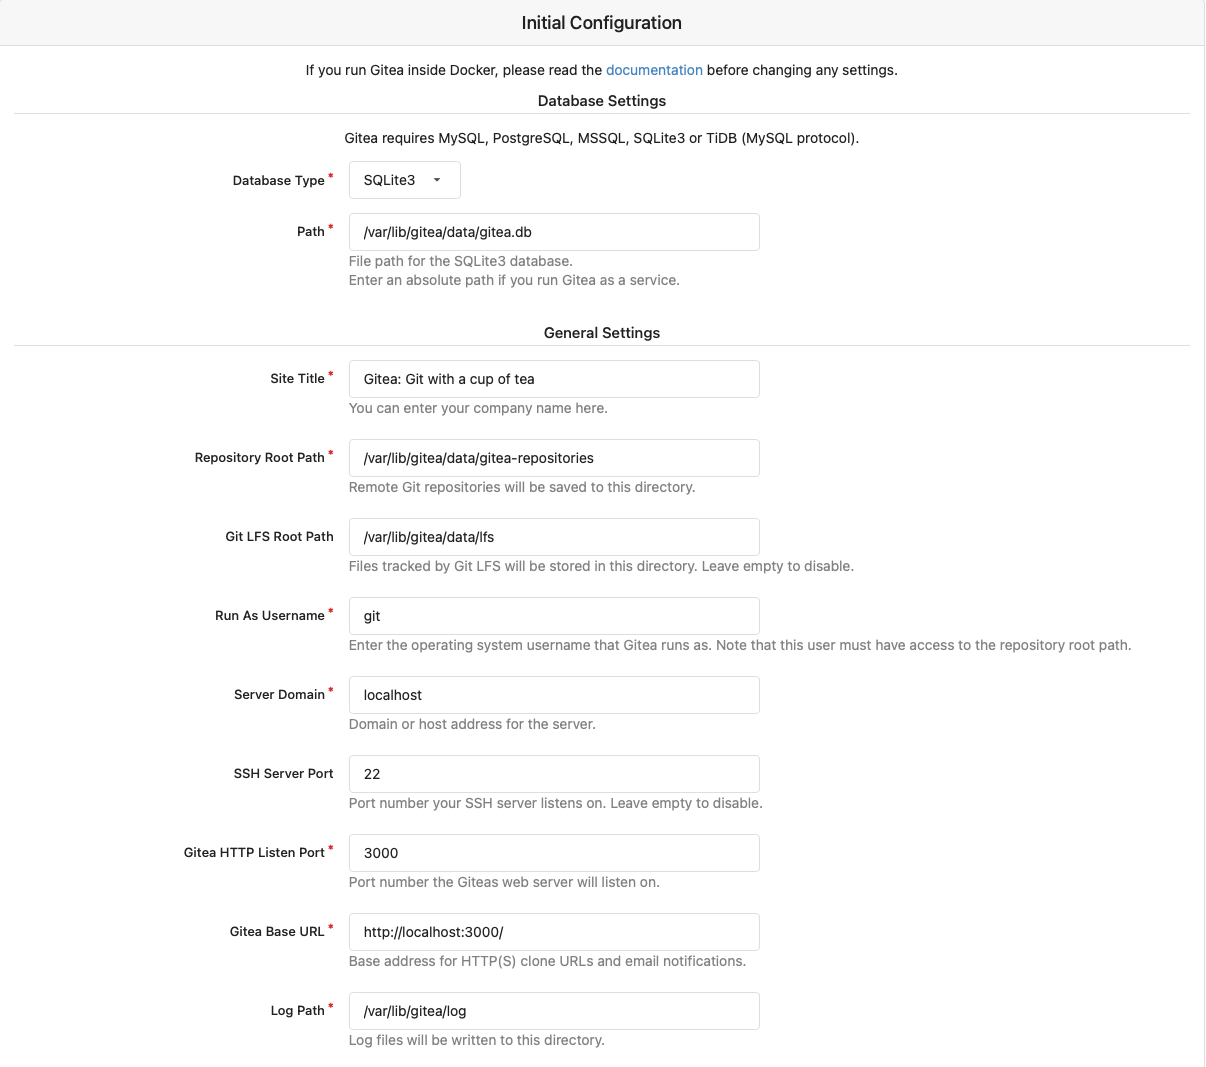
Access the setup page via a browser http://<your-smeserver-IP>:3000
I found it easiest to just use SQLite3 (built in to smeserver v10)
Make sure that you set your Server Domain and Gitea Base URL to the correct values for your server.
You will likely have to refresh the browser and then it will ask you to login.
You can setup your users via the web interface.
If you are having problems accessing gitea, check the app.ini file to ensure that the ROOT_URL is correct innano /etc/gitea/app.ini
systemctl restart gitea
Gitea is an open-source forge software package for hosting software development version control using Git as well as other collaborative features like bug tracking, wikis, and code review.
Prerequisites
- Rocky Linux 8 installed
- Full SSH root access.
- Gitea supports the following databases.
- SQLite
- PostgreSQL
- MySQL
- MariaDB
- TiDB
- MSSQL
In the guide below, we’ll use SQLite as the database for Gitea. You can pick any of the supported databases in your installation as needed.
This is what I did on a bare Rocky 8 minimal install
First we need to install git and any required pkgs
dnf install git git-lfs policycoreutils-python-utils wget nano
useradd git
Next we'll install gitea (latest stable version at the time)
export GITEAVER=1.20.5
wget https://github.com/go-gitea/gitea/releases/download/v${GITEAVER}/gitea-${GITEAVER}-linux-amd64 -O /usr/local/bin/gitea
chmod +x /usr/local/bin/gitea
mkdir -p /etc/gitea /var/lib/gitea/{custom,data,indexers,public,log}
chown git:git /var/lib/gitea/{data,indexers,log}
chmod 750 /var/lib/gitea/{data,indexers,log}
chown root:git /etc/gitea
chmod 770 /etc/gitea
Now we want to set it up as a service and set security settings (selinux and firewall).
wget https://raw.githubusercontent.com/go-gitea/gitea/main/contrib/systemd/gitea.service -O /usr/lib/systemd/system/gitea.service
semanage fcontext -a -t public_content_rw_t "/var/lib/gitea/data/gitea-repositories(/.*)?"
restorecon -r -v /var/lib/gitea/data/gitea-repositories
firewall-cmd --permanent --zone=public --add-port=3000/tcp
firewall-cmd --reload
Now we setup gitea on your server
systemctl enable --now gitea
Access the setup page via a browser http://<your-smeserver-IP>:3000
I found it easiest to just use SQLite3 (already installed)
Make sure that you set your Server Domain and Gitea Base URL to the correct values for your server.
You will likely have to refresh the browser and then it will ask you to login.
You can setup your users via the web interface.
If you are having problems accessing gitea, check the app.ini file to ensure that the ROOT_URL is correct in
nano /etc/gitea/app.ini
if you change it, you'll need to restart gitea
systemctl restart gitea
