Difference between revisions of "OCS Inventory Tools"
m (→Update) |
Unnilennium (talk | contribs) |
||
| (80 intermediate revisions by 6 users not shown) | |||
| Line 1: | Line 1: | ||
| − | {{Languages| | + | {{Languages|OCS Inventory Tools}} |
| + | {{Outdated}} | ||
| + | {{Warning box|This contribs is only available on SME7 and has not been updated since 2007. We ask you to rather use the upto date package on SME8 [[OCS_Inventory]]}} | ||
| + | =Maintainer= | ||
| − | + | '''Unmaintained''' | |
| + | formerly maintained by : | ||
[[User:Cool34000|Sylvain Gomez]]<br/> | [[User:Cool34000|Sylvain Gomez]]<br/> | ||
mailto:sylvaingomez@free.fr | mailto:sylvaingomez@free.fr | ||
Special thanks to [http://remi.collet.free.fr/ Rémi Collet] who provided a working OCS Unified Agent Linux (and so much more!) | Special thanks to [http://remi.collet.free.fr/ Rémi Collet] who provided a working OCS Unified Agent Linux (and so much more!) | ||
| + | |||
| + | Big thanks to Didier Liroulet and OCS team for this full documented software (See '''''/opt/inventory/ocs/ocsreports/files/guide.pdf''''') | ||
| + | |||
| + | And last but not least, thanks to [[User:Snoble|Stefen Noble]] for testings, time spent and help provided! | ||
=Inventory tools for SME 7.x= | =Inventory tools for SME 7.x= | ||
| Line 11: | Line 19: | ||
==OCS Inventory NG Description== | ==OCS Inventory NG Description== | ||
Open Computer and Software Inventory Next Generation is an application designed to help a network or system administrator keep track of the computers configuration and software that are installed on the network. | Open Computer and Software Inventory Next Generation is an application designed to help a network or system administrator keep track of the computers configuration and software that are installed on the network. | ||
| − | + | ||
| + | It is also able to detect all active devices on your network, such as switch, router, network printer and unattended devices. For each one, it stores MAC and IP addresses and allows you to classify them. | ||
| + | |||
| + | Last, but not least, OCS Inventory NG includes package deployment feature on client computers. From the central management server, you can upload packages (software setup, commands or only files to store on client computers) which will be downloaded through HTTP/HTTPS and launched by agent on client computer. | ||
| + | |||
Used with a IT and Asset Management Software such as open source tool GLPI, you will have a powerfull inventory and asset management software with automatic updates of computer configuration, license management, help desk and more. | Used with a IT and Asset Management Software such as open source tool GLPI, you will have a powerfull inventory and asset management software with automatic updates of computer configuration, license management, help desk and more. | ||
| Line 21: | Line 33: | ||
For more information see ''http://www.glpi-project.org/''. | For more information see ''http://www.glpi-project.org/''. | ||
| − | =Download= | + | =Server Installation= |
| − | + | ==Download== | |
| + | You will need ''[http://mirror.contribs.org/smeserver/contribs/sgomez/contribs/inventory/dependencies/ocs_perl_deps.tar.gz a few dependencies]''. | ||
If you want to save it directly on your SME Server, you can give these commands at the prompt: | If you want to save it directly on your SME Server, you can give these commands at the prompt: | ||
wget http://mirror.contribs.org/smeserver/contribs/sgomez/contribs/inventory/dependencies/ocs_perl_deps.tar.gz | wget http://mirror.contribs.org/smeserver/contribs/sgomez/contribs/inventory/dependencies/ocs_perl_deps.tar.gz | ||
| − | |||
| − | = | + | ==Install== |
| − | First, you need to install | + | First, you need to install the dependencies. |
| − | According to your SME version, you may | + | According to your SME Server version, (SME 7.1.? and older), you may need to install mod_perl or update perl-Compress-Zlib |
yum install mod_perl | yum install mod_perl | ||
| + | yum update perl-Compress-Zlib | ||
| + | |||
Other Perl dependencies have been packaged in one file for easy downloading. Simply uncompress the tarball and install RPMs using yum: | Other Perl dependencies have been packaged in one file for easy downloading. Simply uncompress the tarball and install RPMs using yum: | ||
tar -xzf ./ocs_perl_deps.tar.gz | tar -xzf ./ocs_perl_deps.tar.gz | ||
| − | yum | + | yum localinstall ./ocs_perl_deps/*.rpm |
Finally, you can install OCS Reports and GLPI with the following command: | Finally, you can install OCS Reports and GLPI with the following command: | ||
| − | + | yum install smeserver-inventory-tools --enablerepo=smecontribs | |
You can ignore the yum-comments ''signal event post-upgrade'' and ''signal-event reboot''. | You can ignore the yum-comments ''signal event post-upgrade'' and ''signal-event reboot''. | ||
| − | =Update= | + | To save some bandwidth, the help file was split from ''1-6+ RPM versions''. Please download this file separately and copy it in ''/opt/inventory/ocs/ocsreports/files/''. Until you put this file in the right place, the help icon in ocs interface will not work. (we may merge the help file back into the rpm later) |
| − | Update from old RPMs (''smeserver-ocs_inventory_ng'' and ''smeserver-glpi'') is not possible. | + | |
| + | cd /opt/inventory/ocs/ocsreports/files/ | ||
| + | wget http://mirror.contribs.org/smeserver/contribs/sgomez/contribs/inventory/guide.pdf | ||
| + | |||
| + | ==Update== | ||
| + | ===Old RPMs version=== | ||
| + | Update from old RPMs ('''''smeserver-ocs_inventory_ng''''' and '''''smeserver-glpi''''') is not possible. | ||
'''You must uninstall both RPMs first!''' | '''You must uninstall both RPMs first!''' | ||
| − | If you want to keep your | + | If you want to keep your data, you need to uninstall old versions with following commnands: |
rpm -e smeserver-glpi --noscripts | rpm -e smeserver-glpi --noscripts | ||
rpm -e smeserver-ocs_inventory_ng --noscripts | rpm -e smeserver-ocs_inventory_ng --noscripts | ||
| − | There are 3 new dependencies, so you need to install them. These RPMs can be found in the Tarball. | + | There are 3 new dependencies, so you need to install them. These RPMs can be found in the [http://mirror.contribs.org/smeserver/contribs/sgomez/contribs/inventory/dependencies/ocs_perl_deps.tar.gz Tarball]. |
tar -xzf ./ocs_perl_deps.tar.gz | tar -xzf ./ocs_perl_deps.tar.gz | ||
| − | yum | + | yum localinstall ./ocs_perl_deps/*remi*.rpm |
And then install the new version with | And then install the new version with | ||
| − | yum install smeserver-inventory-tools-1- | + | yum install smeserver-inventory-tools --enablerepo=smecontribs |
| + | |||
| + | === New RPM version=== | ||
| + | Update from new RPM ('''''smeserver-inventory-tools''''') is possible. | ||
| + | |||
| + | Use YUM to update: | ||
| + | yum update smeserver-inventory-tools --enablerepo=smecontribs | ||
| + | |||
| + | ==Special commands== | ||
| + | To view OCS and GLPI's configuration, you can type the following at the prompt: | ||
| + | config show ocs | ||
| + | config show glpi | ||
| + | You can change a few parameters: | ||
| + | DB parameter | Options | Default | Explanation | ||
| + | # HTTPS | on/off | off | Enable/Disable forced https mode of web interfaces | ||
| + | # PublicAccess | local/global | local | Accessibility of web interfaces | ||
| + | # MaxUpload | xM | 100M | Max uploadable file size | ||
| + | # InventoryAccess | local/global | global | Accessibility of OCS Server (to receive inventories) | ||
| + | # InventoryDelay | >1 | 600 | Time to wait (sec) to avoid server overload (Agent cron) | ||
| + | # URL | new alias | | Optionnal aliases for ocs and glpi web interfaces | ||
| + | After any change to OCS or GLPI configuration, you should apply modifications by typing the following at the prompt: | ||
| + | signal-event domain-modify | ||
| + | It will expand and restart needed templates and services in one command! | ||
| − | =Uninstallation= | + | example: |
| + | config setprop ocs HTTPS on PublicAccess global | ||
| + | config setprop glpi HTTPS on PublicAccess global | ||
| + | signal-event domain-modify | ||
| + | |||
| + | ==Uninstallation== | ||
To uninstall OCS Reports and GLPI, just hit the following command: | To uninstall OCS Reports and GLPI, just hit the following command: | ||
yum remove smeserver-inventory-tools | yum remove smeserver-inventory-tools | ||
| Line 62: | Line 109: | ||
You should also uninstall all dependencies if you don't need them anymore... | You should also uninstall all dependencies if you don't need them anymore... | ||
| − | = | + | =Client Installation= |
| − | + | The client side is available [http://www.ocsinventory-ng.org/index.php?page=1-01 on all platforms]. Download the latest client version according to your OS. | |
| − | |||
| − | + | After installing the Agent, you should launch it manually to upload your first inventory (as it's updated once per day by default) | |
| − | |||
| − | |||
| − | + | While you are installing the agent, copy the cacert.pem file, see the SSL section below. | |
| − | |||
| − | |||
| − | |||
| − | |||
| − | ==OCS Agent | + | ==OCS Agent for SME Server== |
| + | ===With ''smeserver-inventory-tools''=== | ||
The client-side of OCS will already be installed if you install ''smeserver-inventory-tools''. | The client-side of OCS will already be installed if you install ''smeserver-inventory-tools''. | ||
You should see an inventory of your SME Server in OCS web interface after the RPM install. | You should see an inventory of your SME Server in OCS web interface after the RPM install. | ||
| + | If you updated from old RPMs, issue the following command to create your first inventory: | ||
| + | ocsinventory-agent -s localhost | ||
| + | |||
| + | '''Do not modify ''/etc/ocsinventory-agent/ocsinv.conf'' as this file uses SME templates system in the full install.''' | ||
| + | |||
| + | ===Without ''smeserver-inventory-tools''=== | ||
If you want to inventory other SME Servers (without installing the server-side and web interfaces), you only need following packages in the dependencies tarball: | If you want to inventory other SME Servers (without installing the server-side and web interfaces), you only need following packages in the dependencies tarball: | ||
*monitor-edid-1.11-1.el4.remi.i386.rpm | *monitor-edid-1.11-1.el4.remi.i386.rpm | ||
| Line 89: | Line 136: | ||
OCSSERVER=yourdomain.com | OCSSERVER=yourdomain.com | ||
OCSTAG=your_tag | OCSTAG=your_tag | ||
| − | + | And finally launch the first inventory manually: | |
| − | |||
| − | And finally launch the | ||
ocsinventory-agent -s yourdomain.com -t your_tag | ocsinventory-agent -s yourdomain.com -t your_tag | ||
==OCS Agent for Windows== | ==OCS Agent for Windows== | ||
| − | + | There are 2 differents ways of sending inventories on Windows. Download the latest client software, OCSNG_WIN32_AGENT_1.xx_repack.zip from ocs website. This archive contains 3 executables. | |
| + | |||
| + | See Section 4.1 in the internal OCS help file. | ||
| + | ===Service use=== | ||
| + | Using OCS as a service is what you will probably need. | ||
| + | |||
| + | Launch the install of ''OcsAgentSetup.exe'' and provide default settings of the service. | ||
| + | [[Image:OCS-winagent-setup.png]]<br> | ||
| + | ---- | ||
| + | Then launch the first inventory by typing the following in the 'execute box': | ||
"C:\Program Files\OCS Inventory Agent\OCSInventory.exe" /server:yourdomain.com /np /debug /tag:your_tag | "C:\Program Files\OCS Inventory Agent\OCSInventory.exe" /server:yourdomain.com /np /debug /tag:your_tag | ||
| − | Wait a few seconds and go to http://your-server/ocs, you should see your computer's inventory | + | Wait a few seconds and go to http://your-server/ocs, you should see your computer's inventory. |
| − | ==GLPI== | + | By default, Agent will contact the Server once a day. |
| + | |||
| + | You can override this default behaviour in ocs web interface options. Your changes will be applied next time the Agent contacts the Server. | ||
| + | ---- | ||
| + | For troubleshooting, look at the log file in ''C:\Program Files\OCS Inventory Agent\COMPUTER_NAME.log'' | ||
| + | ===Standalone use=== | ||
| + | You can also make inventories on Windows without installing the service. | ||
| + | |||
| + | OCS standalone client is cut into 2 executables: | ||
| + | *''ocsagent.exe'' - This file contains all needed files for the launcher | ||
| + | *''OcsLogon.exe'' - This file is the standalone executable (launcher) | ||
| + | |||
| + | Of course, ''ocsagent.exe'' must be uncompressed before launching the standalone executable. | ||
| + | |||
| + | This can be done by executing directly ''ocsagent.exe'': files will uncompress in ''c:\ocs-ng''. | ||
| + | |||
| + | You can also import this file into ocs' MySQL database so that the standalone executable can download it if needed. This is documented in [http://wiki.contribs.org/index.php?title=OCS_Inventory_Tools&action=submit#MySQL_importation section MySQL importation]. | ||
| + | |||
| + | The command line is the same as for the service: | ||
| + | "C:\Path_to_file\OcsLogon.exe" /server:yourdomain.com /np /debug /tag:your_tag | ||
| + | For easier and faster inventorying, you can also rename this standalone executable to your domain name (don't forget ''.exe''): | ||
| + | "C:\Path_to_file\yourdomain.com'''.exe'''" /np /debug /tag:your_tag | ||
| + | |||
| + | For troubleshooting, look at the log file in ''C:\ocs-ng\COMPUTER_NAME.log'' | ||
| + | ---- | ||
| + | ===Importing ''ocsagent.exe'' in MySQL=== | ||
| + | The main advantage of this method is that you can send the standalone executable by Internet very quickly or even put the standalone executable on a floppy disk as it's only 65KB! How powerful looks your old floppy disk drive now? | ||
| + | |||
| + | This also allows to update files archived in ''ocsagent.exe'' on your clients (can be service or standalone executable). | ||
| + | |||
| + | A [http://prdownloads.sourceforge.net/ocsinventory/OCSNG_PACKAGER_1.01.zip?download packager] is available at ocs website. This will allow you to repackage ''ocsagent.exe'' with your own modifications (i.e. an SSL certificate!) | ||
| + | [[Image:OCS-packager.png]]<br> | ||
| + | ---- | ||
| + | 1st thing you need is to copy ''ocsagent.exe'' (modified or not) in '''''/opt/inventory/ocs/ocsreports/files/'''''. | ||
| + | |||
| + | Installer is locked (install.php), you need to change perms with the following command: | ||
| + | chmod 660 /opt/inventory/ocs/ocsreports/dbconfig.inc.php | ||
| + | |||
| + | Then, you can import this file in the database. Go to http://yourdomain.com/ocs/install.php | ||
| + | |||
| + | Use the pre-configured account 'ocs' for that: | ||
| + | [[Image:OCS-installphp.png]]<br> | ||
| + | ---- | ||
| + | If you get a warning message (cannot alter database), refresh the page and you should see a successful import. | ||
| + | [[Image:OCS-installphp-ocsagent.png]]<br> | ||
| + | ---- | ||
| + | ''ocsagent.exe'' is now in the database! | ||
| + | {{Warning box|install.php has reset ocs password to 'ocs'. Re-apply your changes with following command: | ||
| + | signal-event domain-modify | ||
| + | This will also reset chmod to 440 on ''dbconfig.inc.php'' | ||
| + | }} | ||
| + | You can now use ''OcsLogon.exe'' alone, it will download/update ''ocsagent.exe'' if needed! | ||
| + | |||
| + | If you want to remove ''ocsagent.exe'' from your database, simply delete the file from the server and redo install.php. This will delete the file from the database. | ||
| + | |||
| + | ==OCS Agent for Linux== | ||
| + | Download the generic linux tar.gz, unpack, read the README, and as root, run the setup script. | ||
| + | |||
| + | You may required additional perl- packages, use you package management tools to search for the missing dependencies based on the README or the error messages. See Section 4.2 in the internal OCS help file. | ||
| + | |||
| + | To run an inventory | ||
| + | ocsinventory-client.pl -server=server.net -tag=network3 | ||
| + | |||
| + | Check the time (will the PC be on) and command given in | ||
| + | /etc/cron.d/ocsinventory-client | ||
| + | |||
| + | =OCS Inventory NG Usage= | ||
| + | Full documentation can be found in the ocs help file, the help icon in ocs interface. | ||
| + | |||
| + | ==Access== | ||
| + | OCS Reports' web interface can be reached at http://your-server/ocs | ||
| + | |||
| + | '''Before login, please choose your language (flags on the top right corner)''' | ||
| + | [[Image:OCS_login_page.png]]<br> | ||
| + | Login : admin<br> | ||
| + | Password: admin | ||
| + | |||
| + | {{Warning box|For security-reasons, change admin's password after your first login, top right icon next to logout!}} | ||
| + | Inventories can be done from WAN but the web interface is only available from inside your network for security reasons by default. | ||
| + | See Sections 5 & 6 in the internal OCS help file for Reporting and Administration help. | ||
| + | |||
| + | ==IP discovery== | ||
| + | IP discovery feature allow OCS Inventory NG to discover all network connected devices on the network. For this, Communication server asks a number of most “active” computers running OCS Inventory NG agent to scan for MAC addresses in their sub network at each run. See Section 7 in the internal OCS help file. | ||
| + | |||
| + | ===Modifying default behaviour=== | ||
| + | You may want to override the default IP Discovery behaviour. | ||
| + | |||
| + | To force a computer to ipdiscover, simply open its inventory. Click on ''Customization'' icon and ''update'' the ipdiscover behaviour. | ||
| + | [[Image:OCS-ipdiscover-step1.png]]<br> | ||
| + | ---- | ||
| + | Now choose the IP of selected computer and save your changes. | ||
| + | [[Image:OCS-ipdiscover-step2.png]]<br> | ||
| + | ---- | ||
| + | You should now see your modifications. | ||
| + | |||
| + | [[Image:OCS-ipdiscover-step3.png]]<br> | ||
| + | At this point, ipdiscover will run next time with the agent! | ||
| + | |||
| + | '''Manually launch the inventory to force ipdiscover''' or wait a day for the next inventory. | ||
| + | ---- | ||
| + | ===Adding networks and devices categories=== | ||
| + | Now click on ''Security'' and go to ''Config'' | ||
| + | [[Image:OCS-ipdiscover-step4.png]]<br> | ||
| + | ---- | ||
| + | Add you own network/subnet. All fields are mandatory. | ||
| + | [[Image:OCS-ipdiscover-step5.png]]<br> | ||
| + | ---- | ||
| + | We can also add categories. Let's do that! Click on 'Network devices types' | ||
| + | [[Image:OCS-ipdiscover-step6.png]]<br> | ||
| + | ---- | ||
| + | |||
| + | ===Usage=== | ||
| + | Go back to ''Security'' and click on ''Network information''. Now that your network is created, you should see ipdiscover working... | ||
| + | |||
| + | Click on ''non-inventoried'' devices. | ||
| + | [[Image:OCS-ipdiscover-step7.png]]<br> | ||
| + | ---- | ||
| + | Now all you have to do is registering new devices! | ||
| + | [[Image:OCS-ipdiscover-step8.png]]<br> | ||
| + | ---- | ||
| + | [[Image:OCS-ipdiscover-step9.png]]<br> | ||
| + | ---- | ||
| + | |||
| + | ==Deploying packages== | ||
| + | OCS Inventory NG includes package deployment feature on client computers. From the central management server, you can upload packages which will be downloaded through HTTP/HTTPS and launched by agent on client computer. See Section 8 in the internal OCS help file. | ||
| + | |||
| + | '''This feature is LAN ONLY''' | ||
| + | |||
| + | ===SSL certificate=== | ||
| + | Deployment feature uses SSL to authenticate Agents. | ||
| + | |||
| + | To allow the Agent to authenticate with the Server, you need to '''copy the ''cacert.pem'' file in your agents' installation directory''' | ||
| + | |||
| + | This file is located in '''''/home/e-smith/ssl.crt/''''' | ||
| + | |||
| + | ====Using default cacert.pem==== | ||
| + | If the file ''/home/e-smith/ssl.crt/cacert.pem'' can not be found, the RPM install will create it by copying your original SME certificate into this file. This is a quick and a simple method. | ||
| + | |||
| + | Copy the '''''cacert.pem''''' file in your agents' installation directory. Skip to next section! | ||
| + | |||
| + | ====Using a custom certificate==== | ||
| + | If you've followed this [http://wiki.contribs.org/Custom_CA_Certificate howto] to create a valid certificate, you can use this certificate with OCS Deployment feature. | ||
| + | |||
| + | Download cacert.org certificate with the following command: | ||
| + | wget http://www.cacert.org/certs/root.crt | ||
| + | And replace the old file with the following command: | ||
| + | cp root.crt /home/e-smith/ssl.crt/cacert.pem | ||
| + | Copy this file into your agents' installation directory. | ||
| + | |||
| + | ===Deployment menu=== | ||
| + | Open OCS' web interface and click on Deployment icon. | ||
| + | [[Image:OCS-deployment-menu.png]]<br> | ||
| + | ---- | ||
| + | |||
| + | ====Building a deployment packages==== | ||
| + | Deployment packages can be either '''''.zip''''' files (Windows) or '''''tar.gz''''' files (Linux) | ||
| + | |||
| + | '''Don't try to deploy other file type.''' | ||
| + | |||
| + | There are many options to deploy packages, | ||
| + | for an overview see [http://www.ocsinventory-ng.org/index.php?page=package-deployment the ocs website] | ||
| + | for detail see section 8.3 of the help file, | ||
| + | for [http://alufis35.uv.es/OCS-Deployment-Tips-and-tricks.html Tips and tricks] see Pablo Iranzo's site | ||
| + | [[Image:OCS-buildpackage.png]]<br> | ||
| + | ---- | ||
| + | After creating the deployment package, you should get this successful screen: | ||
| + | [[Image:OCS-success-build.png]]<br> | ||
| + | ---- | ||
| + | |||
| + | ====Activating deployment packages==== | ||
| + | Once a package is added, you need to activate it. | ||
| + | [[Image:OCS-activate-package1.png]]<br> | ||
| + | ---- | ||
| + | Provide paths to download folder. As this feature is LAN ONLY, provide internal name or IP address for both fields. | ||
| + | |||
| + | Be careful, this path will be resolved by the agent (value ''localhost'' forbidden here!) | ||
| + | |||
| + | [[Image:OCS-activate-package2.png]]<br> | ||
| + | ---- | ||
| + | Don't pay attention to the warning messages when activating, Just click Yes. | ||
| + | [[Image:OCS-activate-package3.png]]<br> | ||
| + | ---- | ||
| + | You can also ignore any warning messages when deleting a package, the package is removed. | ||
| + | |||
| + | ====Activated deployment packages==== | ||
| + | Here you will be able to see activated packages... | ||
| + | [[Image:OCS-activated-package.png]]<br> | ||
| + | |||
| + | ===Deploying your packages=== | ||
| + | All should be ready to go now! | ||
| + | |||
| + | The final step is to affect the created package to computers... | ||
| + | |||
| + | Here's a quick howto for deploying the package ''on a single computer''. | ||
| + | |||
| + | To learn how to deploy on multiple computers, see section 8.5 of the help file. | ||
| + | |||
| + | |||
| + | Open the desired computer's inventory on click on ''Config'' icon and add a new package | ||
| + | [[Image:OCS-deploy-single-pc1.png]]<br> | ||
| + | ---- | ||
| + | You should see all activated packages, affect the one you want and confirm changes | ||
| + | [[Image:OCS-deploy-single-pc2.png]]<br> | ||
| + | ---- | ||
| + | Back at Config page, you should now see affected packages and their states. | ||
| + | [[Image:OCS-deploy-single-pc3.png]]<br> | ||
| + | ---- | ||
| + | Next time the Agent contacts the server, it is notified of the package, and sometime later should be deployed! As usual, you can manually launch the agent to force the update. | ||
| + | |||
| + | See section 8.1 of the help file to understand how download works | ||
| + | |||
| + | =GLPI Usage= | ||
| + | ==Access== | ||
GLPI's web interface can be reached at http://your-server/glpi | GLPI's web interface can be reached at http://your-server/glpi | ||
| Line 107: | Line 373: | ||
{{Warning box|For security-reasons, change admin's password after your first login!}} | {{Warning box|For security-reasons, change admin's password after your first login!}} | ||
GLPI's web interface is only available from inside your network for security reasons by default. | GLPI's web interface is only available from inside your network for security reasons by default. | ||
| + | ==Basics== | ||
| + | [http://glpi-project.org/wiki/doku.php?id=en:welcome GLPI Wiki] | ||
| + | |||
| + | [http://glpi-project.org/wiki/doku.php?id=en:begin What's next?] | ||
| + | {{Incomplete}} | ||
| + | ===External authentication=== | ||
| + | You can configure GLPI so that your SME users can login. For this, we will use SME integrated IMAP feature. | ||
| − | + | In GLPI interface, clic on ''Administration'' icon and open ''Setup'' menu. Then clic on ''External Authentications''. | |
| − | + | ||
| − | + | Settings are on the screenshot: | |
| − | + | [[Image:GLPI-imap-auth.png]]<br> | |
| − | + | ---- | |
| − | + | Apply your changes. SME users can now connect with their existing user+password into GLPI interface! | |
| − | + | ||
| − | + | Logout and login with an existing SME account: | |
| − | + | [[Image:GLPI-user-interface.png]]<br> | |
| − | + | ---- | |
| + | ===Sync GLPI with OCS=== | ||
| + | You can import OCS inventories into GLPI. | ||
| + | Simply clic on ''OCSNG'' in ''Tools'' menu. | ||
| + | [[Image:GLPI-sync-OCS-1.png]]<br> | ||
| + | ---- | ||
| + | Then Import/Update OCS inventories into GLPI | ||
| + | [[Image:GLPI-sync-OCS-2.png]]<br> | ||
| + | ---- | ||
| − | + | ==Advanced== | |
| − | + | ===Sync GLPI with LDAP=== | |
| − | + | [http://glpi-project.org/wiki/doku.php?id=en:ldap Related GLPI Wiki article] | |
| + | {{Incomplete}} | ||
| + | ===Sync GLPI with Active Directory=== | ||
| + | [http://glpi-project.org/wiki/doku.php?id=en:ldap Related GLPI Wiki article] | ||
| + | {{Incomplete}} | ||
| + | ==Plugins== | ||
| + | [http://glpi-project.org/wiki/doku.php?id=en:plugins Related GLPI Wiki article] | ||
| + | {{Incomplete}} | ||
=Additional information= | =Additional information= | ||
| Line 133: | Line 421: | ||
*[http://sme.firewall-services.com/spip.php?article42 Howto] | *[http://sme.firewall-services.com/spip.php?article42 Howto] | ||
*[http://www.dlaoctet.com/index.php/2006/10/12/17-installer-ocs-next-generation-inventory-et-glpi Old version howto] | *[http://www.dlaoctet.com/index.php/2006/10/12/17-installer-ocs-next-generation-inventory-et-glpi Old version howto] | ||
| + | |||
| + | |||
| + | ''Stefen Noble (Snoble)'' | ||
''Sylvain Gomez (Cool34000)'' | ''Sylvain Gomez (Cool34000)'' | ||
---- | ---- | ||
| − | [[Category: Contrib]] | + | [[Category: Deprecated Contrib]] |
| + | [[Category: Administration:Monitoring]] | ||
Latest revision as of 20:07, 17 April 2021
Maintainer
Unmaintained
formerly maintained by :
Sylvain Gomez
mailto:sylvaingomez@free.fr
Special thanks to Rémi Collet who provided a working OCS Unified Agent Linux (and so much more!)
Big thanks to Didier Liroulet and OCS team for this full documented software (See /opt/inventory/ocs/ocsreports/files/guide.pdf)
And last but not least, thanks to Stefen Noble for testings, time spent and help provided!
Inventory tools for SME 7.x
OCS Inventory NG Description
Open Computer and Software Inventory Next Generation is an application designed to help a network or system administrator keep track of the computers configuration and software that are installed on the network.
It is also able to detect all active devices on your network, such as switch, router, network printer and unattended devices. For each one, it stores MAC and IP addresses and allows you to classify them.
Last, but not least, OCS Inventory NG includes package deployment feature on client computers. From the central management server, you can upload packages (software setup, commands or only files to store on client computers) which will be downloaded through HTTP/HTTPS and launched by agent on client computer.
Used with a IT and Asset Management Software such as open source tool GLPI, you will have a powerfull inventory and asset management software with automatic updates of computer configuration, license management, help desk and more.
For more information see http://www.ocsinventory-ng.org/.
GLPI Description
GLPI is the Information Resource-Manager with an additional Administration- Interface. You can use it to build up a database with an inventory for your company (computer, software, printers...). It has enhanced functions to make the daily life for the administrators easier, like a job-tracking-system with mail-notification and methods to build a database with basic information about your network-topology.
For more information see http://www.glpi-project.org/.
Server Installation
Download
You will need a few dependencies. If you want to save it directly on your SME Server, you can give these commands at the prompt:
wget http://mirror.contribs.org/smeserver/contribs/sgomez/contribs/inventory/dependencies/ocs_perl_deps.tar.gz
Install
First, you need to install the dependencies.
According to your SME Server version, (SME 7.1.? and older), you may need to install mod_perl or update perl-Compress-Zlib
yum install mod_perl
yum update perl-Compress-Zlib
Other Perl dependencies have been packaged in one file for easy downloading. Simply uncompress the tarball and install RPMs using yum:
tar -xzf ./ocs_perl_deps.tar.gz
yum localinstall ./ocs_perl_deps/*.rpm
Finally, you can install OCS Reports and GLPI with the following command:
yum install smeserver-inventory-tools --enablerepo=smecontribs
You can ignore the yum-comments signal event post-upgrade and signal-event reboot.
To save some bandwidth, the help file was split from 1-6+ RPM versions. Please download this file separately and copy it in /opt/inventory/ocs/ocsreports/files/. Until you put this file in the right place, the help icon in ocs interface will not work. (we may merge the help file back into the rpm later)
cd /opt/inventory/ocs/ocsreports/files/
wget http://mirror.contribs.org/smeserver/contribs/sgomez/contribs/inventory/guide.pdf
Update
Old RPMs version
Update from old RPMs (smeserver-ocs_inventory_ng and smeserver-glpi) is not possible.
You must uninstall both RPMs first!
If you want to keep your data, you need to uninstall old versions with following commnands:
rpm -e smeserver-glpi --noscripts
rpm -e smeserver-ocs_inventory_ng --noscripts
There are 3 new dependencies, so you need to install them. These RPMs can be found in the Tarball.
tar -xzf ./ocs_perl_deps.tar.gz
yum localinstall ./ocs_perl_deps/*remi*.rpm
And then install the new version with
yum install smeserver-inventory-tools --enablerepo=smecontribs
New RPM version
Update from new RPM (smeserver-inventory-tools) is possible.
Use YUM to update:
yum update smeserver-inventory-tools --enablerepo=smecontribs
Special commands
To view OCS and GLPI's configuration, you can type the following at the prompt:
config show ocs
config show glpi
You can change a few parameters:
   DB parameter   |    Options   | Default | Explanation
# HTTPS           | on/off       | off     | Enable/Disable forced https mode of web interfaces
# PublicAccess    | local/global | local   | Accessibility of web interfaces
# MaxUpload       | xM           | 100M    | Max uploadable file size
# InventoryAccess | local/global | global  | Accessibility of OCS Server (to receive inventories)
# InventoryDelay  | >1           | 600     | Time to wait (sec) to avoid server overload (Agent cron)
# URL             | new alias    |         | Optionnal aliases for ocs and glpi web interfaces
After any change to OCS or GLPI configuration, you should apply modifications by typing the following at the prompt:
signal-event domain-modify
It will expand and restart needed templates and services in one command!
example:
config setprop ocs  HTTPS on PublicAccess global
config setprop glpi HTTPS on PublicAccess global
signal-event domain-modify
Uninstallation
To uninstall OCS Reports and GLPI, just hit the following command:
yum remove smeserver-inventory-tools
You can ignore the yum-comments signal event post-upgrade and signal-event reboot.
To completly remove OCS Reports and GLPI (installation files ; MySQL user+database ; OCS Agent) you will need the following command:
sh /root/OCS_GLPI-Full-Uninstall.sh
You should also uninstall all dependencies if you don't need them anymore...
Client Installation
The client side is available on all platforms. Download the latest client version according to your OS.
After installing the Agent, you should launch it manually to upload your first inventory (as it's updated once per day by default)
While you are installing the agent, copy the cacert.pem file, see the SSL section below.
OCS Agent for SME Server
With smeserver-inventory-tools
The client-side of OCS will already be installed if you install smeserver-inventory-tools.
You should see an inventory of your SME Server in OCS web interface after the RPM install.
If you updated from old RPMs, issue the following command to create your first inventory:
ocsinventory-agent -s localhost
Do not modify /etc/ocsinventory-agent/ocsinv.conf as this file uses SME templates system in the full install.
Without smeserver-inventory-tools
If you want to inventory other SME Servers (without installing the server-side and web interfaces), you only need following packages in the dependencies tarball:
- monitor-edid-1.11-1.el4.remi.i386.rpm
- ocsinventory-agent-0.0.6-1.el4.remi.noarch.rpm
- ocsinventory-ipdiscover-1.01-2.el4.remi.i386.rpm
Then edit /etc/ocsinventory-agent/ocsinv.conf and modify following lines:
OCSSERVER=yourdomain.com
OCSTAG=your_tag
And finally launch the first inventory manually:
ocsinventory-agent -s yourdomain.com -t your_tag
OCS Agent for Windows
There are 2 differents ways of sending inventories on Windows. Download the latest client software, OCSNG_WIN32_AGENT_1.xx_repack.zip from ocs website. This archive contains 3 executables.
See Section 4.1 in the internal OCS help file.
Service use
Using OCS as a service is what you will probably need.
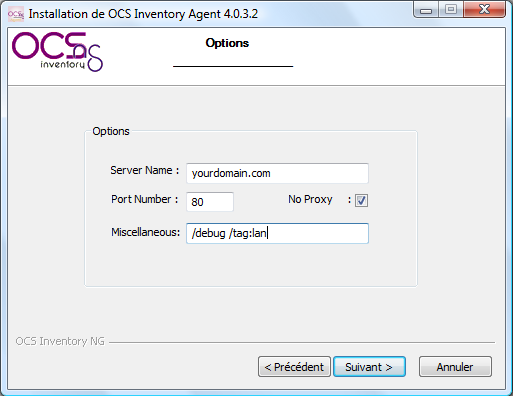
Launch the install of OcsAgentSetup.exe and provide default settings of the service.
Then launch the first inventory by typing the following in the 'execute box':
"C:\Program Files\OCS Inventory Agent\OCSInventory.exe" /server:yourdomain.com /np /debug /tag:your_tag
Wait a few seconds and go to http://your-server/ocs, you should see your computer's inventory.
By default, Agent will contact the Server once a day.
You can override this default behaviour in ocs web interface options. Your changes will be applied next time the Agent contacts the Server.
For troubleshooting, look at the log file in C:\Program Files\OCS Inventory Agent\COMPUTER_NAME.log
Standalone use
You can also make inventories on Windows without installing the service.
OCS standalone client is cut into 2 executables:
- ocsagent.exe - This file contains all needed files for the launcher
- OcsLogon.exe - This file is the standalone executable (launcher)
Of course, ocsagent.exe must be uncompressed before launching the standalone executable.
This can be done by executing directly ocsagent.exe: files will uncompress in c:\ocs-ng.
You can also import this file into ocs' MySQL database so that the standalone executable can download it if needed. This is documented in section MySQL importation.
The command line is the same as for the service:
"C:\Path_to_file\OcsLogon.exe" /server:yourdomain.com /np /debug /tag:your_tag
For easier and faster inventorying, you can also rename this standalone executable to your domain name (don't forget .exe):
"C:\Path_to_file\yourdomain.com.exe" /np /debug /tag:your_tag
For troubleshooting, look at the log file in C:\ocs-ng\COMPUTER_NAME.log
Importing ocsagent.exe in MySQL
The main advantage of this method is that you can send the standalone executable by Internet very quickly or even put the standalone executable on a floppy disk as it's only 65KB! How powerful looks your old floppy disk drive now?
This also allows to update files archived in ocsagent.exe on your clients (can be service or standalone executable).
A packager is available at ocs website. This will allow you to repackage ocsagent.exe with your own modifications (i.e. an SSL certificate!)
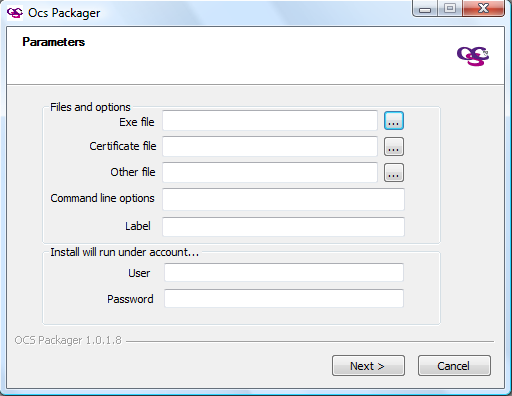
1st thing you need is to copy ocsagent.exe (modified or not) in /opt/inventory/ocs/ocsreports/files/.
Installer is locked (install.php), you need to change perms with the following command:
chmod 660 /opt/inventory/ocs/ocsreports/dbconfig.inc.php
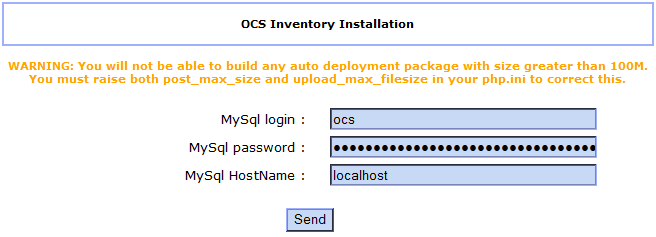
Then, you can import this file in the database. Go to http://yourdomain.com/ocs/install.php
Use the pre-configured account 'ocs' for that:
If you get a warning message (cannot alter database), refresh the page and you should see a successful import.
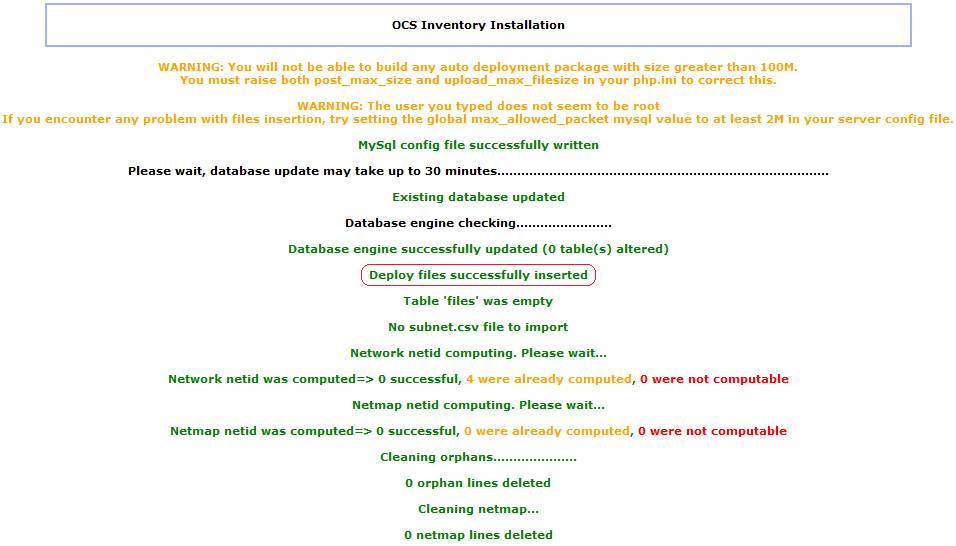
ocsagent.exe is now in the database!
You can now use OcsLogon.exe alone, it will download/update ocsagent.exe if needed!
If you want to remove ocsagent.exe from your database, simply delete the file from the server and redo install.php. This will delete the file from the database.
OCS Agent for Linux
Download the generic linux tar.gz, unpack, read the README, and as root, run the setup script.
You may required additional perl- packages, use you package management tools to search for the missing dependencies based on the README or the error messages. See Section 4.2 in the internal OCS help file.
To run an inventory
ocsinventory-client.pl -server=server.net -tag=network3
Check the time (will the PC be on) and command given in
/etc/cron.d/ocsinventory-client
OCS Inventory NG Usage
Full documentation can be found in the ocs help file, the help icon in ocs interface.
Access
OCS Reports' web interface can be reached at http://your-server/ocs
Before login, please choose your language (flags on the top right corner)
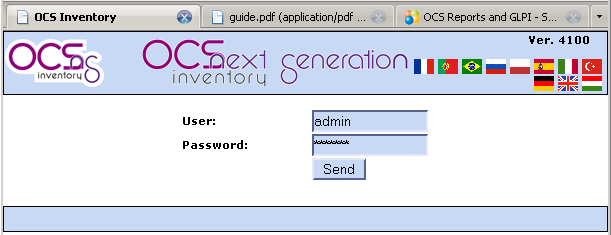
Login : admin
Password: admin
Inventories can be done from WAN but the web interface is only available from inside your network for security reasons by default. See Sections 5 & 6 in the internal OCS help file for Reporting and Administration help.
IP discovery
IP discovery feature allow OCS Inventory NG to discover all network connected devices on the network. For this, Communication server asks a number of most “active” computers running OCS Inventory NG agent to scan for MAC addresses in their sub network at each run. See Section 7 in the internal OCS help file.
Modifying default behaviour
You may want to override the default IP Discovery behaviour.
To force a computer to ipdiscover, simply open its inventory. Click on Customization icon and update the ipdiscover behaviour.

Now choose the IP of selected computer and save your changes.

You should now see your modifications.

At this point, ipdiscover will run next time with the agent!
Manually launch the inventory to force ipdiscover or wait a day for the next inventory.
Adding networks and devices categories
Now click on Security and go to Config

Add you own network/subnet. All fields are mandatory.

We can also add categories. Let's do that! Click on 'Network devices types'
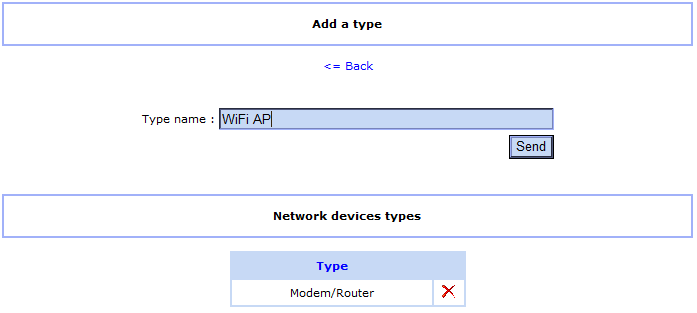
Usage
Go back to Security and click on Network information. Now that your network is created, you should see ipdiscover working...
Click on non-inventoried devices.

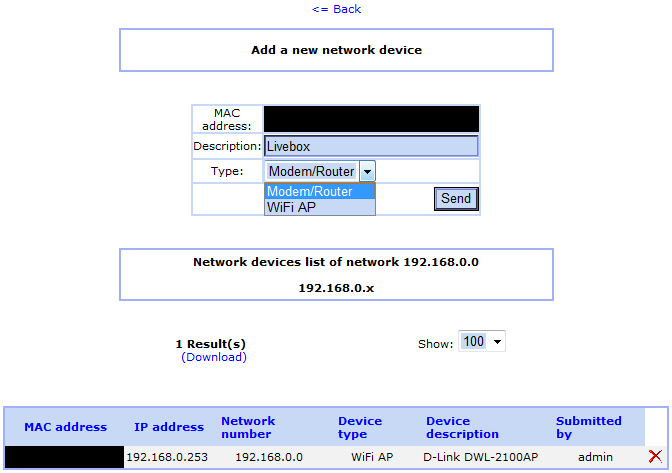
Now all you have to do is registering new devices!
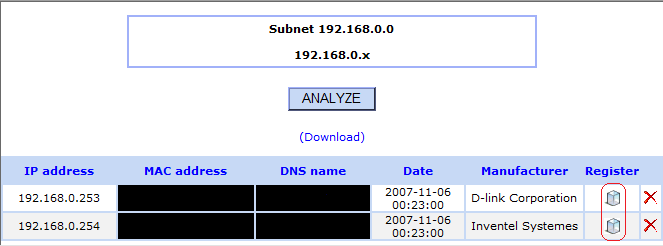
Deploying packages
OCS Inventory NG includes package deployment feature on client computers. From the central management server, you can upload packages which will be downloaded through HTTP/HTTPS and launched by agent on client computer. See Section 8 in the internal OCS help file.
This feature is LAN ONLY
SSL certificate
Deployment feature uses SSL to authenticate Agents.
To allow the Agent to authenticate with the Server, you need to copy the cacert.pem file in your agents' installation directory
This file is located in /home/e-smith/ssl.crt/
Using default cacert.pem
If the file /home/e-smith/ssl.crt/cacert.pem can not be found, the RPM install will create it by copying your original SME certificate into this file. This is a quick and a simple method.
Copy the cacert.pem file in your agents' installation directory. Skip to next section!
Using a custom certificate
If you've followed this howto to create a valid certificate, you can use this certificate with OCS Deployment feature.
Download cacert.org certificate with the following command:
wget http://www.cacert.org/certs/root.crt
And replace the old file with the following command:
cp root.crt /home/e-smith/ssl.crt/cacert.pem
Copy this file into your agents' installation directory.
Open OCS' web interface and click on Deployment icon.

Building a deployment packages
Deployment packages can be either .zip files (Windows) or tar.gz files (Linux)
Don't try to deploy other file type.
There are many options to deploy packages,
for an overview see the ocs website
for detail see section 8.3 of the help file,
for Tips and tricks see Pablo Iranzo's site
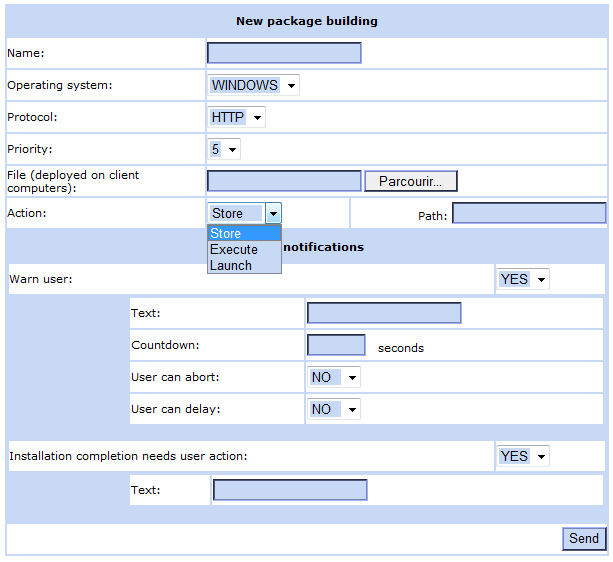
After creating the deployment package, you should get this successful screen:

Activating deployment packages
Once a package is added, you need to activate it.
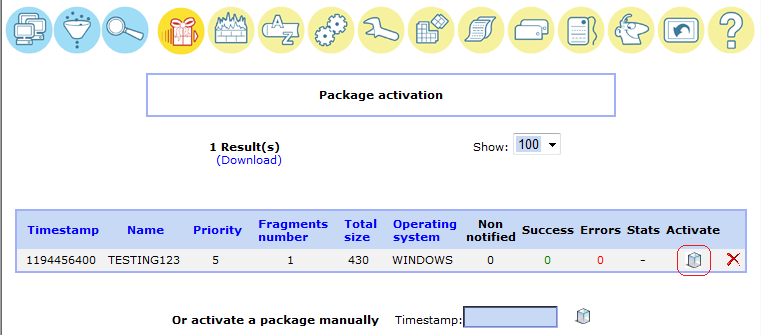
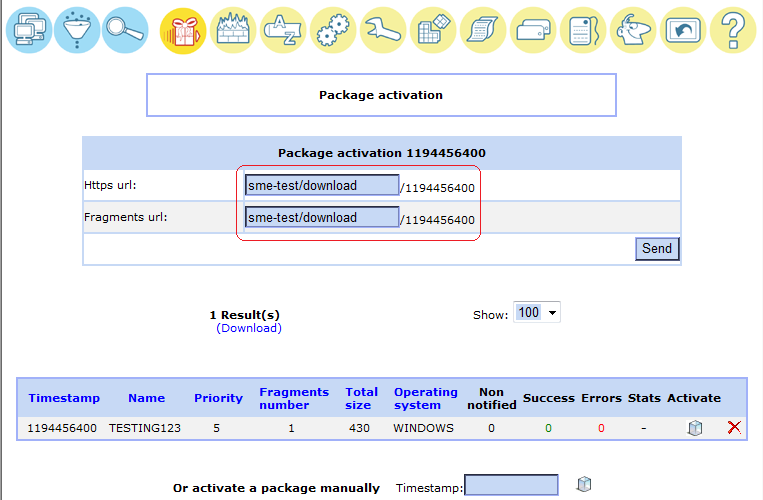
Provide paths to download folder. As this feature is LAN ONLY, provide internal name or IP address for both fields.
Be careful, this path will be resolved by the agent (value localhost forbidden here!)
Don't pay attention to the warning messages when activating, Just click Yes.
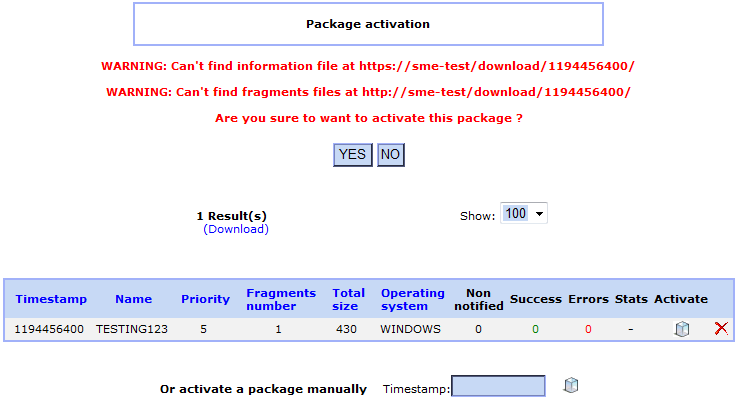
You can also ignore any warning messages when deleting a package, the package is removed.
Activated deployment packages
Here you will be able to see activated packages...

Deploying your packages
All should be ready to go now!
The final step is to affect the created package to computers...
Here's a quick howto for deploying the package on a single computer.
To learn how to deploy on multiple computers, see section 8.5 of the help file.
Open the desired computer's inventory on click on Config icon and add a new package

You should see all activated packages, affect the one you want and confirm changes

Back at Config page, you should now see affected packages and their states.

Next time the Agent contacts the server, it is notified of the package, and sometime later should be deployed! As usual, you can manually launch the agent to force the update.
See section 8.1 of the help file to understand how download works
GLPI Usage
Access
GLPI's web interface can be reached at http://your-server/glpi
Login : glpi
Password: glpi
GLPI's web interface is only available from inside your network for security reasons by default.
Basics
External authentication
You can configure GLPI so that your SME users can login. For this, we will use SME integrated IMAP feature.
In GLPI interface, clic on Administration icon and open Setup menu. Then clic on External Authentications.
Settings are on the screenshot:
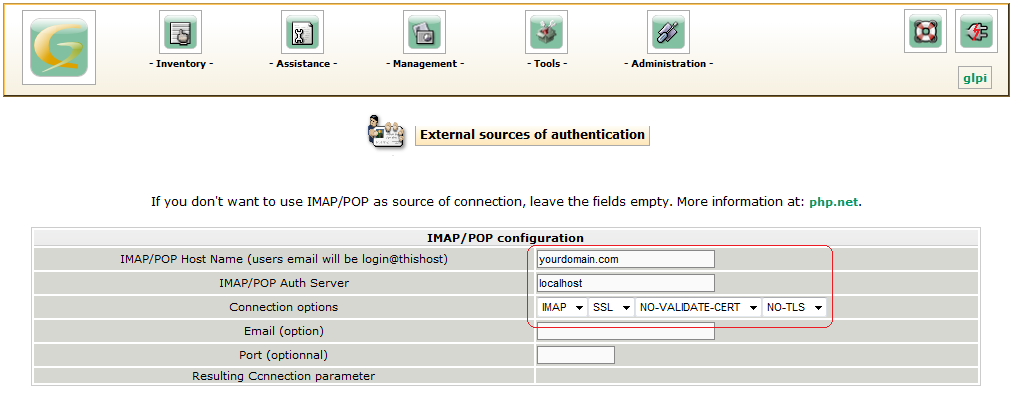
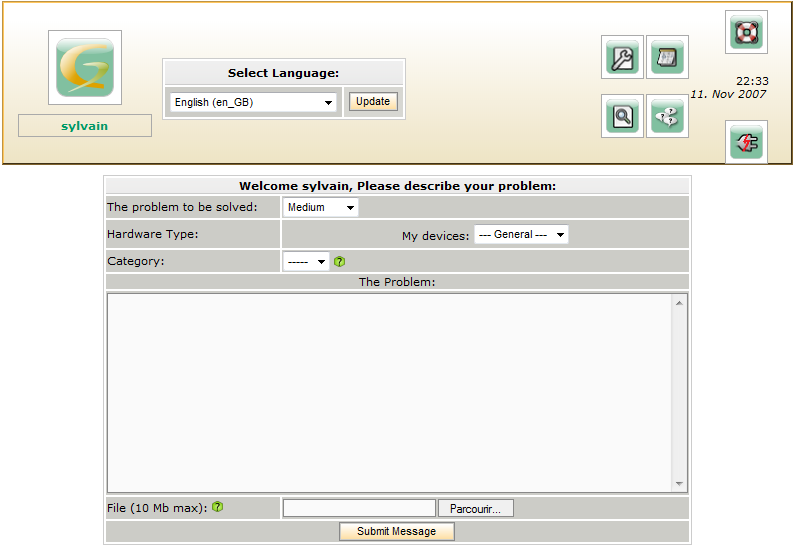
Apply your changes. SME users can now connect with their existing user+password into GLPI interface!
Logout and login with an existing SME account:
Sync GLPI with OCS
You can import OCS inventories into GLPI.
Simply clic on OCSNG in Tools menu.

Then Import/Update OCS inventories into GLPI

Advanced
Sync GLPI with LDAP
Sync GLPI with Active Directory
Plugins
Additional information
Initial howtos:
Stefen Noble (Snoble)
Sylvain Gomez (Cool34000)
