Difference between revisions of "OCS Inventory Tools"
m (→Deploying your packages: missing section number) |
|||
| Line 257: | Line 257: | ||
Next time the Agent contacts the server, it is notified of the package, and sometime later should be deployed! As usual, you can manually launch the agent to force the update. | Next time the Agent contacts the server, it is notified of the package, and sometime later should be deployed! As usual, you can manually launch the agent to force the update. | ||
| − | See section 8. of the help file to understand how download works | + | See section 8.1 of the help file to understand how download works |
=GLPI Usage= | =GLPI Usage= | ||
Revision as of 00:20, 8 November 2007
Maintainer
Sylvain Gomez
mailto:sylvaingomez@free.fr
Special thanks to Rémi Collet who provided a working OCS Unified Agent Linux (and so much more!)
Big thanks to Didier Liroulet and OCS team for this full documentated software (See /opt/inventory/ocs/ocsreports/files/guide.pdf)
And last but not least, thanks to Stefen Noble for testings, time spent and help provided!
Inventory tools for SME 7.x
OCS Inventory NG Description
Open Computer and Software Inventory Next Generation is an application designed to help a network or system administrator keep track of the computers configuration and software that are installed on the network. Information about Hardware and Operating System are collected. Used with a IT and Asset Management Software such as open source tool GLPI, you will have a powerfull inventory and asset management software with automatic updates of computer configuration, license management, help desk and more.
For more information see http://www.ocsinventory-ng.org/.
GLPI Description
GLPI is the Information Resource-Manager with an additional Administration- Interface. You can use it to build up a database with an inventory for your company (computer, software, printers...). It has enhanced functions to make the daily life for the administrators easier, like a job-tracking-system with mail-notification and methods to build a database with basic information about your network-topology.
For more information see http://www.glpi-project.org/.
Server Installation
Download
You can download this package here. You will also need a few dependencies. If you want to save it directly on your SME Server, you can give these commands at the prompt:
wget http://mirror.contribs.org/smeserver/contribs/sgomez/contribs/inventory/dependencies/ocs_perl_deps.tar.gz
wget http://mirror.contribs.org/smeserver/contribs/sgomez/contribs/inventory/smeserver-inventory-tools-1-5.i386.rpm
Install
First, you need to install the dependencies.
According to your SME Server version, (SME 7.1.? and older), you may need to install mod_perl or update perl-Compress-Zlib
yum install mod_perl
yum update perl-Compress-Zlib
Other Perl dependencies have been packaged in one file for easy downloading. Simply uncompress the tarball and install RPMs using yum:
tar -xzf ./ocs_perl_deps.tar.gz
yum localinstall ./ocs_perl_deps/*.rpm
Finally, you can install OCS Reports and GLPI with the following command:
yum localinstall smeserver-inventory-tools-1-5.i386.rpm
You can ignore the yum-comments signal event post-upgrade and signal-event reboot.
Update
Old RPMs version
Update from old RPMs (smeserver-ocs_inventory_ng and smeserver-glpi) is not possible.
You must uninstall both RPMs first!
If you want to keep your data, you need to uninstall old versions with following commnands:
rpm -e smeserver-glpi --noscripts
rpm -e smeserver-ocs_inventory_ng --noscripts
There are 3 new dependencies, so you need to install them. These RPMs can be found in the Tarball.
tar -xzf ./ocs_perl_deps.tar.gz
yum localinstall ./ocs_perl_deps/*remi*.rpm
And then install the new version with
yum localinstall smeserver-inventory-tools-1-5.i386.rpm
New RPM version
Update from new RPM (smeserver-inventory-tools) is possible.
Use YUM to update:
yum localinstall smeserver-inventory-tools-1-x.i386.rpm
Where "x" is the new version number
Uninstallation
To uninstall OCS Reports and GLPI, just hit the following command:
yum remove smeserver-inventory-tools
You can ignore the yum-comments signal event post-upgrade and signal-event reboot.
To completly remove OCS Reports and GLPI (installation files ; MySQL user+database ; OCS Agent) you will need the following command:
sh /root/OCS_GLPI-Full-Uninstall.sh
You should also uninstall all dependencies if you don't need them anymore...
Client Installation
The client side is available on all platforms. Download the latest client version according to your OS.
After installing the Agent, you should launch it manually to upload your first inventory (as it's updated once per day by default)
While you are installing the agent, copy the cacert.pem file, see the SSL section below.
OCS Agent for SME Server
With smeserver-inventory-tools
The client-side of OCS will already be installed if you install smeserver-inventory-tools.
You should see an inventory of your SME Server in OCS web interface after the RPM install.
If you updated from old RPMs, issue the following command to create your first inventory:
ocsinventory-agent -s localhost
Do not modify /etc/ocsinventory-agent/ocsinv.conf as this file uses SME templates system in the full install.
Without smeserver-inventory-tools
If you want to inventory other SME Servers (without installing the server-side and web interfaces), you only need following packages in the dependencies tarball:
- monitor-edid-1.11-1.el4.remi.i386.rpm
- ocsinventory-agent-0.0.6-1.el4.remi.noarch.rpm
- ocsinventory-ipdiscover-1.01-2.el4.remi.i386.rpm
Then edit /etc/ocsinventory-agent/ocsinv.conf and modify following lines:
OCSSERVER=yourdomain.com
OCSTAG=your_tag
And finally launch the first inventory manually:
ocsinventory-agent -s yourdomain.com -t your_tag
OCS Agent for Windows
Download the latest client software, OCSNG_WIN32_AGENT_1.xx_repack.zip, this contains three alternatives, it is suggested you use OcsAgentSetup.exe. See Section 4.1 in the internal OCS help file.
Launch the first inventory by typing the following in the 'execute box':
"C:\Program Files\OCS Inventory Agent\OCSInventory.exe" /server:yourdomain.com /np /debug /tag:your_tag
Wait a few seconds and go to http://your-server/ocs, you should see your computer's inventory, Or just wait a day for the automatic update.
OCS Agent for Linux
For a RPM based distro use the above rpms. For others download the generic linux tar.gz, unpack, read the README, and as root, run the setup script.
You may required additional perl- packages, use you package management tools to search for the missing dependencies based on the README or the error messages. See Section 4.2 in the internal OCS help file.
The first inventory is launched during install.
OCS Inventory NG Usage
Access
OCS Reports' web interface can be reached at http://your-server/ocs
Before login, please choose your language (flags on the top right corner)
Login : admin
Password: admin
Inventories can be done from WAN but the web interface is only available from inside your network for security reasons by default. See Sections 5 & 6 in the internal OCS help file for Reporting and Administration help.
IP discovery
IP discovery feature allow OCS Inventory NG to discover all network connected devices on the network. For this, Communication server asks a number of most “active” computers running OCS Inventory NG agent to scan for MAC addresses in their sub network at each run. See Section 7 in the internal OCS help file.
Modifying default behaviour
You may want to override the default IP Discovery behaviour.
To force a computer to ipdiscover, simply open its inventory. Click on Customization icon and update the ipdiscover behaviour.

Now choose the IP of selected computer and save your changes.

You should now see your modifications.

At this point, ipdiscover will run next time with the agent!
Manually launch the inventory to force ipdiscover or wait a day for the next inventory.
Adding networks and devices categories
Now click on Security and go to Config

Add you own network/subnet. All fields are mandatory.

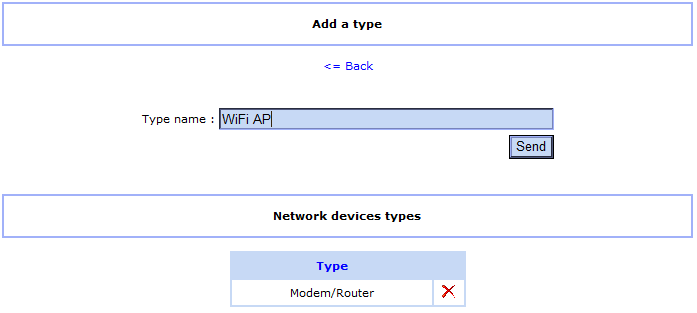
We can also add categories. Let's do that! Click on 'Network devices types'
Usage
Go back to Security and click on Network information. Now that your network is created, you should see ipdiscover working...
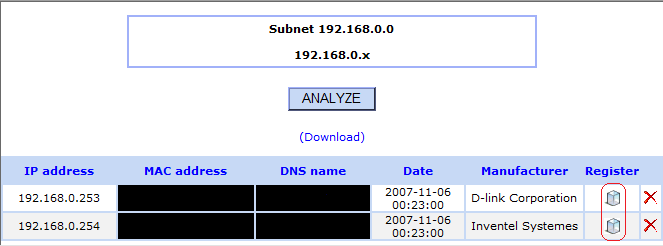
Click on non-inventoried devices.

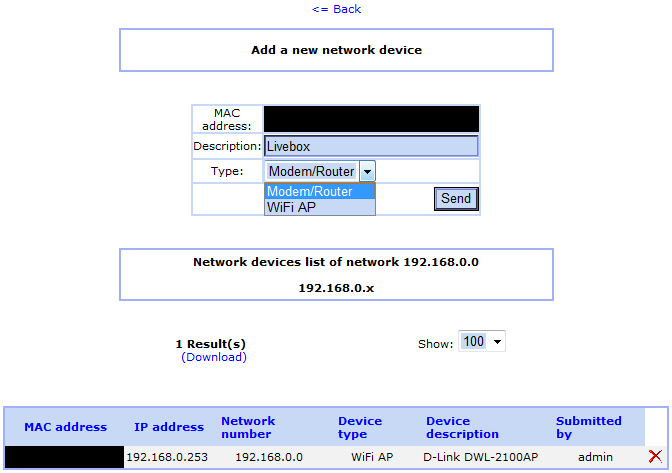
Now all you have to do is registering new devices!
Deploying packages
OCS Inventory NG includes package deployment feature on client computers. From the central management server, you can upload packages which will be downloaded through HTTP/HTTPS and launched by agent on client computer. See Section 8 in the internal OCS help file.
This feature is LAN ONLY
SSL certificate
Deployment feature uses SSL to authenticate Agents.
To allow the Agent to authenticate with the Server, you need to copy the cacert.pem file in your agents' installation directory
This file is located in /home/e-smith/ssl.crt/
Using default cacert.pem
If the file /home/e-smith/ssl.crt/cacert.pem can not be found, the RPM install will create it by copying your original SME certificate into this file. This is a quick and a simple method.
Copy the cacert.pem file in your agents' installation directory. Skip to next section!
Using a custom certificate
If you've followed this howto to create a valid certificate, you can use this certificate with OCS Deployment feature.
Download cacert.org certificate with the following command:
wget http://www.cacert.org/certs/root.crt
And replace the old file with the following command:
cp root.crt /home/e-smith/ssl.crt/cacert.pem
Copy this file into your agents' installation directory.
Open OCS' web interface and click on Deployment icon.

Building a deployment packages
Deployment packages can be either .zip files (Windows) or tar.gz files (Linux)
Don't try to deploy other file type.
There are many options to deploy packages, see section 8.3 of the help file.
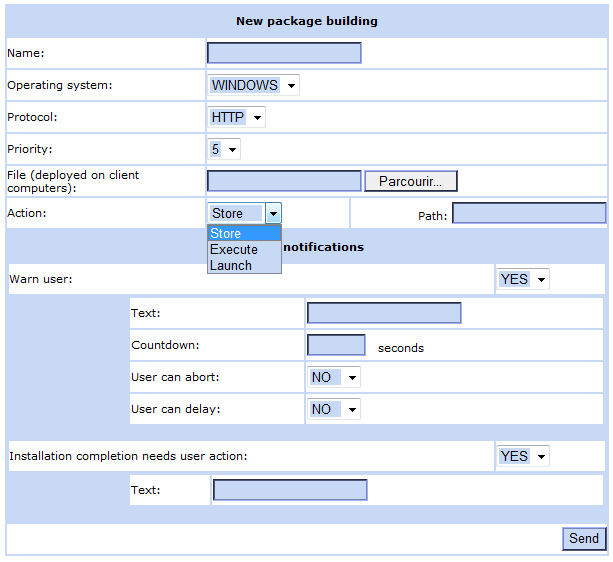
After creating the deployment package, you should get this successful screen:

Activating deployment packages
Once a package is added, you need to activate it.
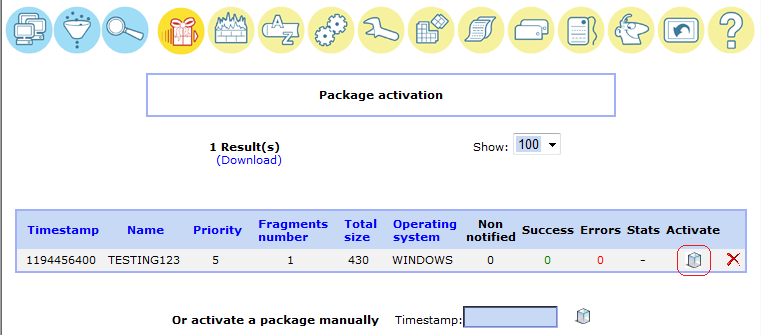
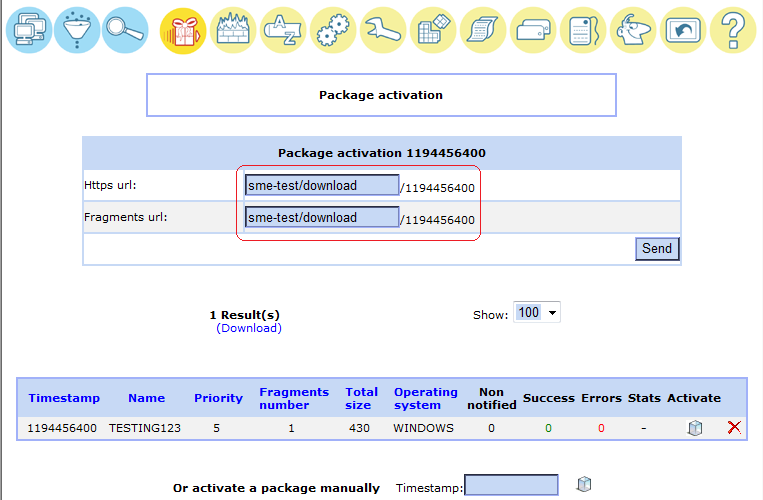
Provide paths to download folder. As this feature is LAN ONLY, provide internal names for both fields!
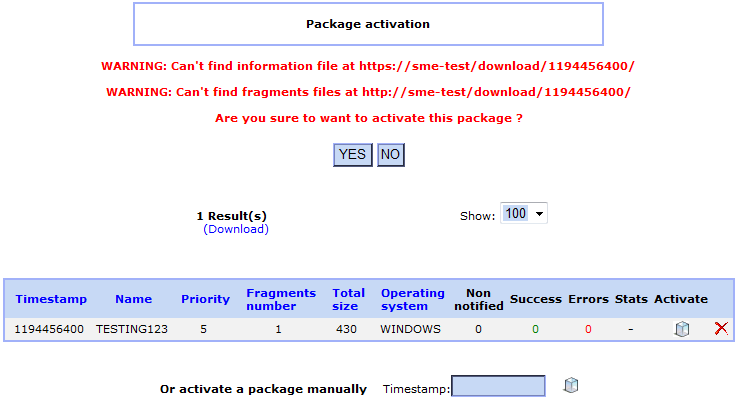
Don't pay attention to the warning message when activating.
Activated deployment packages
Here you will be able to see activated packages...

Deploying your packages
All should be ready to go now!
The final step is to affect the created package to computers...
Here's a quick howto for deploying the package on a single computer.
To learn how to deploy on multiple computers, see section 8.5 of the help file.
Open the desired computer's inventory on click on Config icon and add a new package

You should see all activated packages, affect the one you want and confirm changes

Back at Config page, you should now see affected packages and their states.

Next time the Agent contacts the server, it is notified of the package, and sometime later should be deployed! As usual, you can manually launch the agent to force the update.
See section 8.1 of the help file to understand how download works
GLPI Usage
Access
GLPI's web interface can be reached at http://your-server/glpi
Login : glpi
Password: glpi
GLPI's web interface is only available from inside your network for security reasons by default.
Sync GLPI with OCS
You can import OCS inventories into GLPI.
Simply clic on OCSNG in Tools menu.

Then Import/Update OCS inventories into GLPI

Special commands
To view OCS and GLPI's configuration, you can type the following at the prompt:
config show ocs
config show glpi
You can change a few parameters:
   DB parameter   |    Options   | Default | Explanation
# HTTPS           | on/off       | off     | enable/disable https mode
# PublicAccess    | local/global | local   | Accessibility of web interface
# InventoryAccess | local/global | global  | Accessibility of OCS Server (to receive inventories)
# InventoryDelay  | >1           | 600     | Time to wait (sec) to avoid server overload (Agent cron)
After any change to OCS or GLPI configuration, you should apply modifications by typing the following at the prompt:
signal-event ocsglpi-update
It will expand and restart needed templates and services in one command!
Additional information
Initial howtos:
Sylvain Gomez (Cool34000)
