Difference between revisions of "OpenVPN Routed"
| Line 110: | Line 110: | ||
This will take a moment to sync. Once that is completed, open the OpenVPN Connect app on your device. It will inform you that there's a new profile available for import. On that screen, tap the green + button. | This will take a moment to sync. Once that is completed, open the OpenVPN Connect app on your device. It will inform you that there's a new profile available for import. On that screen, tap the green + button. | ||
| − | [[File:Openvpn_newprofile. | + | [[File:Openvpn_newprofile.PNG]] |
The app will open the profile and indicate that it isn't associated with an identity by showing "None selected". Tap where it says "None selected" to choose an identity profile. | The app will open the profile and indicate that it isn't associated with an identity by showing "None selected". Tap where it says "None selected" to choose an identity profile. | ||
| − | [[File:Openvpn_importprofile. | + | [[File:Openvpn_importprofile.PNG]] |
Next, the app will list your available identity profiles. Choose the one you want to associate with this OpenVPN connection. | Next, the app will list your available identity profiles. Choose the one you want to associate with this OpenVPN connection. | ||
| − | [[File:Openvpn_chooseidentity. | + | [[File:Openvpn_chooseidentity.PNG]] |
Configuration is now complete. You can connect to your OpenVPN server using the slider on the screen. | Configuration is now complete. You can connect to your OpenVPN server using the slider on the screen. | ||
Revision as of 03:46, 6 December 2014
Maintainer
Daniel B. from Firewall Services
Description
OpenVPN is a full-featured open source SSL VPN solution that accommodates a wide range of configurations, including remote access, site-to-site VPNs, Wi-Fi security, and enterprise-scale remote access solutions with load balancing, fail-over, and fine-grained access-controls. Starting with the fundamental premise that complexity is the enemy of security, OpenVPN offers a cost-effective, lightweight alternative to other VPN technologies that is well-targeted for the SME and enterprise markets.
This contrib will help you configuring OpenVPN in routed mode. With this mode, clients connecting to the VPN from the outside will get an IP in a virtual private network. (this network will use a separated IP range from your standard local network, unlike the OpenVPN_Bridge contrib
Requirements
- SME Server 8.0 (serveronly or server&gateway works)
- You may want to install PHPki to manage easily your certificates.
Installation
install the rpms
install fws repo, see : Fws
then :
yum install smeserver-openvpn-routed --enablerepo=fws,smecontribs
Configure
This contribs is really minimal and doesn't have a panel to configure everything. You have to configure all by hand.
here's the file the contrib expects to see before being started:
- /etc/openvpn/routed/pub/cert.pem (the server certificate, in PEM format)
- /etc/openvpn/routed/pub/cacert.pem (the CA certificate, in PEM format)
- /etc/openvpn/routed/pub/dh.pem (Diffie-Helman parameters)
- /etc/openvpn/routed/priv/key.pem (the server private key)
- /etc/openvpn/routed/priv/takey.pem (an optional shared key)
If you already run the OpenVPN_Bridge contrib, you can just copy all the certificates:
cp -a /etc/openvpn/bridge/{priv,pub} /etc/openvpn/routed/
Configure as running in parallel of bridge contrib
- install
- change port
config setprop openvpn-routed UDPPort 1195
- copy bridge certificates
cp -a /etc/openvpn/bridge/{priv,pub} /etc/openvpn/routed/
- if you want to change the default network range assigned (192.169.29.0)
db configuration setprop openvpn-routed Network 192.168.79.0/255.255.255.0
- signale event to regenerate all you need
signal-event openvpn-routed-update
Client configuration - iOS
You can connect using the free OpenVPN Connect app. Unfortunately, configuring this app for your connection is a somewhat involved process. It will require creating or downloading a PKCS#12 file manually for the client, creating a .ovpn configuration file, installing the CA and client certificates on your iOS device, and finally importing the .ovpn configuration file into your device.
Create a PKCS#12 file for the client
A PKCS#12 file is used to bundle the client's private key with its associated certificates, and will be used to install an identity on your iOS device. PHPki has the ability to generate these files for download, but does not require a password for the client certificate if you have chosen the role of VPN client only when creating the certificate. iOS, however, requires a password to import a PKCS#12 file. If you entered a password when you created the client certificate, you can simply download the .p12 file from PHPki and import it using the instructions below. If you did not enter a password, you will need to create the PKCS#12 file manually. Begin by using PHPki to download a PEM bundle for the client. Log into the server-manager, go to Certificate Management, then to Manage Certificates, and click the download icon to the right of the client certificate you want to use. On the next screen, in the file type dropdown, choose PEM Bundle w/Root. Save this file to a convenient location and open it with your favorite text editor. It will look like this:
-----BEGIN PRIVATE KEY-----
MIIEwAIBADANBgkqhkiG9w0BAQEFAASCBKowggSmAgEAAoIBAQDhKd2tv7D6lnzs
...
P9sSy5mmpaI3o+vRt6fXYCvL37g=
-----END PRIVATE KEY-----
-----BEGIN CERTIFICATE-----
MIIGuzCCBKOgAwIBAgIDEAACMA0GCSqGSIb3DQEBBQUAMIHLMQswCQYDVQQGEwJV
...
ex7wHUDqk6zpdeygiuK8fYAbbeb7/9EGopKOPI8J+PPyaJ96ljqDK6FphY3Jt0k=
-----END CERTIFICATE-----
-----BEGIN CERTIFICATE-----
MIIHWjCCBUKgAwIBAgIJAPM30y+H/VCKMA0GCSqGSIb3DQEBBQUAMIHLMQswCQYD
...
Wx8wzFUHXwxOlYGsDRK9r/NTlPyiKwV9Z/kxVFSrFR7/FwCu8Ty4dSmsENk7xEzh
wAhb0RNq1QLkr/0K6KQ=
-----END CERTIFICATE-----
The first block is the client's private key, the second block is the client's certificate, and the third block is the CA certificate. You'll need to split these out into three files. Name them, for the sake of clarity, user.key, user.crt, and ca.crt. Save these three files in a location that's accessible to your SME server. Then you can actually create the PKCS#12 file using this command:
$ openssl pkcs12 -export -in user.crt -inkey user.key -certfile ca.crt -name MyClient -out client.p12
You may replace MyClient with whatever client name you wish. In processing this, openssl will ask for a password; you must enter one. When the system returns to the shell prompt, your client.p12 file will be ready to use.
Create .ovpn configuration file
The .ovpn configuration file tells the OpenVPN Connect client how to connect to your server. Begin by logging into the server-manager and going to OpenVPN-Bridge on the left sidebar. Click the button marked "Display a functional client configuration file." Copy the text that's shown into your favorite text editor and save it as client.ovpn. You'll then need to make some changes.
First, remove the first two lines. Second, on the first remaining line, change "dev tap" to "dev tun". This is required for iOS compatibility. Third, comment out or remove the line that says "pkcs12 user.p12". Third, change the line that says "remote" to read "remote yourserver.tld 1195 udp". Finally, add your CA certificate to the end of the file, like this:
 <ca>
 -----BEGIN CERTIFICATE-----
 MIIHWjCCBUKgAwIBAgIJAPM30y+H/VCKMA0GCSqGSIb3DQEBBQUAMIHLMQswCQYD
 VQQGEwJVUzEXMBUGA1UECBMOU291dGggQ2Fyb2xpbmExEzARBgNVBAcTCkhhcnRz
 ...
 Wx8wzFUHXwxOlYGsDRK9r/NTlPyiKwV9Z/kxVFSrFR7/FwCu8Ty4dSmsENk7xEzh
 wAhb0RNq1QLkr/0K6KQ=
 -----END CERTIFICATE-----
 </ca>
Save this file.
Install CA and client certificates on your iOS device
Email the ca.crt and client.p12 files to an account that your iOS device can reach using the built-in Mail app. Using the Mail app, open the message and tap on the ca.crt file to open it. The device will take you through the steps of installing the file, and once it is installed, will return you to the message. Then tap on the client.p12 file and follow the prompts to install it, including entering the password. Again, once it is installed, you'll be returned to the email message.
Importing .ovpn file and configuring connection
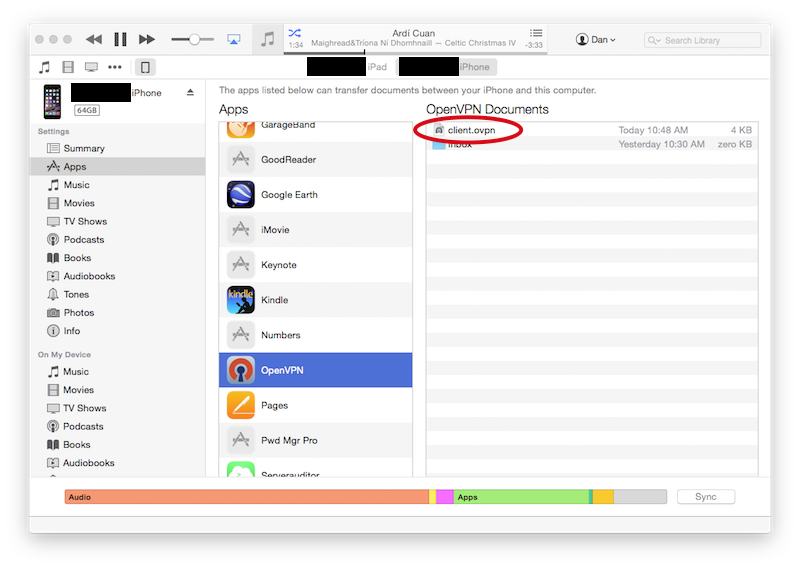
To configure the OpenVPN Connect app, you'll need to copy the .ovpn file to your device using iTunes. Open iTunes, select your device, and choose Apps from the left sidebar. In the right-hand frame, scroll down to the heading "The apps listed below can transfer documents between your iPhone and this computer". Under that heading, scroll down in the apps list and click on OpenVPN. Drag and drop the .ovpn file to the right-hand frame, under the heading "OpenVPN Documents."

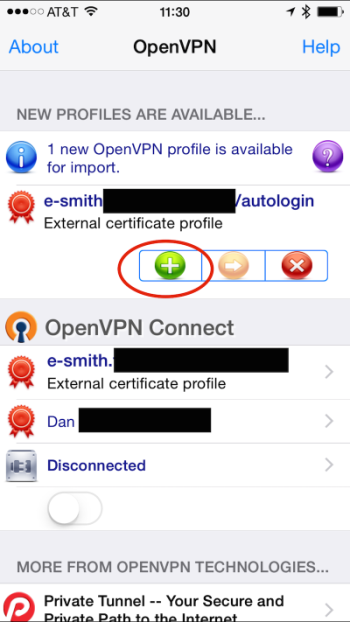
This will take a moment to sync. Once that is completed, open the OpenVPN Connect app on your device. It will inform you that there's a new profile available for import. On that screen, tap the green + button.

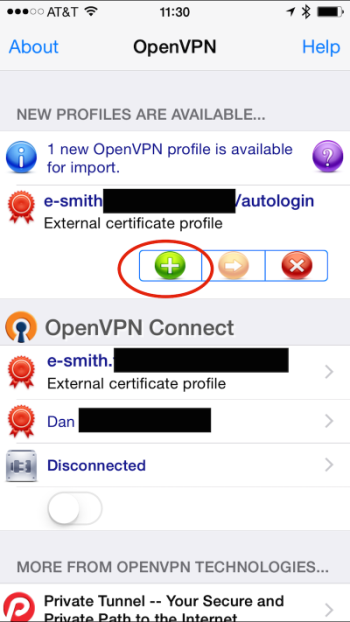
The app will open the profile and indicate that it isn't associated with an identity by showing "None selected". Tap where it says "None selected" to choose an identity profile.

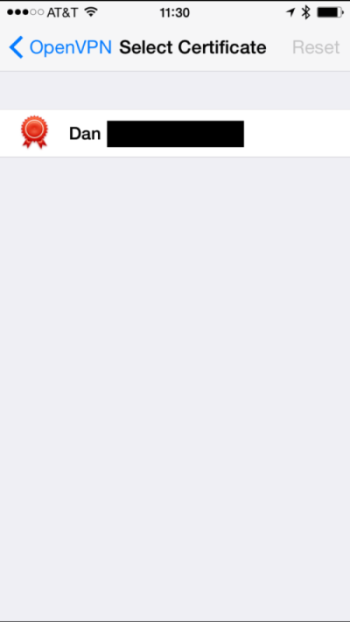
Next, the app will list your available identity profiles. Choose the one you want to associate with this OpenVPN connection.

Configuration is now complete. You can connect to your OpenVPN server using the slider on the screen.
default key properties
these properties can be modified simply by issuing
config setprop openvpn-routed propertie newvalue
to reset to default, simply issue:
config delprop openvpn-routed propertie
where you have to replace propertie and newvalue with what you want.
{propertie} || default;
- {Protocol} || 'udp';
- {UDPPort} || '1194';
- {TCPPort} || '1194';
- {Authentication} || 'CrtWithPass';
- {'Network'} || '192.168.29.0/255.255.255.0';
- {PushLocalNetworks} || 'enabled';
- {RedirectGateway} || 'disabled';
- {Mtu} || ;
- {Fragment} || ;
- {Cipher} || ;
- {RedirectGateway} || ;
- {Protocol} || 'udp';
- {DuplicateCN} || 'disabled';
- {PassTOS} || 'enabled';
- {Compression} || 'enabled';
- {MaxClients} || ;
- {ConfigRequired} || 'disabled';
- {Verbose} || '3';