Difference between revisions of "User:Mike"
| (22 intermediate revisions by the same user not shown) | |||
| Line 1: | Line 1: | ||
| − | ''' | + | =='''<big>Setup an SME Server with 2 SSD’s in a RAID1 setup with Over Provisioning</big>'''<br />== |
| − | |||
| − | |||
| − | |||
| − | |||
| − | |||
| − | |||
| − | |||
| − | |||
| − | |||
| − | |||
| + | ==='''Write Amplification'''<br />=== | ||
| − | + | This manual describes how to setup an SME Server with 2 Solid State Drives (SSD’s) in a RAID1 setup with Over Provisioning to prevent Write Amplification.<br /> | |
| + | SSD’s are much faster than conventional hard disks and they last longer if you threat them right.<br /> | ||
| + | An SSD is vulnerable to Write Amplification which means it writes and erases certain memory blocks more than others and therefor the most used memory blocks reach the maximum amount of writes it can do much faster.<br /> | ||
| + | This is because it uses the free space of the SSD to move data around which means that the Write Amplification and therefor the performance and the lifecycle of the SSD decrease drastically if the SSD just has a few % of empty space left.<br /> | ||
| + | 2 ways to prevent Write Amplification are Over Provisioning and Trimming (Garbage collection).<br /> | ||
| + | Unfortunately Trimming is still unsupported on Software RAID like used in the SME Server which leaves us with Over Provisioning.<br /> | ||
| + | Also SSD’s in RAID5 is discouraged as it also vastly increases Write Amplification.<br /> | ||
| + | Because this is a manual on how to setup an SME Server with 2 SSD’s in a RAID1 setup with Over Provisioning to prevent Write Amplification, and not on What Write Amplification is exactly, I will not go into that any further.<br /> | ||
| + | For more information on that, this is a good place to start: http://en.wikipedia.org/wiki/Write_amplification<br /> | ||
| − | |||
| − | |||
| − | |||
| − | |||
| + | ==='''Over Provisioning'''<br />=== | ||
| − | + | Over Provisioning is a fancy term for partitioning xx% less than the full capacity of the disk.<br /> | |
| + | There is not a right amount of Over Provisioning but 10% is usually an average used setting which means you only use 90% of the disk size to partition.<br /> | ||
| + | Because the default RAID1 installation of the SME Server is not made with SSD’s in mind, it uses 100% of the 2 disks capacity which means we have to manually partition the 2 disks.<br /> | ||
| + | This manual shows you how to do that and it is made using the SME Server 9.0 as an example.<br /> | ||
| − | |||
| − | |||
| + | ==='''Setup an SME Server with 2 SSD’s in a RAID1 setup with Over Provisioning'''<br />=== | ||
| − | + | In the Boot Menu select Advanced installation options.<br /> | |
| − | [[File: | + | [[File:pic01.gif|499px|frameless|none|Picture 1]] |
| − | Skip the media check unless you have a reason not to. | + | Select Install or upgrade using the graphical installer.<br /> |
| − | [[File:pic03.gif|590px| | + | [[File:pic02.gif|498px|frameless|none|Picture 2]] |
| + | |||
| + | |||
| + | Skip the media check unless you have a reason not to.<br /> | ||
| + | [[File:pic03.gif|590px|frameless|none|Picture 3]] | ||
| + | |||
| + | |||
| + | Select your language.<br /> | ||
| + | In this example we choose English.<br /> | ||
| + | [[File:pic04.gif|589px|frameless|none|Picture 4]] | ||
| + | Click next.<br /> | ||
| + | |||
| + | |||
| + | Select your keyboard layout.<br /> | ||
| + | In this example we choose U.S. English.<br /> | ||
| + | [[File:pic05.gif|587px|frameless|none|Picture 5]] | ||
| + | Click next.<br /> | ||
| + | |||
| + | |||
| + | Select Basic Storage Devices.<br /> | ||
| + | [[File:pic06.gif|588px|frameless|none|Picture 6]] | ||
| + | Click next.<br /> | ||
| + | |||
| + | |||
| + | Select Yes, discard any data.<br /> | ||
| + | [[File:pic07.gif|590px|frameless|none|Picture 7]] | ||
| + | Click next.<br /> | ||
| + | |||
| + | |||
| + | Select your timezone.<br /> | ||
| + | [[File:pic08.gif|589px|frameless|none|Picture 8]] | ||
| + | Click next.<br /> | ||
| + | |||
| + | |||
| + | Select Create Custom Layout.<br /> | ||
| + | [[File:pic09.gif|589px|frameless|none|Picture 9]] | ||
| + | Click next.<br /> | ||
| + | |||
| + | |||
| + | You are given a default RAID1 layout which uses the full disk capacity.<br /> | ||
| + | This is where we start costomizing the partition layout.<br /> | ||
| + | For the example I have two 40GByte SSD disks.<br /> | ||
| + | Both disks have a 250MB system partition (sda1 and sdb1) and a larger partition for the rest of the data (sda2 and sdb2).<br /> | ||
| + | [[File:pic10.gif|590px|frameless|none|Picture 10]] | ||
| + | Click next.<br /> | ||
| + | |||
| + | |||
| + | Remove all partitions by selecting sda and sdb and selection delete with both.<br /> | ||
| + | After that you have a 2 partition free SSD’s like shown below.<br /> | ||
| + | You can see the disk is 40959 MB in size.<br /> | ||
| + | [[File:pic11.gif|590px|frameless|none|Picture 11]] | ||
| + | Now, Over Provisioning usually is set somewhere between 5% and 25% and like said before, there is no right value to set for Over Provisioning.<br /> | ||
| + | Usually people set it at 10% and that is what most SSD tools advise. Setting it lower than that will age your SSD disk faster and will compromise your SSD’s performance.<br /> | ||
| + | If you are rather safe that sorry and the diskcapacity of your RAID1 set is not an issue you could set it to 15% or 20%.<br /> | ||
| + | Setting it higher seems like overkill to me.<br /> | ||
| + | In our example we will use 10% Over Provisioning.<br /> | ||
| + | The system (250MB) and swap (4064MB) partitions will be the same size as in the default setting.<br /> | ||
| + | That will make the size of the larger data partition: 40959MB x 0,9 = 36863MB – 250MB = 36613MB.<br /> | ||
| + | |||
| + | |||
| + | We will start bij partitioning disk sda.<br /> | ||
| + | Select sda and click create.<br /> | ||
| + | Select RAID Partition and click create.<br /> | ||
| + | Set all options like shown in the folowing screen and select OK:<br /> | ||
| + | [[File:pic12.gif|293px|frameless|none|Picture 12]] | ||
| + | The size of the partition (250MB) will be the same whatever size SSD you will be using.<br /> | ||
| + | |||
| + | |||
| + | Under sda select the Free space and click create.<br /> | ||
| + | Select RAID Partition and click create.<br /> | ||
| + | Set all options like shown in the folowing screen and select OK:<br /> | ||
| + | [[File:pic13.gif|295px|frameless|none|Picture 13]] | ||
| + | The size of the partition will be 90% of the SSD size - 250MB.<br /> | ||
| + | So this size will depend on the size SSD you are using and using 10% Over Provisioning.<br /> | ||
| + | |||
| + | |||
| + | Now we will do the same for the disk sdb.<br /> | ||
| + | Select sdb and click create.<br /> | ||
| + | Select RAID Partition and click create.<br /> | ||
| + | Set all options like shown in the folowing screen and select OK:<br /> | ||
| + | [[File:pic14.gif|295px|frameless|none|Picture 14]] | ||
| + | The size of the partition (250MB) will be the same whatever size SSD you will be using.<br /> | ||
| + | |||
| + | |||
| + | Under sda select the Free space and click create.<br /> | ||
| + | Select RAID Partition and click create.<br /> | ||
| + | Set all options like shown in the folowing screen and select OK:<br /> | ||
| + | [[File:pic15.gif|294px|frameless|none|Picture 15]] | ||
| + | The size of the partition will be 90% of the SSD size - 250MB.<br /> | ||
| + | So this size will depend on the size SSD you are using and using 10% Over Provisioning.<br /> | ||
| + | |||
| + | |||
| + | Select Hard Drives and select create.<br /> | ||
| + | Select RAID Device and click create.<br /> | ||
| + | Set all options like shown in the folowing screen and select OK:<br /> | ||
| + | [[File:pic16.gif|239px|frameless|none|Picture 16]] | ||
| + | Make sure you select both system partitions sda1 and sdb1 witch both are 250MB.<br /> | ||
| + | |||
| + | |||
| + | Select Hard Drives and select create.<br /> | ||
| + | Select RAID Device and click create.<br /> | ||
| + | Set all options like shown in the folowing screen and select OK:<br /> | ||
| + | [[File:pic17.gif|240px|frameless|none|Picture 17]] | ||
| + | Make sure you select both system partitions sda2 and sdb2.<br /> | ||
| + | |||
| + | |||
| + | Under RAID Devices select md1 and click create.<br /> | ||
| + | Select LVM Volume Group and click create.<br /> | ||
| + | Select Add and set all options like shown in the folowing screen and select OK:<br /> | ||
| + | [[File:pic18.gif|323px|frameless|none|Picture 18]] | ||
| + | Set the swap size the same as the default setting that was presented to you earlier.<br /> | ||
| + | |||
| + | |||
| + | Select Add again and set all options like shown in the folowing screen and select OK:<br /> | ||
| + | [[File:pic19.gif|323px|frameless|none|Picture 19]] | ||
| + | Set the size the same as the maximum size shown in the same window.<br /> | ||
| + | |||
| + | |||
| + | Select OK again in this window to start the installation.<br /> | ||
| + | [[File:pic20.gif|323px|frameless|none|Picture 20]] | ||
| + | |||
| + | |||
| + | The RAID1 set you just created is shown now.<br /> | ||
| + | Notice that both sda and sdb have 10% of free space now.<br /> | ||
| + | [[File:pic21.gif|592px|frameless|none|Picture 21]] | ||
| + | Click next.<br /> | ||
| + | |||
| + | |||
| + | Select Write changes to disk.<br /> | ||
| + | [[File:pic22.gif|235px|frameless|none|Picture 22]] | ||
| + | |||
| + | |||
| + | After the partitioning/formatting has finished you will see the screen below:<br /> | ||
| + | [[File:pic23.gif|593px|frameless|none|Picture 23]] | ||
| + | Click next.<br /> | ||
| + | |||
| + | |||
| + | The packages will now be installed.<br /> | ||
| + | [[File:pic24.gif|594px|frameless|none|Picture 24]] | ||
| + | |||
| + | |||
| + | After some time your installation will be completed and you are asked to reboot:<br /> | ||
| + | [[File:pic25.gif|592px|frameless|none|Picture 25]] | ||
| + | Click Reboot.<br /> | ||
| + | After reboot, finish your SME configuration as you are used to, set an admin password, IP-settings and so on…<br /> | ||
| + | |||
| + | |||
| + | Login to your server with user root and use the command cat /proc/mdstat to check if your RAID1 set is synchronising:<br /> | ||
| + | [[File:pic26.gif|591px|frameless|none|Picture 26]] | ||
| + | |||
| + | |||
| + | After the synchronisation finished the command cat /proc/mdstat output should look something like this:<br /> | ||
| + | [[File:pic27.gif|340px|frameless|none|Picture 27]] | ||
| + | |||
| + | |||
| + | '''Tip:'''<br /> | ||
| + | Do not use the admin account to add an SSD disk to a RAID1 set that is custum partitioned to use less than 100% of the disk space from the menu (Option 5. Manage disk redundancy) because the script behind this option will not check how the disk that needs to be cloned is partitioned.<br /> | ||
| + | The script will add the disk but will partition it using 100% of the disk space even when the first SSD disk in the RAID1 set is partitioned using less than 100% of the disk space.<br /> | ||
| + | |||
| + | [[Category:Howto]][[Category:Administration:Storage]] | ||
Latest revision as of 14:07, 24 September 2014
Setup an SME Server with 2 SSD’s in a RAID1 setup with Over Provisioning
Write Amplification
This manual describes how to setup an SME Server with 2 Solid State Drives (SSD’s) in a RAID1 setup with Over Provisioning to prevent Write Amplification.
SSD’s are much faster than conventional hard disks and they last longer if you threat them right.
An SSD is vulnerable to Write Amplification which means it writes and erases certain memory blocks more than others and therefor the most used memory blocks reach the maximum amount of writes it can do much faster.
This is because it uses the free space of the SSD to move data around which means that the Write Amplification and therefor the performance and the lifecycle of the SSD decrease drastically if the SSD just has a few % of empty space left.
2 ways to prevent Write Amplification are Over Provisioning and Trimming (Garbage collection).
Unfortunately Trimming is still unsupported on Software RAID like used in the SME Server which leaves us with Over Provisioning.
Also SSD’s in RAID5 is discouraged as it also vastly increases Write Amplification.
Because this is a manual on how to setup an SME Server with 2 SSD’s in a RAID1 setup with Over Provisioning to prevent Write Amplification, and not on What Write Amplification is exactly, I will not go into that any further.
For more information on that, this is a good place to start: http://en.wikipedia.org/wiki/Write_amplification
Over Provisioning
Over Provisioning is a fancy term for partitioning xx% less than the full capacity of the disk.
There is not a right amount of Over Provisioning but 10% is usually an average used setting which means you only use 90% of the disk size to partition.
Because the default RAID1 installation of the SME Server is not made with SSD’s in mind, it uses 100% of the 2 disks capacity which means we have to manually partition the 2 disks.
This manual shows you how to do that and it is made using the SME Server 9.0 as an example.
Setup an SME Server with 2 SSD’s in a RAID1 setup with Over Provisioning
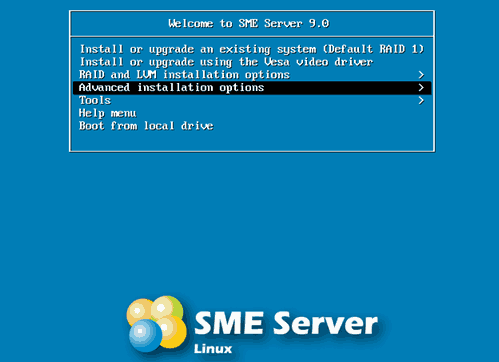
In the Boot Menu select Advanced installation options.
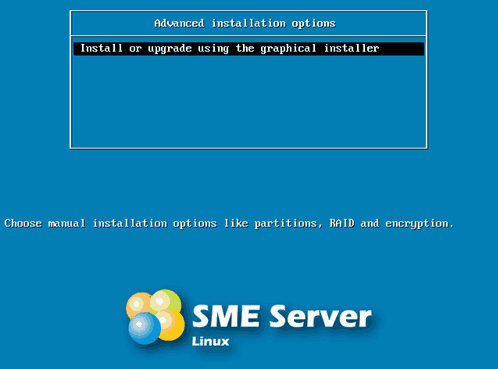
Select Install or upgrade using the graphical installer.
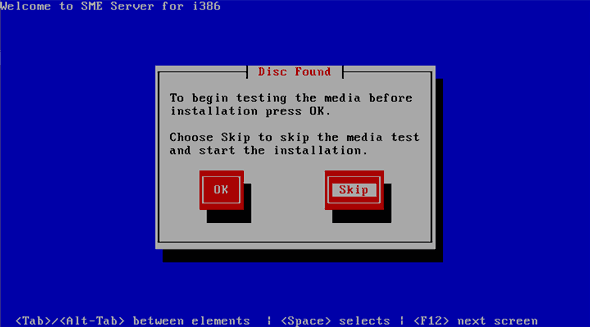
Skip the media check unless you have a reason not to.
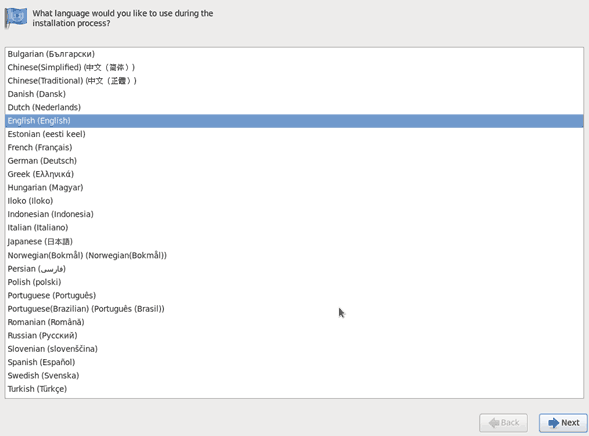
Select your language.
In this example we choose English.
Click next.
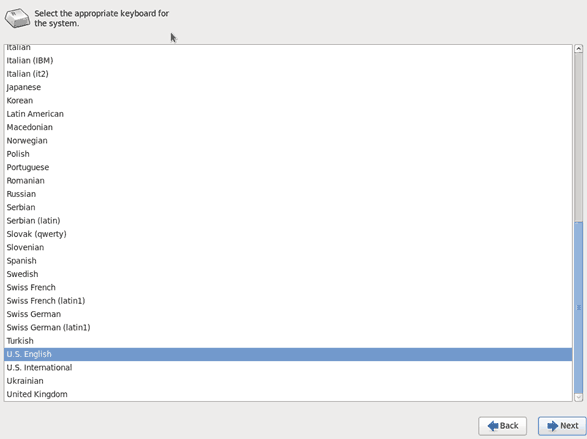
Select your keyboard layout.
In this example we choose U.S. English.
Click next.
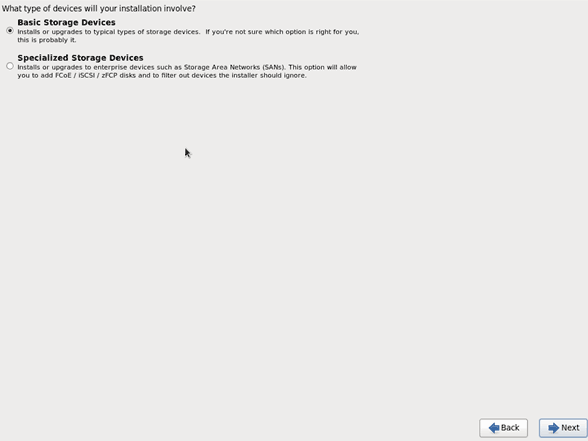
Select Basic Storage Devices.
Click next.
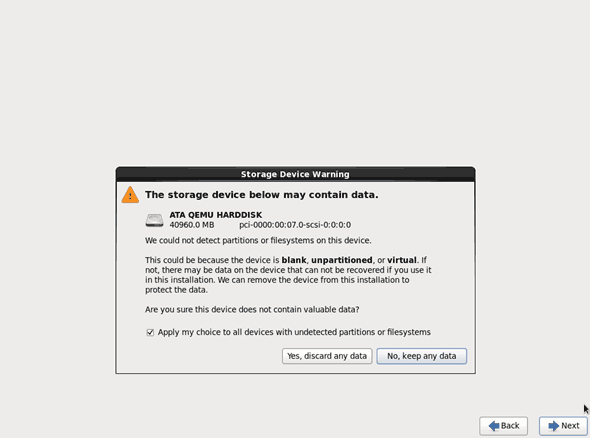
Select Yes, discard any data.
Click next.
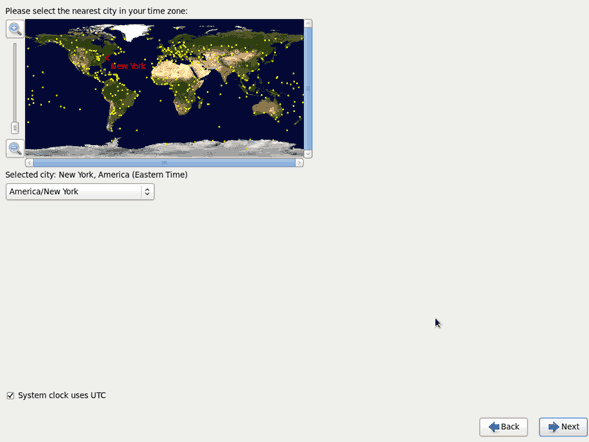
Select your timezone.
Click next.
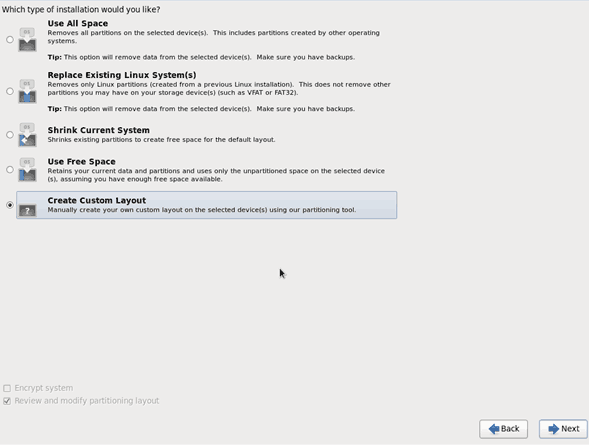
Select Create Custom Layout.
Click next.
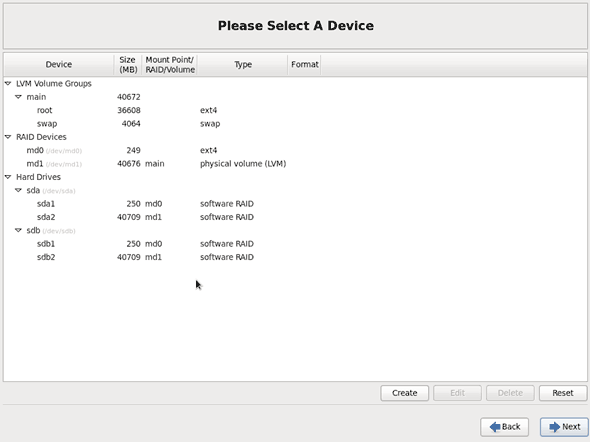
You are given a default RAID1 layout which uses the full disk capacity.
This is where we start costomizing the partition layout.
For the example I have two 40GByte SSD disks.
Both disks have a 250MB system partition (sda1 and sdb1) and a larger partition for the rest of the data (sda2 and sdb2).
Click next.
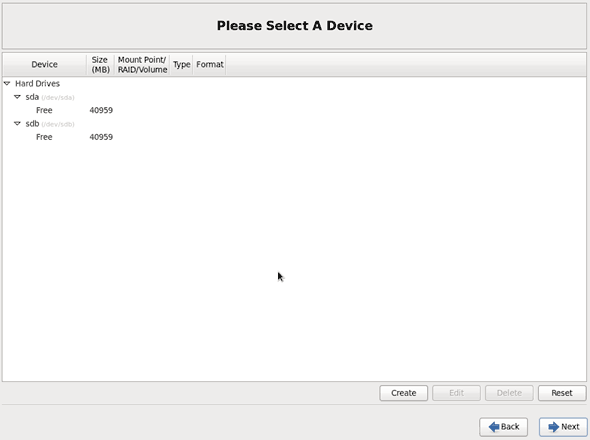
Remove all partitions by selecting sda and sdb and selection delete with both.
After that you have a 2 partition free SSD’s like shown below.
You can see the disk is 40959 MB in size.
Now, Over Provisioning usually is set somewhere between 5% and 25% and like said before, there is no right value to set for Over Provisioning.
Usually people set it at 10% and that is what most SSD tools advise. Setting it lower than that will age your SSD disk faster and will compromise your SSD’s performance.
If you are rather safe that sorry and the diskcapacity of your RAID1 set is not an issue you could set it to 15% or 20%.
Setting it higher seems like overkill to me.
In our example we will use 10% Over Provisioning.
The system (250MB) and swap (4064MB) partitions will be the same size as in the default setting.
That will make the size of the larger data partition: 40959MB x 0,9 = 36863MB – 250MB = 36613MB.
We will start bij partitioning disk sda.
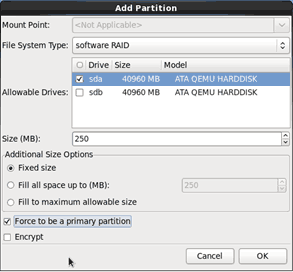
Select sda and click create.
Select RAID Partition and click create.
Set all options like shown in the folowing screen and select OK:
The size of the partition (250MB) will be the same whatever size SSD you will be using.
Under sda select the Free space and click create.
Select RAID Partition and click create.
Set all options like shown in the folowing screen and select OK:
The size of the partition will be 90% of the SSD size - 250MB.
So this size will depend on the size SSD you are using and using 10% Over Provisioning.
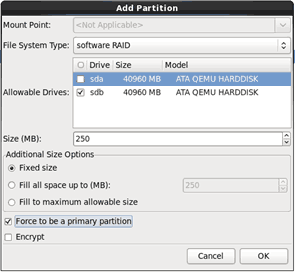
Now we will do the same for the disk sdb.
Select sdb and click create.
Select RAID Partition and click create.
Set all options like shown in the folowing screen and select OK:
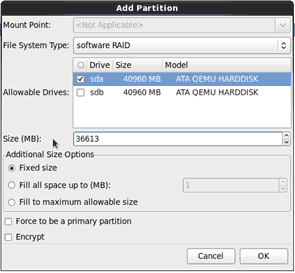
The size of the partition (250MB) will be the same whatever size SSD you will be using.
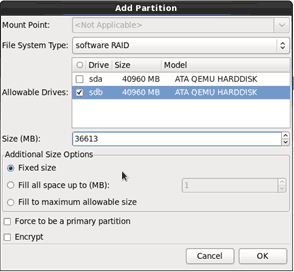
Under sda select the Free space and click create.
Select RAID Partition and click create.
Set all options like shown in the folowing screen and select OK:
The size of the partition will be 90% of the SSD size - 250MB.
So this size will depend on the size SSD you are using and using 10% Over Provisioning.
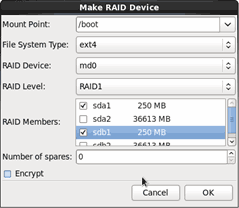
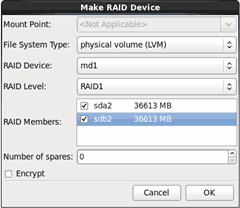
Select Hard Drives and select create.
Select RAID Device and click create.
Set all options like shown in the folowing screen and select OK:
Make sure you select both system partitions sda1 and sdb1 witch both are 250MB.
Select Hard Drives and select create.
Select RAID Device and click create.
Set all options like shown in the folowing screen and select OK:
Make sure you select both system partitions sda2 and sdb2.
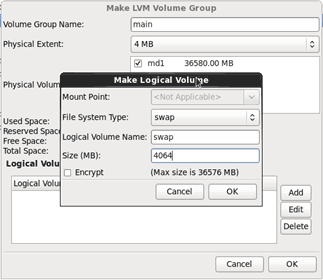
Under RAID Devices select md1 and click create.
Select LVM Volume Group and click create.
Select Add and set all options like shown in the folowing screen and select OK:
Set the swap size the same as the default setting that was presented to you earlier.
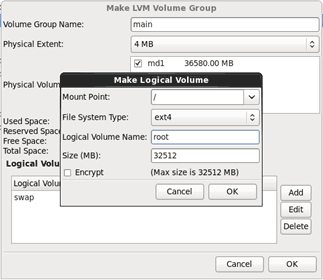
Select Add again and set all options like shown in the folowing screen and select OK:
Set the size the same as the maximum size shown in the same window.
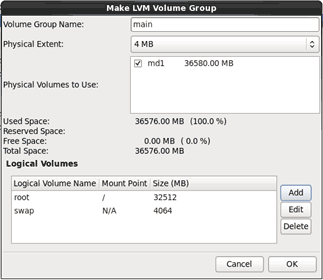
Select OK again in this window to start the installation.
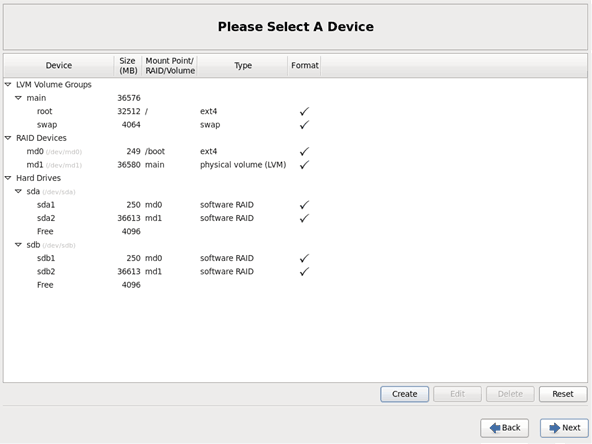
The RAID1 set you just created is shown now.
Notice that both sda and sdb have 10% of free space now.
Click next.
Select Write changes to disk.
After the partitioning/formatting has finished you will see the screen below:
Click next.
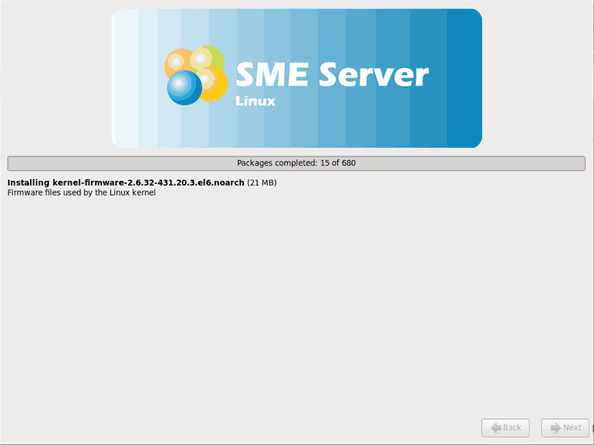
The packages will now be installed.
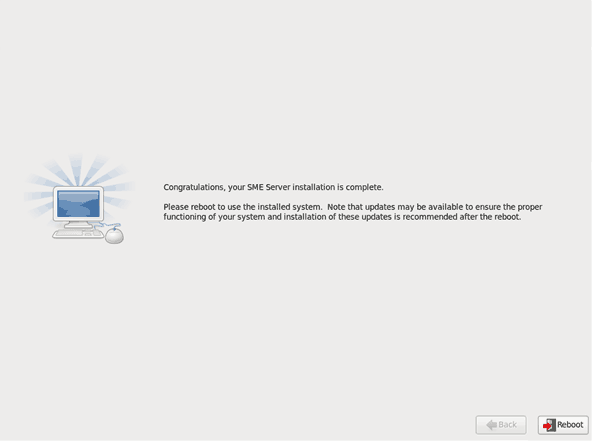
After some time your installation will be completed and you are asked to reboot:
Click Reboot.
After reboot, finish your SME configuration as you are used to, set an admin password, IP-settings and so on…
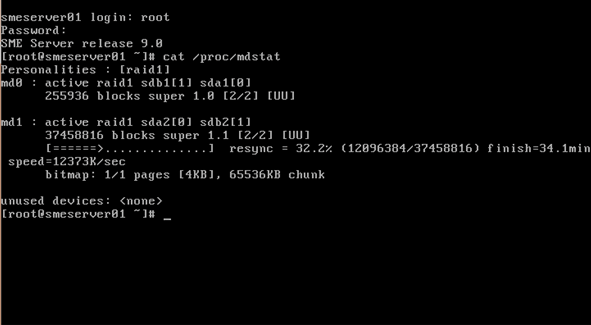
Login to your server with user root and use the command cat /proc/mdstat to check if your RAID1 set is synchronising:
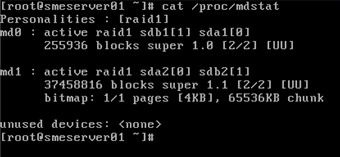
After the synchronisation finished the command cat /proc/mdstat output should look something like this:
Tip:
Do not use the admin account to add an SSD disk to a RAID1 set that is custum partitioned to use less than 100% of the disk space from the menu (Option 5. Manage disk redundancy) because the script behind this option will not check how the disk that needs to be cloned is partitioned.
The script will add the disk but will partition it using 100% of the disk space even when the first SSD disk in the RAID1 set is partitioned using less than 100% of the disk space.
