Difference between revisions of "SME Server talk:Documentation:Administration Manual:Chapter13"
| (15 intermediate revisions by 2 users not shown) | |||
| Line 1: | Line 1: | ||
| − | + | --[[User:Stephdl|Stephdl]] ([[User talk:Stephdl|talk]]) 03:47, 15 August 2013 (MDT) adding a not box at the end | |
| − | === | + | ====Workgroup==== |
| − | + | If you are using a computer on a local network and you wish to access the server via Windows file sharing, it is important that you are logged onto the same workgroup as your SME Server. This screen allows you to enter the name of the Windows workgroup the server should appear in. You should also enter the Windows server name. In order that you may later connect multiple locations using IPSEC VPNs, we suggest that you use a different name for each server. If you wish you can change the workgroup name to correspond with an existing workgroup. | |
| − | + | [[Image:Workgroup.png]] | |
| − | + | Macintosh users need only enter a server name or accept the defaults. | |
| − | + | Also in this section, you can specify whether the server should be the domain master for your Windows workgroup. Most sites should choose "Yes" unless you are adding an server to an existing network which already has a domain master. | |
| − | |||
| − | " | + | {{Warning box|If you have a Windows NT server or Windows 2000 server on your network that is functioning as a network server, you should answer "no" as that other server will act as the domain master.}} |
| + | If you do configure your system to be the domain master, a special Windows share called NETLOGON is created with a DOS batch file called netlogon.bat. This batch file is executed by Windows clients that have been configured to "Logon to domain". The netlogon.bat file we provide by default does very little, but advanced users can, if they wish, modify this script to set environment variables for their clients or provide automatic drive mappings. | ||
| − | + | As the NETLOGON share is only writable by the "admin" user, you modify the netlogon.bat script by logging on to a Windows system as "admin", connecting to the share and then modifying the script using a Windows text editor. Be aware that the NETLOGON share will not be visible in Network Neighborhood or other similar tools. As the "admin" user, you will need to connect to the share or map a drive to it, by using the specific path: | |
| + | \\ servername \NETLOGON\ | ||
| − | + | The sample file contains a few examples of setting the system time for each machine and also for mapping a common drive for all Windows client. | |
| − | |||
| − | |||
| − | |||
| − | |||
| − | |||
| − | |||
| − | + | {{Note box|You can see the [[SME_Server:Documentation:Administration_Manual:Chapter7#Setting_up_network_drives|chapter 7]] if you want a manual method to modify the netlogon.bat}} | |
| − | + | ---- | |
| − | |||
| − | |||
| − | |||
| − | |||
| − | |||
| − | |||
| − | |||
| − | |||
| − | |||
| − | [[User: | + | --[[User:Stephdl|Stephdl]] ([[User talk:Stephdl|talk]]) 03:51, 15 August 2013 (MDT) addind some a tip box at the end to explain a bit more why you should have a smtp relay for your sme server |
| + | =====E-mail Delivery===== | ||
| + | This screen presents you with additional options for controlling how your system handles e-mail. | ||
| + | |||
| + | [[Image:Email-delivery.png]] | ||
| + | |||
| + | * Forwarding address for administrative notices: The default address for administrative notices (i.e. undeliverable mail, backup notifications and other status/error messages) is "admin". If you'd like those messages to be sent elsewhere, then you have to use the menu Collaboration > User panel > admin and fill the field "Forwarding address" in the admin menu. | ||
| + | |||
| + | {{Note box|Be aware that all messages sent to postmaster, root or mailer-daemon at your domain are sent to either admin or the address that you enter in this field.}} | ||
| + | |||
| + | * E-mail to unknown users: This field allows you to choose whether incoming messages to unknown users are bounced back to the sender or forwarded to the system administrator. Some users prefer the latter setting because it allows them to catch and reroute e-mail that was incorrectly addressed. | ||
| + | |||
| + | {{Note box|If you choose to have messages forwarded to the system administrator, they will be sent to either "admin" or the e-mail address specified in the forwarding address field mentioned above.}} | ||
| + | |||
| + | * Internet provider's SMTP server: Normally the server will send outgoing messages directly to their intended destination. If, however, you have an unreliable connection or are using a residential Internet service, it may be advisable to route e-mail via your provider's SMTP server. In that case, you should enter the SMTP server's hostname or IP address here. | ||
| + | |||
| + | {{Tip box|In fact, if you have a temporary dial-up connection to the Internet or dynamic IP, you may find that you need to use your ISP's mail server in order to deliver mail to some locations. '''As a reaction to the huge volume of unsolicited commercial e-mail ("spam")''', many Internet sites are refusing direct SMTP connections from IP addresses that are known to be temporary dial-up accounts or dynamic IP. '''For this reason, you may need to use your ISP's mail server since it will have a permanent connection to the Internet.}}''' | ||
Latest revision as of 10:51, 15 August 2013
--Stephdl (talk) 03:47, 15 August 2013 (MDT) adding a not box at the end
Workgroup
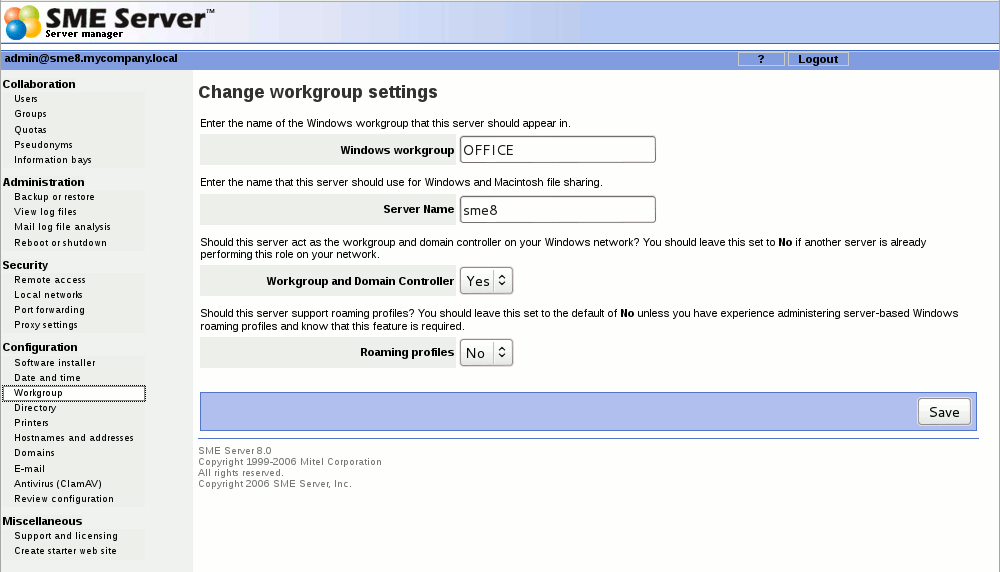
If you are using a computer on a local network and you wish to access the server via Windows file sharing, it is important that you are logged onto the same workgroup as your SME Server. This screen allows you to enter the name of the Windows workgroup the server should appear in. You should also enter the Windows server name. In order that you may later connect multiple locations using IPSEC VPNs, we suggest that you use a different name for each server. If you wish you can change the workgroup name to correspond with an existing workgroup.
Macintosh users need only enter a server name or accept the defaults.
Also in this section, you can specify whether the server should be the domain master for your Windows workgroup. Most sites should choose "Yes" unless you are adding an server to an existing network which already has a domain master.
If you do configure your system to be the domain master, a special Windows share called NETLOGON is created with a DOS batch file called netlogon.bat. This batch file is executed by Windows clients that have been configured to "Logon to domain". The netlogon.bat file we provide by default does very little, but advanced users can, if they wish, modify this script to set environment variables for their clients or provide automatic drive mappings.
As the NETLOGON share is only writable by the "admin" user, you modify the netlogon.bat script by logging on to a Windows system as "admin", connecting to the share and then modifying the script using a Windows text editor. Be aware that the NETLOGON share will not be visible in Network Neighborhood or other similar tools. As the "admin" user, you will need to connect to the share or map a drive to it, by using the specific path: \\ servername \NETLOGON\
The sample file contains a few examples of setting the system time for each machine and also for mapping a common drive for all Windows client.
--Stephdl (talk) 03:51, 15 August 2013 (MDT) addind some a tip box at the end to explain a bit more why you should have a smtp relay for your sme server
E-mail Delivery
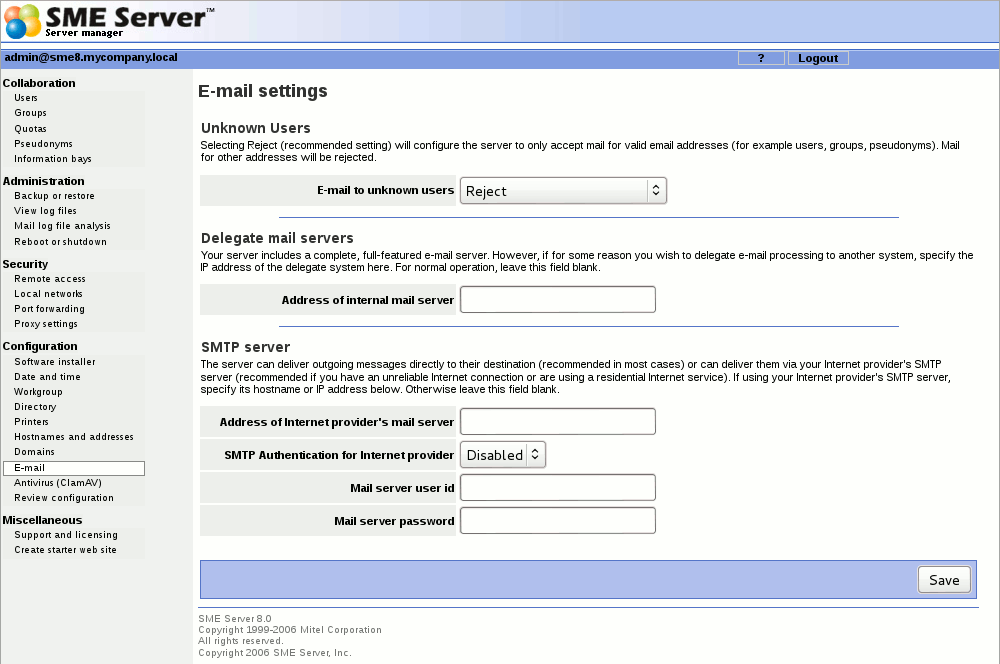
This screen presents you with additional options for controlling how your system handles e-mail.
- Forwarding address for administrative notices: The default address for administrative notices (i.e. undeliverable mail, backup notifications and other status/error messages) is "admin". If you'd like those messages to be sent elsewhere, then you have to use the menu Collaboration > User panel > admin and fill the field "Forwarding address" in the admin menu.
- E-mail to unknown users: This field allows you to choose whether incoming messages to unknown users are bounced back to the sender or forwarded to the system administrator. Some users prefer the latter setting because it allows them to catch and reroute e-mail that was incorrectly addressed.
- Internet provider's SMTP server: Normally the server will send outgoing messages directly to their intended destination. If, however, you have an unreliable connection or are using a residential Internet service, it may be advisable to route e-mail via your provider's SMTP server. In that case, you should enter the SMTP server's hostname or IP address here.

